Announcing JNBridgePro 7.0

Today we’re excited to announce JNBridgePro 7.0, with two new major features: support for Mono, and the elimination of “bitness” issues. These improvements will enable users to expand the reach of their applications, and simplify the development and deployment process.

JNBridgePro 7.0 can now run on Mono

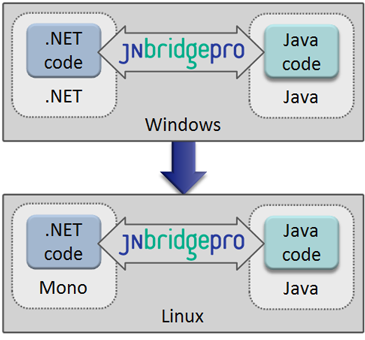
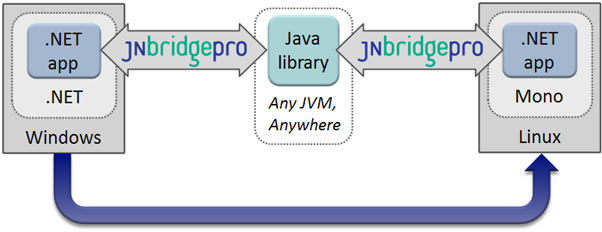
One of the most common questions about JNBridgePro that we’ve had to say no to is “Can it run on Mono?” Starting today with JNBridgePro 7.0, the answer is yes. As a user of JNBridgePro, you’ve created applications that combine .NET and Java code, where the .NET code runs on Windows machines, and the Java code runs in a JVM. Now with JNBridgePro 7.0, the .NET code can also run on Linux machines, using the Mono runtime. (As always, the Java sides of the applications can run on any platform that can run Java.)

Why use Mono? Here are four examples:

  1. You want to move your existing .NET & Java application onto a commodity Linux server for business or technical reasons.
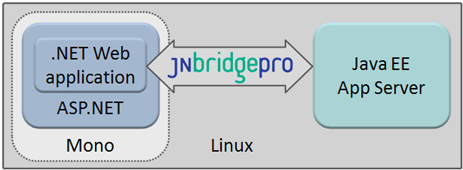
  2. You want to create greenfield applications on Linux platforms. In this example, you can build an application that combines an ASP.NET Web application with Java EE code running on an application server, and have the entire result run on a Linux server.
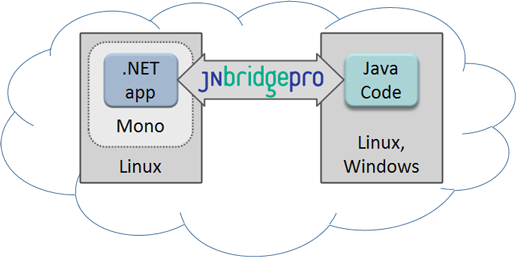
  3. You want to move your .NET & Java application to a Linux-based IaaS cloud provider.
  4. As an ISV, you want to expand your.NET&Java application’s footprint beyond Windows to support for Linux:

No code changes are necessary to move your .NET & Java applications that use JNBridgePro from Windows to Linux, just some possible configuration file changes, so your existing applications will just work.

JNBridgePro 7.0’s current Mono support is on Linux, on the Ubuntu, openSUSE, and Debian distributions currently supported by Mono, as well as on Windows. We’re considering extending JNBridgePro’s Mono support to additional platforms, based on customer feedback. JNBridgePro will work on Mono in both the .NET-to-Java and Java-to-.NET directions using the TCP/binary communications mechanism, and in the .NET-to-Java direction using the HTTP/SOAP communications mechanism. Future releases will fill in the gaps in available communications mechanisms, so you will be able to use any mechanism on any platform.

Microsoft .NET
(Windows)
Mono
(Linux, Windows)
.NET-to-JavaShared memoryTCP/binary

HTTP/SOAP

TCP/binaryHTTP/SOAP
Java-to-.NETShared memoryTCP/binary

HTTP/SOAP

TCP/binary

Unified 32-bit and 64-bit

Ever since we’ve introduced support for 64-bit platforms, customers have sometimes been confused by “bitness” issues. In JNBridgePro 7.0, we’ve eliminated bitness-related confusion by unifying our 32-bit and 64-bit distributions into a single release.

First, customers no longer need to decide ahead of time whether they need 32-bit or 64-bit JNBridgePro – now, there’s just a single installer containing the components and tools that will work for you regardless of whether you’re creating 32-bit or 64-bit applications. That means that there will be no more situations where you first download the 64-bit JNBridgePro installer, then need to go back and download the 32-bit version.

Second, you can now create “Any CPU” applications that work with the shared-memory communications mechanism. “Any CPU” applications will run as 64-bit processes on 64-bit systems, and as 32-bit processes on 32-bit systems. Since the JNBridgePro shared-memory components contain native code and come in 32-bit and 64-bit flavors, there used to be situations where users would create an “Any CPU” application using shared memory that ran fine on a 64-bit machine, but that threw an exception on a 32-bit machine (or vice versa). In such cases, the user would have to go back and create separate 32-bit and 64-bit builds using the proper shared memory components. Now, you can create a single “Any CPU” build that contains both the 32-bit and 64-bit shared memory components, and the correct ones will be used depending on the bitness of the currently-running process. This increases flexibility in deployment, speeds up the time spend building and testing, and eliminates potential errors.

Download the new version

JNBridgePro 7.0, with Mono support and unified 32/64-bit capabilities, is available for download now. Download it here, or check out the documentation and our demos and examples.

Building an Excel add-in for HBase MapReduce

Summary

This latest project from JNBridge Labs investigates building an Excel add-in for Hadoop HBase. As a Java framework, HBase applications must use Java APIs, resulting in single-platform solutions. A cross-platform HBase integrated solution, particularly one that provides business intelligence on the desktop, like Microsoft Excel, is unable to leverage the HBase remote client API. This means using a lower level interoperability mechanism, like implementing a .NET Thrift client. The current project uses JNBridgePro for .NET-to-Java interoperability. It also leverages concepts and code from the previous lab, Building a LINQ provider for HBase MapReduce, which investigated a LINQ extension for HBase.  

Introduction

Hadoop allows businesses to quickly analyze very large data sets. Hadoop can reduce ludicrous amounts of data to a meaningful answer in a short amount of time, however, without understanding the shape of your data, you run the risk of garbage in, garbage out. Analysis itself is an iterative process relying on investigation. Tools that aid data investigation provide a means to quickly view, sort, filter/reduce and represent data, making it possible to quickly find and understand patterns, trends and relationships.

Microsoft Excel has always been the ubiquitous off-the-shelf  tool for data analysis and it makes a ready-to-go front end for Hadoop. Excel can be extended using add-ins developed in Visual Studio using VSTO, Visual Studio Tools for Office. This lab will explore a simple Excel front-end to HBase MapReduce. The front-end will allow a user to view HBase tables and execute MapReduce jobs. The goal is to make the add-in generic with respect to the column definitions and data in a HBase table.

Getting Started

The components required for this lab are identical to those required in the previous lab, Building a LINQ provider for HBase MapReduce. Here’s a quick list of the components.

  1. Apache Hadoop Stack (see the previous lab’s Getting Started section for more information)
  2. Visual Studio 2012
  3. Eclipse
  4. JNBridgePro 7.0
  5. Office Developer Tools for Visual Studio 2012 (this includes VSTO).
  6. Microsoft Office 2010

Calling Java from .NET: Creating proxies using JNBridgePro

Since the Excel add-in is written in C#/.NET and needs to call several Java class APIs, the first step is to use the JNBridgePro plug-in for Visual Studio to create an assembly of proxies that represent the Java API. When a proxy of a Java class is instantiated in .NET, the real Java object is instantiated in the Java Virtual Machine. The JNBridgePro run-time manages communications, i.e. invoking methods, and syncing garbage collection between the .NET CLR and the JVM.

For this development step, as well as during run-time, a bunch of Hadoop, HBase and ZooKeeper JAR files must be available on the Windows machine. These can be scraped from a machine running the Hadoop stack (look in /usr/lib/hadoop/lib/usr/lib/hbase/lib, etc.)

This is a screen shot of the Edit Class Path dialog for the JNBridgePro Visual Studio plug-in.
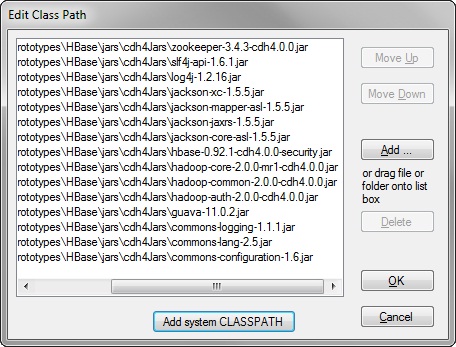
These are the JAR files required to create the .NET proxies. During run-time, three additional JAR files must be included in the JVM’s class path when initiating the bridge between the JVM and the CLR: avro-1.5.4.jarcommons-httpclient-3.1.jar and slf4j-nop-1.6.1.jar (the last JAR file inhibits logging by Hadoop and HBase).

Below, is a screen shot of the JNBridgePro proxy tool in Visual Studio. The left hand pane shows all the namespaces found in the JAR files shown in the above dialog. The required namespaces are org.apache.hadoop.hbase.client and org.apache.hadoop.hbase.filter. In addition, individual classes like org.apache.hadoop.hbase.HBaseConfiguration are required (see the link at the end of this blog to download the source).
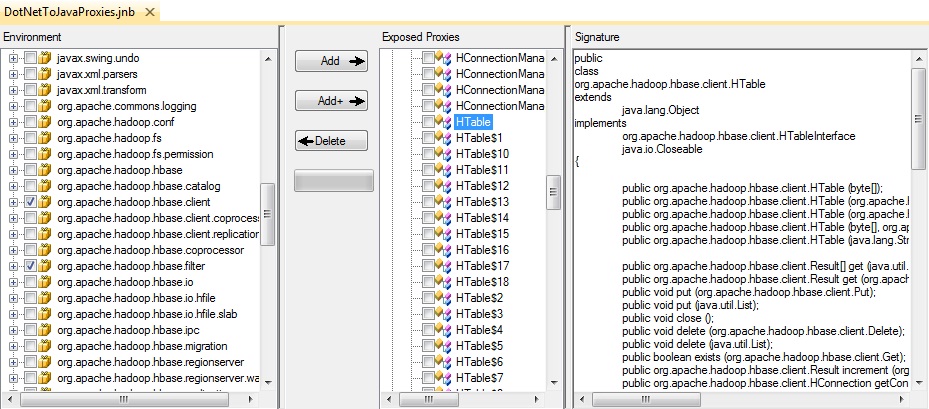
 

By clicking on the Add+ button, the chosen classes, as well as every dependent class, will be found and displayed in the center pane. The right-hand pane displays the public members and methods of the Java HTable class. The last step is to build the proxy assembly, DotNetToJavaProxies.dll.

Creating and populating an HBase Table

It would be nice to have an HBase table loaded with data and provide an opportunity to test calling various HBase Java APIs from .NET. The simple data will consist of an IP address, like “88.240.129.183″ and the requested web page, for example “/zebra.html”. This lab will use the same table, access_logs, created for the previous lab, Building a LINQ provider for HBase MapReduce. Please see the previous lab’s section, Creating and populating an HBase Table, for the code used to build this table.

Building an Excel add-in

The Excel add-in will consist of a single control pane. As the user interacts with the pane, underlying code accesses the Excel data model consisting of workbooks, worksheets and charts. Here’s what the completed add-in looks like.
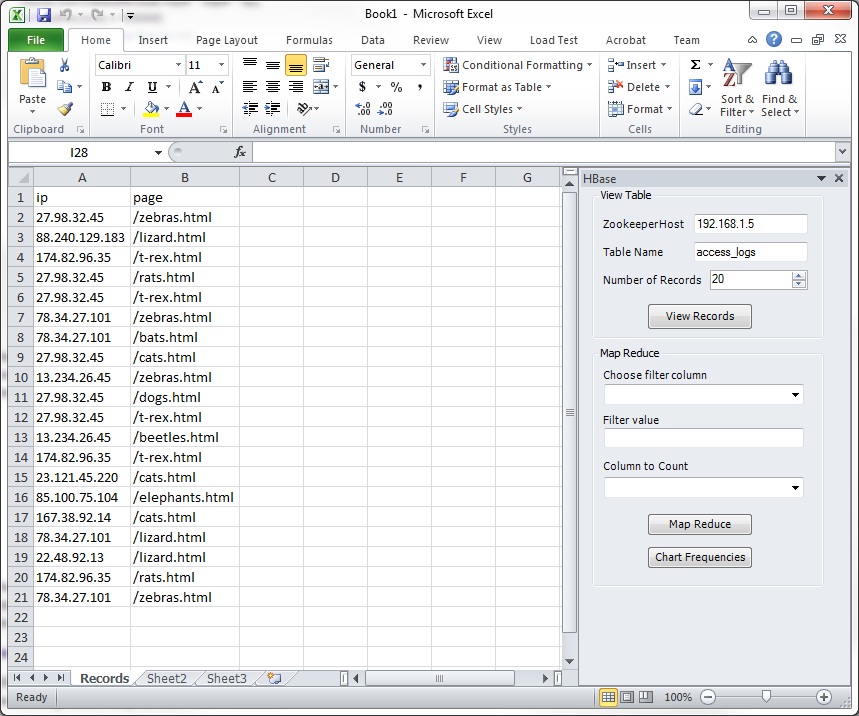
The class HBasePane is a .NET User Control. It consists of two groups, View Table and Map Reduce. The above screen shot shows the user controls labeled Zookeeper Host, Table Name and Number of Records, which all have user entered values. By clicking on the button, View Records, the user has loaded in 20 rows from the HBase table, access_logs.

Here’s the handler code for the button click event.

        private void viewTableButtonClick(object sender, EventArgs e)
        {
            Excel.Worksheet activeWorksheet 
                 = ((Excel.Worksheet)Globals.ExcelHBaseAddIn.Application.ActiveSheet);
            activeWorksheet.Name = "Records";
            Excel.Range navigator = activeWorksheet.get_Range("A1");
            int numRows = Decimal.ToInt32(this.numberOfRecords.Value);
            // most of the work done here
            this.columns = ViewHBaseTable.populateWorkSheet(navigator
                , this.hostName.Text
                , this.tableName.Text
                , numRows);
            // autofit the range
            int numCols = this.columns.Count<string>();
            Excel.Range c1 = activeWorksheet.Cells[1, 1];
            Excel.Range c2 = activeWorksheet.Cells[numRows, numCols];
            this.cols = activeWorksheet.get_Range(c1, c2); 
            this.cols.EntireColumn.AutoFit();
            // populate the user controls with the column names
            this.filterComboBox.Items.AddRange(this.columns);
            this.frequencyComboBox.Items.AddRange(this.columns);
        }

All the work is done in the method, ViewHBaseTable.populateWorkSheet(). The user controls are hostName, tableName and numberOfRecords. The hostName control contains the address of the machine that’s running Zookeeper, which is responsible for managing connections from the HBase client API. Below is code from populateWorkSheet(). Notice that the HBase table column family and cell names are obtained using the methods getFamily() and getQualifier() along with the cell values. The method returns an array of strings that represents the column and cell names in the table. These are used to populate the combo box controls filterComboBox and frequencyComboBox in the group Map Reduce.

            Configuration hbaseConfig = HBaseConfiguration.create();
            hbaseConfig.set("hbase.zookeeper.quorum", hostName);
            try
            {
                HTable tbl = new HTable(hbaseConfig, tableName);
                Scan scan = new Scan();
                ResultScanner scanner = tbl.getScanner(scan);
                Result r;
                while (((r = scanner.next()) != null) && ndx++ < numRecords)
                {
                    List aList = r.list();
                    ListIterator li = aList.listIterator();
                    while (li.hasNext())
                    {
                        kv = (KeyValue)li.next();
                        familyName = Bytes.toString(kv.getFamily());
                        cellName = Bytes.toString(kv.getQualifier());
                        value = Bytes.toString(kv.getValue());
                        // make a unique list of all the column names
                        if (!names.Contains(familyName + ":" + cellName))
                        {
                            names.Add(familyName + ":" + cellName);
                        }
                        // add headers
                        if (currentRow == 2)
                        {
                            currentCell = navigator.Cells[1, currentColumn];
                            currentCell.Value2 = cellName;
                        }
                        currentCell = navigator.Cells[currentRow, currentColumn++];
                        currentCell.Value2 = value;
                    }
                    currentRow++;
                    currentColumn = 1;
                }
                scanner.close();
                tbl.close();
            }
            catch (Exception ex)
            {
                throw ex;
            }
            return names.ToArray<string>();
        }

Generic filtering and frequency user interface

Below is a close-up screenshot of the HBase pane. The interface in the View Table group allows the user to point to a Hadoop implementation, choose a table and the number of records to load into the active worksheet. Once that is done, the user can then define a MapReduce job using the controls in the Map Reduce group.
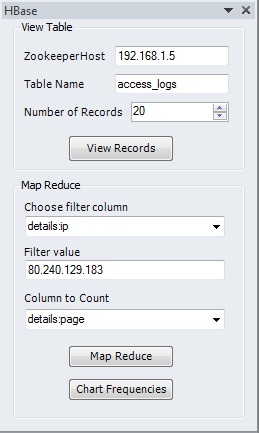
The user interface allows filtering on any one column. The combo box control labeled Choose filter column contains all the column names in the form family:cell. The text box labeled FilterValue is the filter which elides all rows where the chosen column  doesn’t match the filter value. The combo box labeled Column to Count is used to choose the column whose values will be grouped and counted. The above values ask the question: “What are the pages—specifically the frequencies of the pages— visited by the IP address 80.240.129.183“.

When the button, Map Reduce, is clicked, this handler is invoked:

        private void onMapRedButtonClick(object sender, EventArgs e)
        {
            this.filterColumn = this.filterComboBox.Text;
            this.filterValue = this.filterValueTextBox.Text;
            this.frequencyColumn = this.frequencyComboBox.Text;
            Excel.Worksheet activeWorksheet 
                = ((Excel.Worksheet)Globals.ExcelHBaseAddIn.Application.Worksheets[2]);
            activeWorksheet.Name = "Frequency";
            Excel.Range navigator = activeWorksheet.get_Range("A1");
            // most of the fun stuff happens here
            int numRows = MapReduce.executeMapReduce(navigator
                , this.filterColumn
                , this.filterValue
                , this.frequencyColumn
                , this.hostName.Text
                , this.tableName.Text);
            // autofit the range
            Excel.Range c1 = activeWorksheet.Cells[1, 1];
            Excel.Range c2 = activeWorksheet.Cells[numRows, 2];
            this.cols = activeWorksheet.get_Range(c1, c2); 
            this.cols.EntireColumn.AutoFit();
            // bring the worksheet to the top
            activeWorksheet.Activate();
        }

All the work is done by the method MapReduce.executeMapReduce(), partially shown below. The .NET-to-Java method call, HBaseToLinq.FrequencyMapRed.executeMapRed(), is almost the same Java code used in the previous lab, Building a LINQ provider for HBase MapReduce. The only modifications have been to remove hard-coded column names, instead using the programmatic column names for filtering and frequency counts chosen by the user. The method then scans the results of the MapReduce job stored in the table, summary_user, and loads them into a worksheet, returning the number of records in the results table.

            try
            {
                HBaseToLinq.FrequencyMapRed.executeMapRed(hostName
                    , tableName
                    , frequencyColumn
                    , columnToFilter
                    , filterValue);
            }
            catch(Exception ex)
            {
                throw ex;
            }
            Configuration hbaseConfig = HBaseConfiguration.create();
            hbaseConfig.set("hbase.zookeeper.quorum", hostName);
            try
            {
                string cellName = 
                     frequencyColumn.Substring(frequencyColumn.IndexOf(":") +1);
                string familyName = 
                     frequencyColumn.Substring(0, frequencyColumn.IndexOf(":"));
                HTable tbl = new HTable(hbaseConfig, "summary_user");
                Scan scan = new Scan();
                ResultScanner scanner = tbl.getScanner(scan);
                Result r;
                while ((r = scanner.next()) != null)
                {
                    rowKey = Bytes.toString(r.getRow());
                    count = Bytes.toInt(r.getValue(Bytes.toBytes(familyName)
                         , Bytes.toBytes("total")));
                    currentCell = navigator.Cells[currentRow, currentColumn++];
                    currentCell.Value2 = rowKey;
                    currentCell = navigator.Cells[currentRow++, currentColumn];
                    currentCell.Value2 = count;
                    currentColumn = 1;
                }
                scanner.close();
                tbl.close();
            }
            catch (Exception ex)
            {
                throw ex;
            }
            return currentRow - 1;

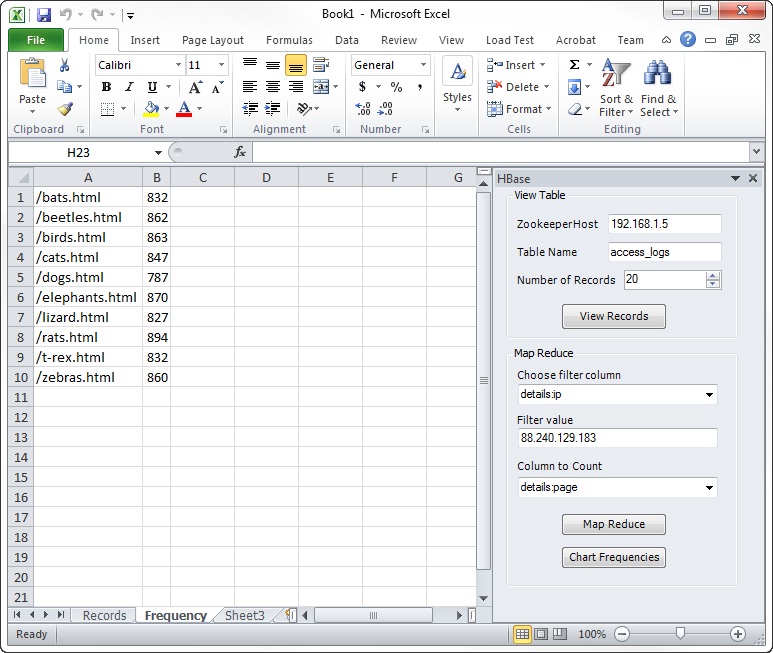
Here’s a screen shot of the Excel add-in after performing the MapReduce.
Visualizing data

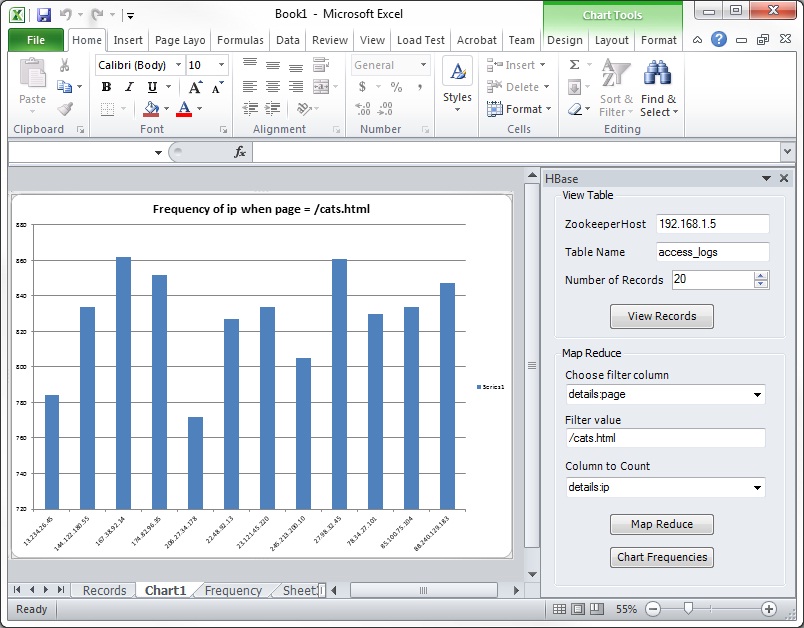
Data visualization through graphs and charts is an important final step when investigating and analyzing data. Clicking on the button Chart Frequencies causes the add-in to create a stacked column chart of the Frequency worksheet. Here’s the code for the handler, onChartFrequenciesClick().

        private void onChartFrequenciesClick(object sender, EventArgs e)
        {
            Excel.Workbook wb = Globals.ExcelHBaseAddIn.Application.ActiveWorkbook;
            Excel.Chart chart = (Excel.Chart)wb.Charts.Add();
            chart.ChartType = Excel.XlChartType.xlColumnStacked;
            chart.SetSourceData(this.cols, Excel.XlRowCol.xlColumns);
            chart.HasTitle = true;
            string filterName = this.filterColumn.Substring(this.filterColumn.IndexOf(":") + 1);
            string frequencyName 
                 = this.frequencyColumn.Substring(this.frequencyColumn.IndexOf(":") + 1);
            chart.ChartTitle.Text = "Frequency of " 
                  + frequencyName 
                  + " when " + filterName 
                  + " = " + this.filterValue;
        }

This screen shot of the add-in shows the resulting chart. Notice that the MapReduce columns for filtering and frequency are different than the previous example. Here, the question being asked is “What is the frequency of visiting IP addresses for the page, /cats.html”.
Conclusion

Building an Excel add-in that supports viewing any HBase table of column families and provides filtering and Map Reduce frequency counts is relatively straightforward. Leveraging the HBase Java client APIs using JNBridgePro to create .NET proxies is key to the simplicity.  By keeping the MapReduce job both on the Java side and generic, any table can be filtered and reduced to frequencies of one particular column.

The source for this example can be downloaded here.
What does “Any CPU” really mean?

There’s a new “Prefer 32-bit” option in Visual Studio 2012 that tripped us up, and can trip you up too.

Running through some standard JNBridgePro test examples recently, we were surprised that the examples didn’t work, and the embedded Java side failed. The examples were created using Visual Studio 2012, set Any CPU, and, since we were running the tests on a 64-bit machine and were using shared memory, we supplied a 64-bit JRE as part of the configuration.

After a bit of investigation, we discovered a new setting in the VS 2012 project that isn’t in previous versions of Visual Studio: in the project’s properties, under the Build tab, there is a new checkbox: “Prefer 32-bit.” The checkbox only seems to be enabled when Any CPU is selected, and it was automatically checked. And indeed the running process was 32-bit. What was happening? Didn’t “Any CPU” mean that the application would run as 64 bit on a 64-bit system, and 32 bit on a 32-bit system? And how does “Any CPU/Prefer 32-bit” differ from simple x86?

We did some research and discovered an explanation in a Microsoft blog post here. It turns out that the meaning of “Any CPU” has changed a bit. I won’t go into too many details, but would suggest that anyone doing .NET development read the blog post. In a nutshell, the new “Prefer 32-bit” is connected to Microsoft’s new support for ARM architectures as of .NET 4.5. It also seems to have something to do with Microsoft’s retreat from encouraging 64-bit and “Any CPU” development in deference to 32-bit development, as the complexity of supporting both 32-bit and 64-bit environments has become apparent. In making the changes, Microsoft has made some design decisions that we feel are to the detriment of users. (Also note that we still strongly believe in supporting “Any CPU” and x64 development. Read more about the bitness challenge in this blog post.)

In the first design decision we take issue with, Microsoft has decided to make “Any CPU/Prefer 32-bit” the default in Visual Studio 2012 when creating .NET 4.5 applications. This is unfortunate because users assume “Any CPU” meant the same thing as it previously did (the application will run as 64 bit on 64-bit systems), and because the new “Prefer 32-bit” setting is somewhat hidden and not immediately obvious. In our experience, most users set the Target Platform (Any CPU/x86/x64/etc.) in the configuration manager, where there’s no mention of the “Prefer 32-bit” setting – “Prefer 32-bit” is only visible (and settable) in the project properties, where most developers don’t have a reason to look, but where it’s already been set, without telling the developer.

Second, setting “Prefer 32-bit” as the default leads to inconsistencies in creating new projects versus migrating exiting ones. “Prefer 32-bit” is set in new “Any CPU” projects created in VS 2012, but it isn’t set when migrating an existing project from VS 2010. Props to Microsoft for not altering the behavior of existing projects when migrating from VS 2010 to 2012, but why not go a step further and make “Any CPU” behavior consistent by leaving the “Prefer 32-bit” setting turned off by default in new projects created with VS 2012?

The inconsistent behavior is what really what makes this change so annoying. Microsoft could have offered the “Prefer 32-bit” capability and not surprise unsuspecting users by just leaving the setting turned off by default. Users would happily create new applications without problem, and without suspecting that “Any CPU” could possibly mean anything different than what it meant before. Interestingly enough, users could still target ARM platforms if “Any CPU” running on ARM was guaranteed to run as 32 bit (until 64-bit ARM chips become generally available, at which time such applications will run as 64 bit). Microsoft could also allow developers to specifically target ARM in the same way as they can now specifically target x86, x64, and IA64. I can almost guarantee that this would be less confusing than the current use of “Any CPU” and “Prefer 32-bit,” particularly since very few .NET developers are going to be targeting ARM, at least not for a long time.

So what does this mean for users of JNBridgePro and the JNBridge adapters? First, as mentioned earlier, we still strongly believe in “Any CPU” and x64 development, and are working hard to create products that can be used in “Any CPU” applications. There are some subtleties and complications in making this transparent to the user, but we’ve done a lot of work on this, which you can see in JNBridgePro 7.0, and will soon see in new releases of the adapters. We’ve discussed the work that we’ve done here. The next version of JNBridgePro will have even more support for “Any CPU” applications; particularly, when using shared memory, you’ll be able to specify paths to both a 32-bit and a 64-bit jvm.dll, and the proper JRE will be loaded depending on whether it’s a 32-bit or a 64-bit process. This will make Any CPU applications using shared memory even easier to deploy on any system without changes.

Second, we want all our users to know that JNBridgePro will still work in all “Any CPU” applications using shared memory, even when “Prefer 32-bit” is turned on. When it is, simply use a 32-bit JRE, and when it isn’t turned on, use a 32-bit or 64-bit JRE as is appropriate to the platform. The V.next of JNBridgePro, with the aforementioned ability to specify both 32-bit and 64-bit JREs, will make this process even more transparent.

We’re always trying to stay ahead of Microsoft’s changes, whether they’re ill-advised or not. The change to the meaning of “Any CPU,” and the new default “Prefer 32-bit” setting are just one example of how we’ve stayed on top of .NET’s evolution, so that your applications using JNBridgePro and the adapters continue to work despite the changes to .NET, and will continue to work in the future.

Instantiating Generic Collections

We had a question from a user recently asking how to instantiate certain generic collections in Java-to-.NET projects.  Some of the things that were discussed are of interest to the general community.

The user had a .NET method that was proxied to Java.  The method had several parameters, one of which was List<string>, and the other of which was Dictionary<string, List<string>>.  (Both List<> and Dictionary<,> were part of System.Collections.Generic.)  The questions were how to instantiate these collections and add elements to them.

This is actually one of the rare cases where you need to make use of the proxy for System.String. Ordinarily, .NET strings (System.String) are automatically converted to java.lang.Strings, and you never need to use the proxy for System.String, but you do here, since you need to access the .NET type object for System.String from the Java side.

To instantiate List<string>, you first need to make sure you’ve proxied System.String, as well as System.Collections.Generic.List__1 and System.Collections.Generic.Dictionary__2. Then use the code

import System.Collections.Generic.List__1;
import System.String;

List__1 theList = new List__1(String.GetDotNetClass());

Note that String above is the proxy of System.String, because of the import statement. We use that because we need the .NET typeof(string), not the Java String.class.

Note that the proxied List.Add() method has signature void Add(System.Object), so if we want to add a string using the proxied method, we need to do it as follows, using the DotNetString wrapper:

import System.DotNetString;

theList.Add(new DotNetString("a string"));

There are several ways to instantiate Dictionary<string, List<string>>, but they generally involve instantiating List<string> as above, and then getting a .NET Type object from that instantiated list. Sometimes you may need to instantiate such a list just to get the Type object; other times you may have such a list already lying around.  Here’s one way to do it, assuming you’ve instantiated theList as above.  If not, you can just write simple code to instantiate such a list and use that.

import System.Collections.Generic.Dictionary__2;

Dictionary__2 theDictionary = new Dictionary__2(String.GetDotNetClass(), theList.GetType());

Then, you can add key/value pairs to the dictionary as follows:

theDictionary.Add(new DotNetString("the key"), theList);

That’s really all there is to it. If you have any questions, or want to see some other examples, please don’t hesitate to contact us.

Announcing JNBridgePro 7.1 and versions 3.1 of the JMS Adapters for .NET and BizTalk Server

JNBridgePro version 7.1 and versions 3.1 of the JMS Adapters for .NET and for BizTalk Server are released!

JNBridgePro now supports Visual Studio 2013, and completes the “any-CPU” feature to include specifing separate 32-bit and 64-bit JVMs in a single shared-memory application.

The JMS Adapters for .NET and for BizTalk now provide support for the JMS 2.0 specification, and a new unified installer for both 32 and 64-bit.

Download a full-featured 30-day trial today from www.jnbridge.com/downloads.htm.

JNBridgePro and Java 8

Java 8 has a couple of new features (particularly, static and default methods in interfaces) that create problems for our current JNBridgePro 7.1. We will be coming out shortly with a new version that supports Java 8 along with previous versions of Java, but if you’re currently using JNBridgePro 7.1 and are having problems with Java 8, contact us and we’ll send you a patch.

JNBridgePro v7.2, adapters v3.2 released

Today we’ve announced the release of JNBridgePro version 7.2, which supports Java 8 (in addition to still supporting Java 5, 6, and 7). JNBridgePro v7.2 adds support for, among other new Java 8 features, static and default methods in interfaces. In addition, v7.2 includes substantial performance improvements in .NET applications that create very large numbers (in the millions, for example) of instances of a single Java class.

In addition, we’ve announced new version 3.2 releases of our JMS adapters for BizTalk Server and .NET. In addition to using the new JNBridgePro 7.2 components, the new adapters contain enhanced diagnostics to help track down configuration and performance issues.

For more information, please see the announcement. The new releases can be downloaded here.

New Java 8 features in JNBridgePro 7.2

Usually, when new versions of Java are released, we at JNBridge don’t have much to do.  The features generally don’t have an impact on what JNBridgePro does, and things just work.  Sometimes, as with variable-length argument lists (introduced in Java 5), they are simply syntactic sugar and are automatically proxied into their underlying form (an array).  Other times, new features occur behind the scenes (for example, lambda expressions in Java 8) and are never exposed to .NET users through proxies, so JNBridgePro doesn’t need to worry about them.

Java 8, however, contains two new features, static interface methods and default interface methods, that do affect JNBridgePro functionality. Both features are designed to improve usability of the language (whether or not they do is debatable, but that’s a topic for another blog post).  Static methods in interfaces are designed to add additional functionality to an interface, in the same way that static field constants have existed in Java interfaces in the past.  Default interface methods are intended to spare users from having to incorporate common implementations of certain interface methods; only unusual implementations need to be supplied.  Both static and default interface methods cause interfaces to act like abstract classes, with greater flexibility.

For JNBridgePro, the problem is that interfaces in most .NET languages (including C#) do not have these features, and attempting to map these features directly during proxy generation will cause exceptions to be thrown, or will cause DLLs to fail verification at run time.  In order to make these new Java 8 features available to .NET developers, we had to make some changes in the way that these new members of Java interfaces are mapped to their .NET proxies.

It was easy to determine how to map static interface methods. We’ve already had to deal with the problem with mapping static interface constants to proxied .NET interfaces, because most .NET languages don’t allow these, either.  For each proxied Java interface, we automatically create an associated helper class (called IConstants, when the original interface is I), which contains the static constants. Starting with JNBridgePro 7.2, static interface methods are also proxied into those same helper classes.

Handling default interface classes is a bit more involved. Not only are C# interfaces not permitted to include actual method implementations, “default” or not, but any C# class implementing an interface must account for every method in the interface, even if a Java class implementing the underlying interface doesn’t need to account for default interface methods.  This means that when we proxy a Java class that implements an interface with default methods, and that uses the default method, the proxied class will fail .NET verification because it doesn’t account for all methods in the implemented interface. To remedy this, starting with JNBridgePro 7.2 if a Java class relies on a default interface method and doesn’t actually provide an implementation of its own, then the .NET proxy will include an implementation of the method, which when called will result in a call to the default method. This should be transparent to the user.

Java-in-.NET embedding and Java 7 and 8

Embedding Java components in .NET applications, when using Java 7 or 8, doesn’t work the same way it previously did with Java 5 or 6, as the focus handling has changed.

When Java components are embedded in .NET applications, and Java 7 or 8 is being used, focus-related events like keyboard events and mouse wheel events are no longer handled properly — they are no longer directed to the appropriate component, but rather are directed to the wrong place and dropped. (Other mouse events, including clicks, which are not focus-related, still function properly.)

Starting with Java 7, the Windows implementation of the AWT focus subsystem was changed.  Previously, every AWT and Swing component was mapped to an underlying Windows component (a “focus proxy”) that handled focus-related events and dispatched them to the appropriate AWT/Swing component. With Java 7 (and continuing into Java 8), the owning frame acts as the focus proxy for all components that are contained within it. Oracle claims that “the mechanism is transparent for a user,” but the change does dramatically affect the behavior of Java AWT and Swing components that are embedded inside Windows Forms and WPF applications. Our research indicates that the AWT focus subsystem is choosing the wrong Windows component as the focus proxy.

We are currently working on a fix to this problem, but we have no estimate on when that fix will be ready. In the meantime, if you are embedding Java components in .NET applications, we recommend using Java 6 for the moment. Note that if your embedded Java component does not depend on focus-related events (for example, it does not take text input or use keyboard shortcuts or respond to mouse wheel events), then you should be able to use Java 7 or 8.

Also note that embedding .NET UI components inside Java applications still works fine as before, whether Java 5, 6, 7, or 8 is being used.

We thank you for your patience while we work on this issue, and we apologize for the inconvenience.

Exception: “You need to install the Visual C++ runtime library”

In Java-to-.NET projects, you get the following exception message:

Couldn’t start up .NET side. Please verify that the files jnbshare.dll, jnbsharedmem.dll, and jnbjavaentry2.dll are in the GAC or are in the folder pointed to by the dotNetSide.appBase property. If that is the case, then you need to install the Visual C/C++ 9.0, 10.0, or 11.0 runtime library. In order to use shared memory communications, this JNBridge product requires that the Visual C/C++ 9.0, 10.0, or 11.0 runtime be installed. You can download a copy from https://support.microsoft.com/en-us/help/2977003/the-latest-supported-visual-c-downloads

The shared memory communications mechanism references the Visual C++ runtime library, and the C++ runtime library of the appropriate version and bitness must be installed on the machine. In most cases, this library is already installed by some other product — often a Microsoft product. If the machine is relatively new and clean, the library will be missing, and you will see this error.

You can download the appropriate Visual C++ runtime library from Microsoft here.

If your application targets .NET Framework 2.0, 3.0, or 3.5, download and install version 9.0 of the Visual C++ (VC++) runtime library, associated with Visual Studio 2008. If your application targets .NET Framework 4.0, 4.5, 4.6, or 4.7, download and install version 10.0 of the VC++ runtime library, associated with Visual Studio 2010. In some cases, this is not sufficient to resolve the problem, and you should install version 11.0 of the VC++ runtime library, associated with Visual Studio 2012. In all cases, download the library of the appropriate bitness: if your application runs in a 32-bit process, download the 32-bit (x86) version; if your application runs in a 64-bit process, download the 64-bit (x64) version. In all cases, you can download the library from the link given above.