Calling Java from .NET
Introduction
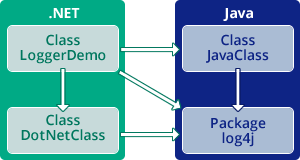 This demo shows how you can have .NET classes call Java, using the Java-based Apache logging services package
 log4j. The result will be a .NET console application that displays the logged events from both Java and .NET. The steps include:
- Start Visual Studio and create a .NET-to-Java proxies project
- Choose and generate the .NET proxies that call the Java classes.
- Create the .NET code that calls the proxies.
- Run the code.
We’ll access an existing Java class, loggerDemo.JavaClass, that includes an instance method doIt() that sends a log message to log4j. We’ll create a .NET-based class, com.jnbridge.demos.logging.DotNetClass that includes its own instance method f() that also sends a log message to log4j. A .NET-based driver method calls both JavaClass and DotNetClass, and we will see how both Java- and .NET-originated logging messages are displayed on the same console output.
Create Proxy Generation Project
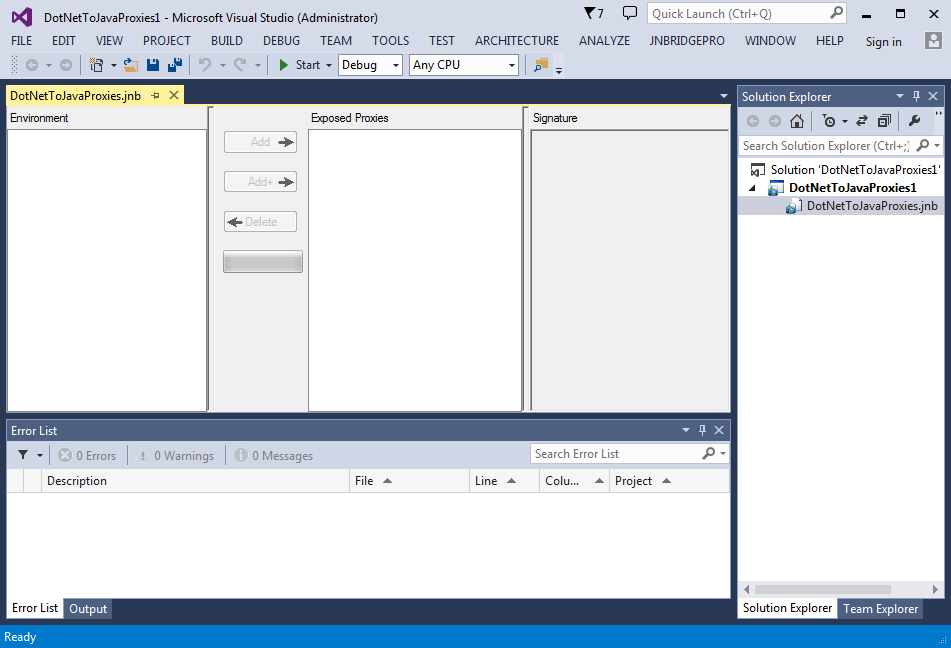
The first step in the process is to generate proxies for the classes in the log4j package, and for loggerDemo.JavaClass.
Start by launching Visual Studio and creating a new project. In the New Project dialog, select the JNBridge group on the left side, and select a DotNetProxies project. Leave the project with the supplied default name.
Once the project has been created, double-click on the DotNetToJavaProxies.jnb node in the solution explorer to reveal the proxy generation interface. The interface contains the following panes:
- The environment pane displays the Java classes of which the proxy generator is aware, and for which proxies can be generated.
- The exposed proxies pane shows those Java classes for which proxies will be generated.
- The signature pane shows information on the methods and fields offered by a Java class, as well as other information on the class.
- The output pane displays diagnostic and informative messages generated during the operation of the tool.
Edit Classpath
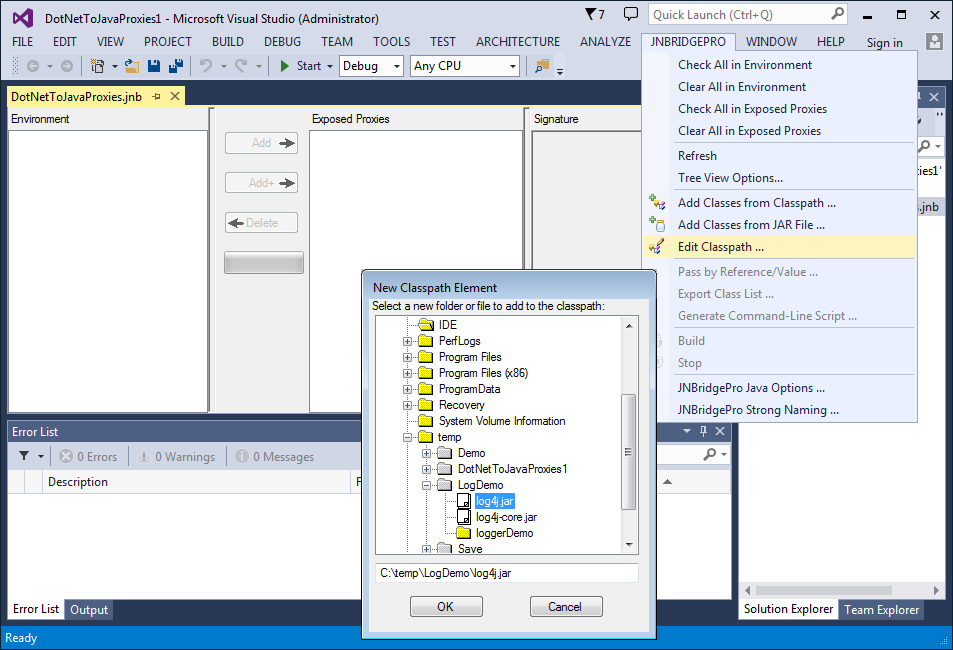
Next, add the files log4j.jar and log4j-core.jar to the class path to be searched by the proxy generator. (You can download the log4j JAR files from http://logging.apache.org/log4j/1.2/download.html.) Also add the folder in which loggerDemoJavaClass.class is to be found.
Choose JNBridgePro → Edit Classpath. The Edit Class Path dialog box will come up. Clicking on the Add button will bring up a dialog that will allow you to indicate the paths of the Jar and class files.
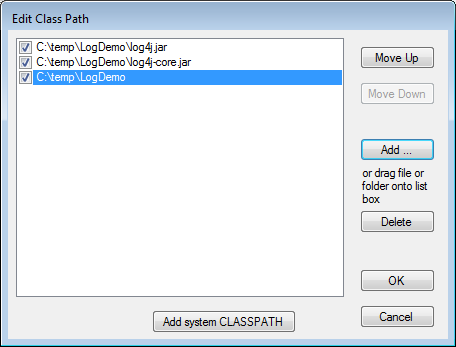
When all the necessary elements of the classpath are added, the Edit Class Path dialog should contain information similar to this dialog.
Load Classes
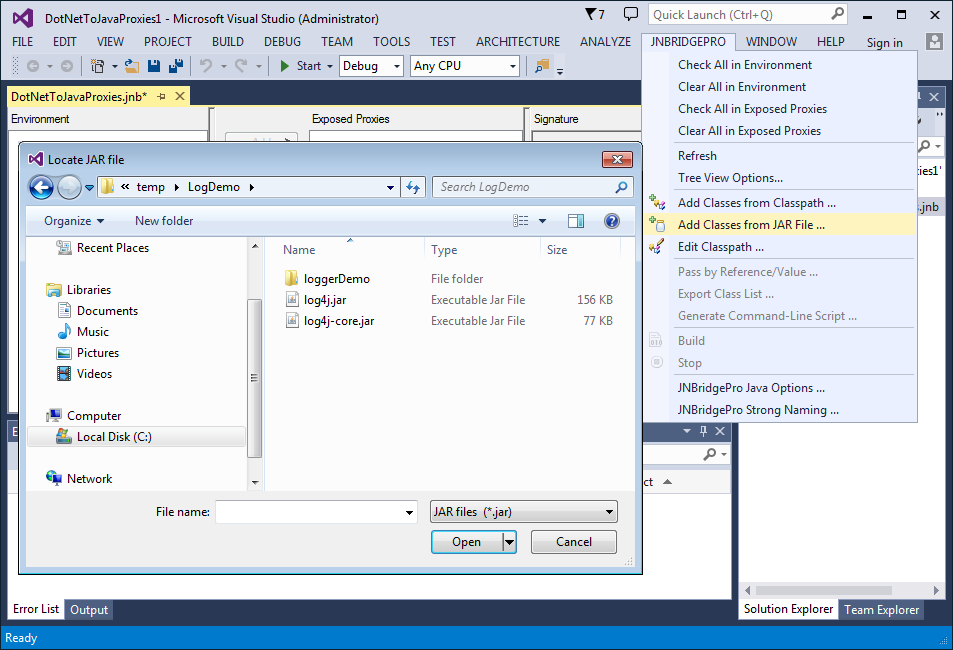
Load the classes from each of the .jar files, and add JavaClass. For the .jar files, choose JNBridgePro → Add Classes from JAR File for each .jar file. For a single class such as JavaClass, use the menu command JNBridgePro → Add Classes from Classpath and enter the fully qualified class name loggerDemo.JavaClass.
Load Class Progress
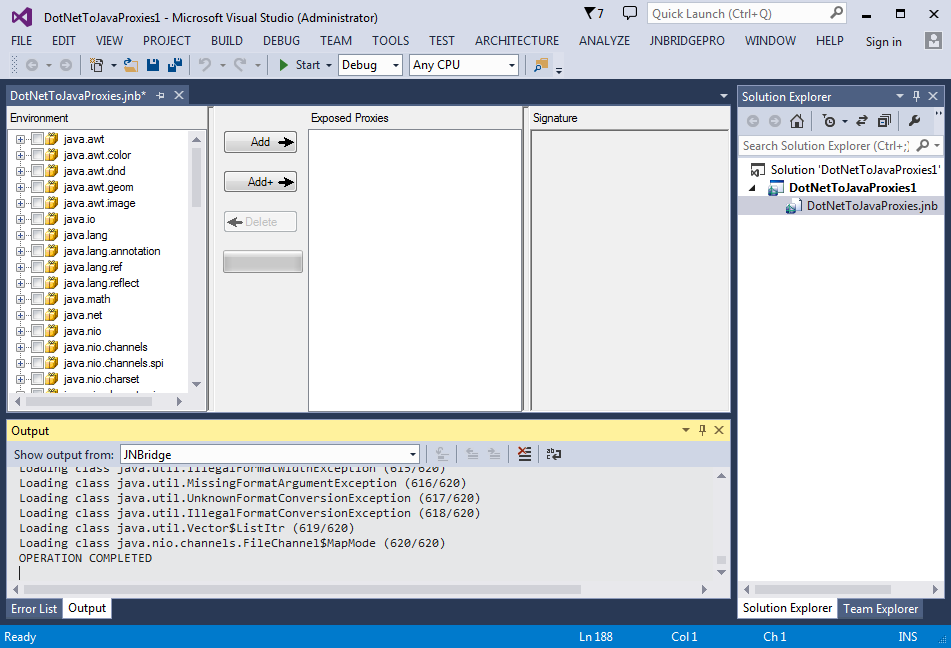
Loading all the classes may take a few seconds. The load progress is shown in the output pane in the bottom of the window, and in the progress bar. When finished, the classes in the log4j.jar files and loggerDemo.JavaClass are displayed in the Environment pane. Note that the proxy generator will warn us that we are missing a number of classes relating to JMS (Java Messaging Service), XML, and JavaMail. Since we are not going to use these capabilities of log4j, we can safely ignore this warning.
Choose Proxies
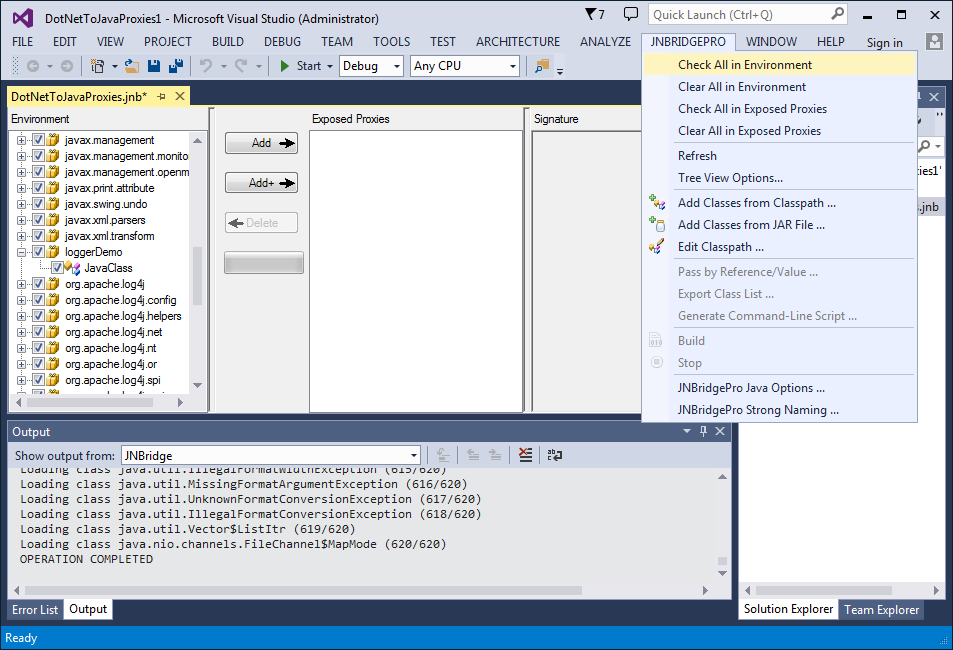
For this demo we’re going to generate proxies for all these classes, so when all the classes have been loaded into the environment, we need to make sure that each class in the tree view has a check mark next to it. Select JNBridgePro → Check All in Environment to select all the classes.
Once each class has been checked, click Add to add each checked class to the list of proxies to be exposed. These will be shown in the Exposed Proxies pane.
Generate Proxies
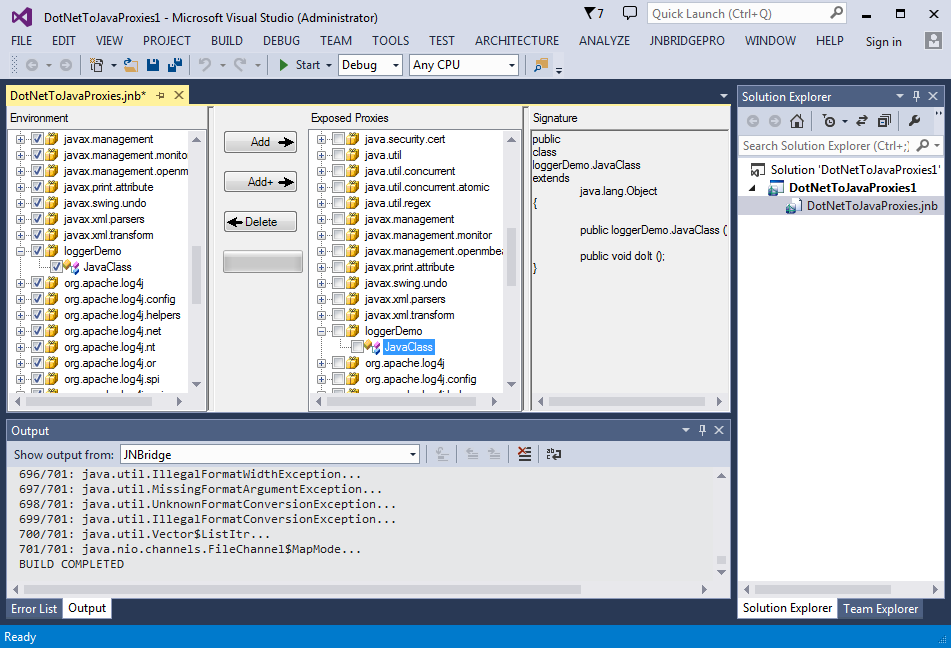
Next generate the proxies. Choose JNBridgePro → Build to generate the assembly (.dll) that will contain the generated proxies. The Visual Studio plugin will choose the name and location of the proxy dll. (If you’re using the standalone proxy generation tool, you get to name the proxy dll and choose its location.) The proxy generation process will take a few minutes, and progress and other information will be indicated in the Output pane.
Note that, if you’re using the Visual Studio plugin, you can actually skip this step, since the proxies will be built as part of the process when the entire solution is built.
Use the Proxies
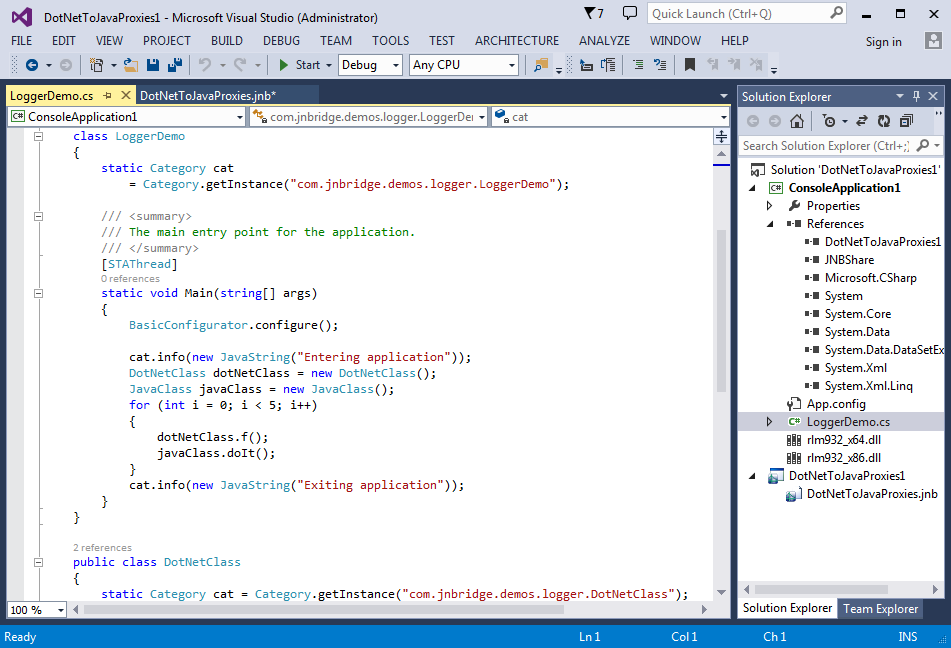
Now that the proxies have been generated, we can use them to access Java classes from .NET.
In the Solution Explorer, right-click on the solution node and select Add → New Project… Select a C# Console Application, and make it the startup project. Add references to the DotNetToJavaProxies project, and to jnbshare.dll (distributed with JNBridgePro). In the file Program.cs, enter the C# code as shown.
Note that strings passed to the info() and debug() methods need to be wrapped in a java.lang.JavaString() object. This is because info() and debug() both expect a parameter of class java.lang.Object, and the .NET string is not a subclass of java.lang.Object, while java.lang.JavaString is. See the JNBridgePro User’s Guide for more details.
Call Java Methods
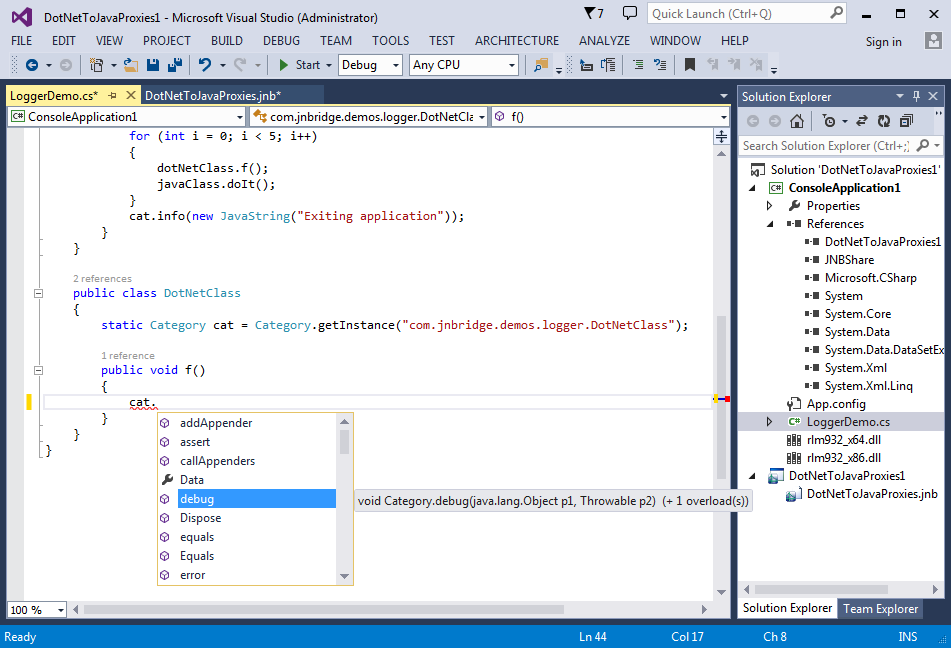
The proxies for the Java objects in log4j are used exactly as the original objects would be used in Java. We can now use the Java class just as if they were written in .NET!
- Proxies for the Java classes have namespaces identical to the package names of the original Java classes. Thus, we simply import the namespaces
org.apache.log4j,java.lang, andloggerDemo, and afterwards can use the names of the Java classes. - Proxies for the Java classes
Category,BasicConfigurator, andJavaClassare used in exactly the same way as the original Java classes would have been used. - The .NET class
DotNetClasscalls to the logger objectcatwill cause messages to be written to the same output as the messages logged byJavaClass. - When typing in the calls to the Java objects, Visual Studio’s IntelliSense facility will offer to complete the names of method calls in the same way that it would for calls to .NET objects, and will provide information on number and types of parameters.
After entering the code, build the project to create the executable.
Run the Program
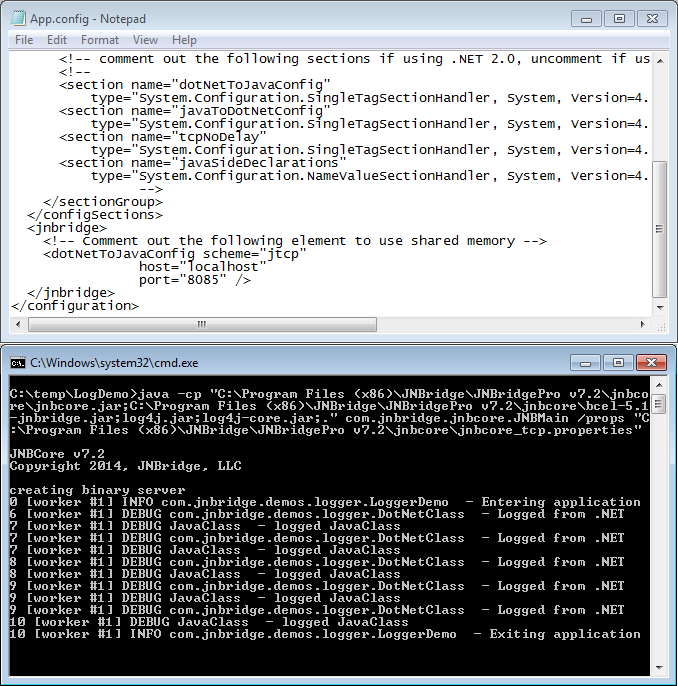
Running the program is easy. Simply modify the application configuration file on each side so it specifies our chosen communication mechanism and its associated parameters.
The shared-memory communications channel will automatically cause a JVM to be created in the same process as the .NET application when the .NET application starts, and the .NET code will seamlessly and directly communicate with the Java code. If the Java side is on a different machine from the .NET side, or if more than one .NET program will be accessing the Java code, we can start up the JVM separately, and configure the two sides to communicate via a socket-based communications channel. In either case, the .NET and Java code remain the same; only the configuration information is changed.
In this tcp/binary example, we simply start up the Java program. Then we run the .NET application. Calls to the Java code will automatically be made, and the Java-side console window will display logging messages originating on both the .NET and the Java side.
Summary
This demo has shown how simple it is to integrate Java and .NET code. We accomplished it in three stages:
- Generate proxies to allow .NET classes to access Java classes. The proxies were generated using a visual tool that allows you to explore which Java classes are to be exposed to .NET.
- Link the .NET proxy assembly to the .NET development project and write the .NET code that accesses the Java classes. The .NET classes access Java classes transparently, as if the Java classes were themselves .NET classes. JNBridgePro automatically manages the Java-.NET communications and object lifecycles. Standard Visual Studio features, such as IntelliSense, work when writing the .NET code that calls the Java classes.
- Configure JNBridgePro to specify the communications mechanism and run the integrated .NET and Java code. JNBridgePro can scale from in-process on the same machine to cross-network via a simple configuration file change, your code remains untouched.
Download JNBridgePro to try this for yourself! The sample code for this demo, and more, is included in the installation.
Calling .NET from Java
Introduction
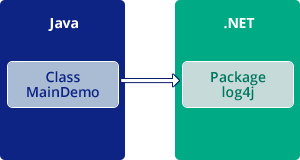
This demo shows how you can have Java classes call .NET. We’ll construct a Java console application that calls .NET classes, using Java code to call the Apache logging services package for .NET log4net. The results will log messages from both Java and .NET in the same output.
The steps include:
- Start the proxy generator (either the Eclipse plug-in or the standalone proxy generation tool) and load the classes.
- Choose and generate the Java proxies that call the .NET classes.
- Create the Java code that calls the proxies.
- Run the code.
We’ll create a Java class j2NLogDemo.MainClass that calls multiple classes in the log4net API. When we run this class, we will see how the logging information appears in the .NET output.
Start Proxy Generator
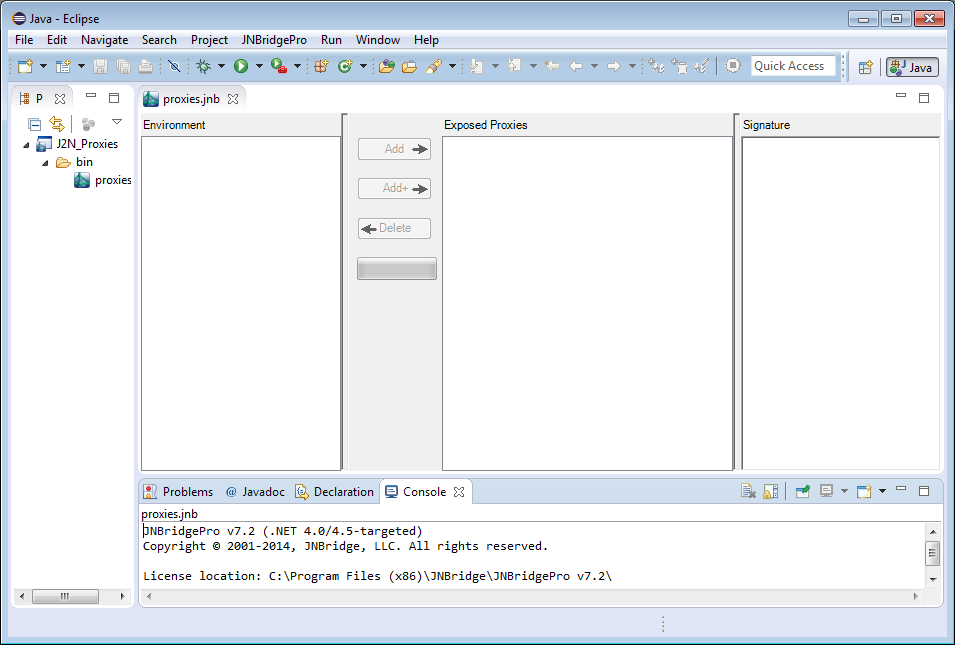
The first step in the process is to generate proxies for the classes in the log4net package.
Start by launching either the Eclipse plug-in or the standalone proxy generation tool.The interface contains the following panes:
- The environment pane displays the .NET classes for which proxies can be generated.
- The exposed proxies pane shows those .NET classes for which proxies will be generated.
- The signature pane shows information on the methods and fields offered by a .NET class, as well as other information on the class.
- The output pane displays diagnostic and informative messages generated during the operation of the tool.
Add Assembly
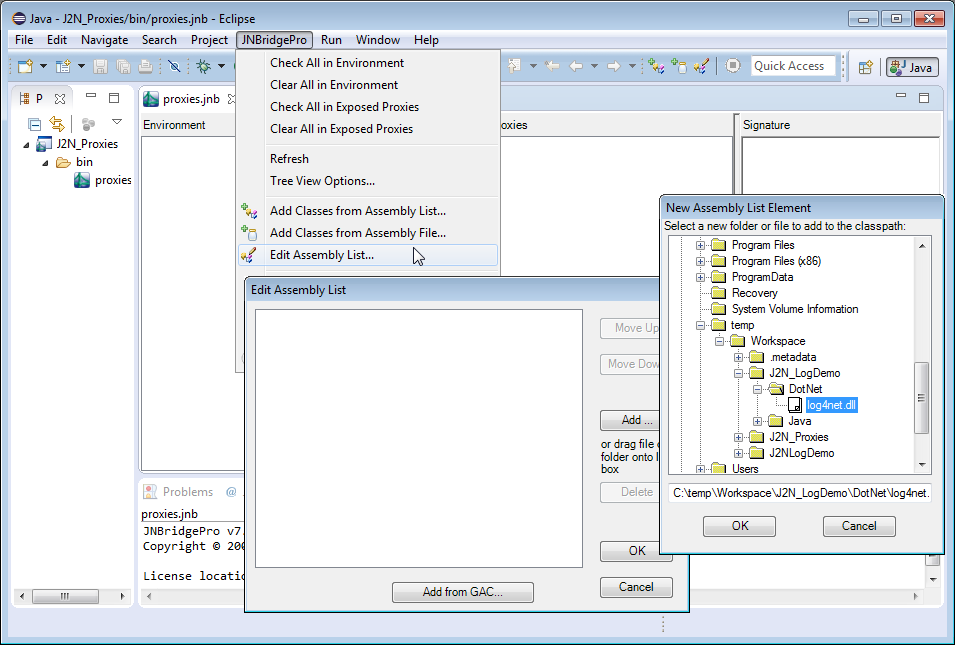
Next, add the file log4net.dll to the assembly list to be searched by the proxy generation tool. (You can download the log4net DLL files from http://logging.apache.org/log4net/download_log4net.cgi.) Choose JNBridgePro → Edit Assembly list. The Edit Edit Assembly List dialog box will come up, and clicking on the Add button will bring up a dialog that will allow you to indicate the paths of the DLL files.
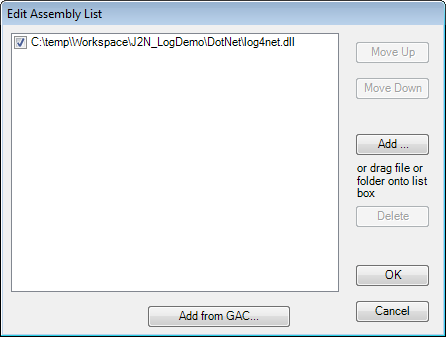 When the path to
 log4net.dll is added, the Edit Assembly List dialog should contain information similar to that shown here.
Load Classes
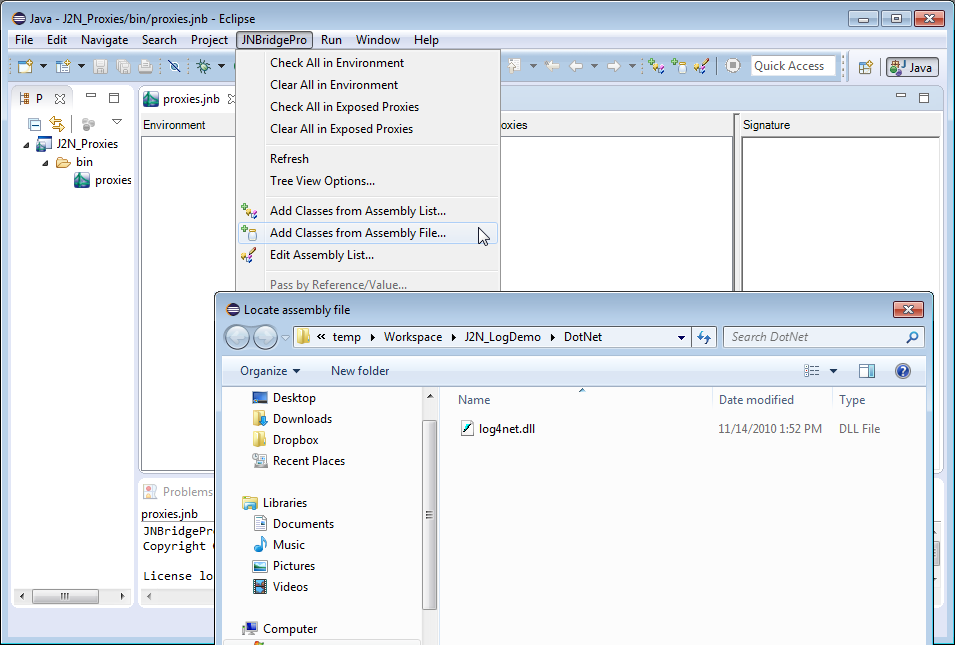
Load the classes from log4net.dll. Choose JNBridgePro → Add Classes from Assembly File and navigate to log4net.dll. You can also add individual classes by using the menu command JNBridgePro → Add Classes from Assembly List and entering the fully qualified class name for each class to be added.
Load Class Progress
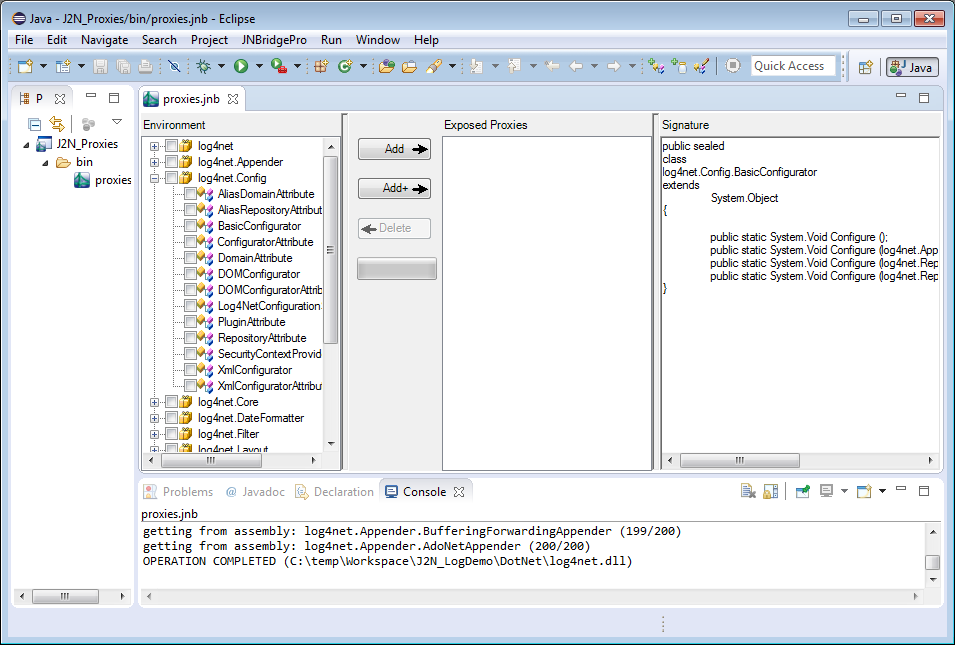
Loading all the classes may take a few seconds. The load progress is shown in the output pane in the bottom of the window, and in the progress bar. When finished, the classes in log4net.dll are displayed in the Environment pane.
Choose Proxies
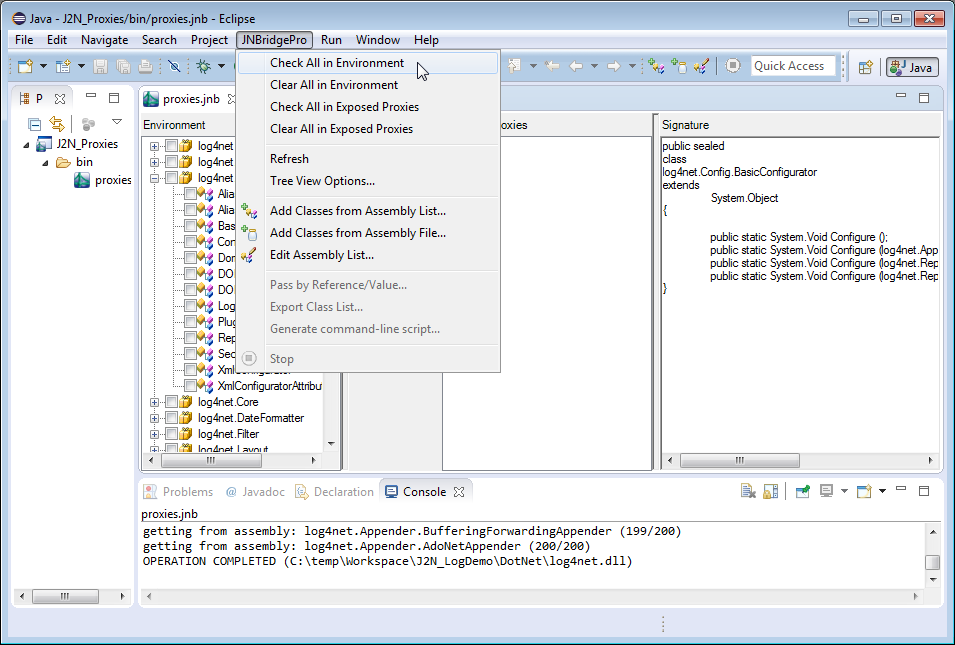
For this demo we’re going to generate proxies for all these classes, so when all the classes have been loaded into the environment, we need to make sure that each class in the tree view has a check mark next to it. Select JNBridgePro → Check All in Environment to select all the classes.
Once each class has been checked, click Add + to add each checked class to the list of proxies to be exposed, plus all potential supporting classes such as parameter and return value classes, superclasses, and so on. These will be shown in the Exposed Proxies pane.
Generate Proxies
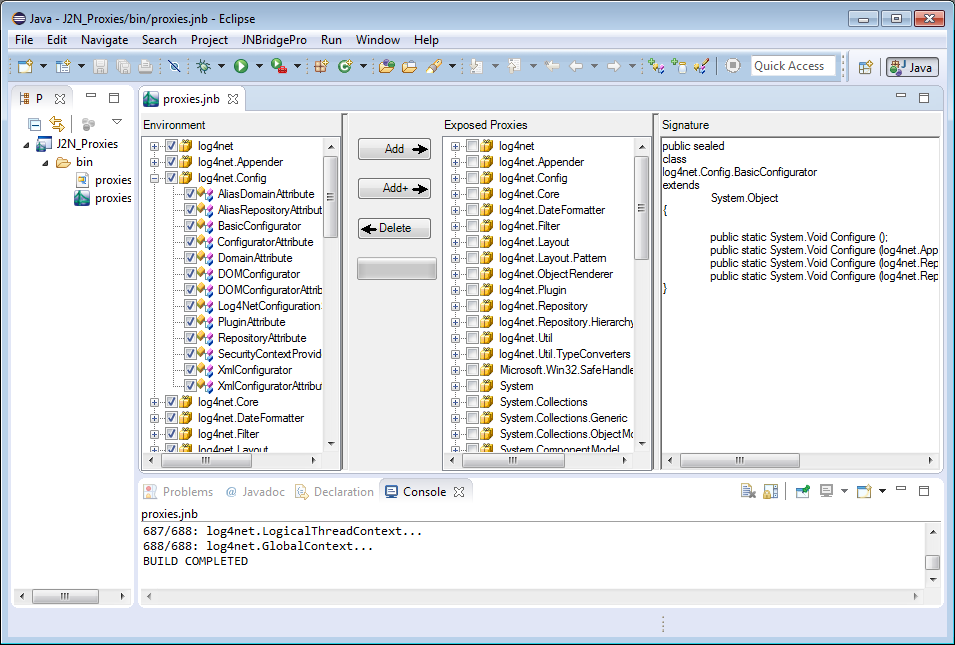
Since we’re using the Eclipse plugin in this demo, the proxies are built automatically; we don’t have to explicitly perform a build or to assign a name or location to the proxy jar file. However, if you’re using the standalone proxy generation tool, you would choose Project → Build, and choose a name and location for the (jar) file that will contain the generated proxies. The proxy generation process may take a few minutes, and progress and other information will be indicated in the Output pane.
Use the Proxies
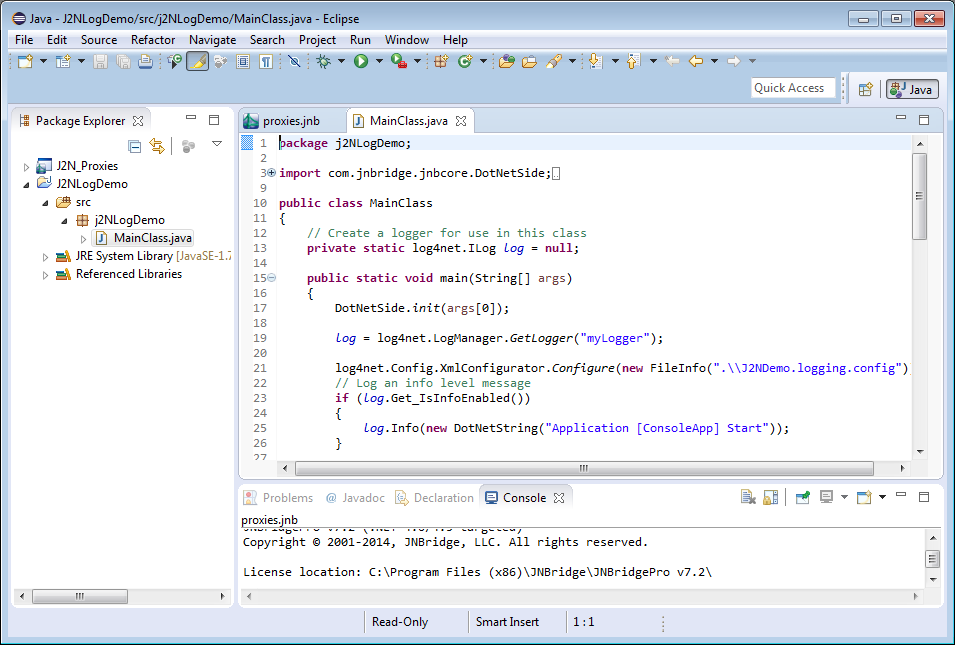
Now that the proxies have been generated, we can use them to access .NET classes from Java.
In the Eclipse environment, create a new Java project. In the new project’s build class path, add the Java-to-.NET interoperability project that you just created, along with jnbcore.jar and bcel-5.1-jnbridge.jar (distributed with JNBridgePro). Next, add a new class and enter Java code such as the code in this example.
Note that strings passed to the Info(), Warn(), Error() and Debug() methods need to be wrapped in a System.DotNetString object. This is because Info(), Warn(), Error() and Debug() all expect a parameter of class System.Object. See the JNBridgePro User’s Guide for more details.
Call .NET Objects

The proxies for the .NET objects in log4net are used exactly as the original objects would be used in .NET. We can now use the .NET classes just as if they were written in Java!
- Proxies for the .NET classes have namespaces identical to the package names of the original .NET classes. Thus, we simply import the namespaces
log4net, andlog4net.Configand afterwards can use the names of the .NET classes. - Proxies for the .NET classes
LogManager,XMLConfigurator, andMDCare used in exactly the same way as the original .NET classes would have been used. - The Java class
MainClasscalls to the logger object log will cause messages to be written to the .NET logging output.
After entering the code, build the project to create the binaries.
Run the Program
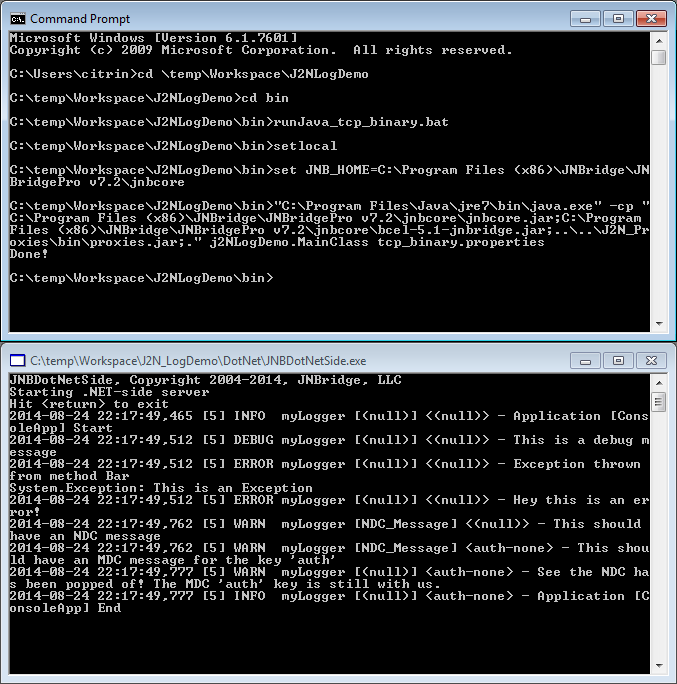
Running the program is easy. Simply modify the application configuration file on each side so it specifies our chosen communication mechanism and its associated parameters.
The shared-memory communications channel will automatically cause a .NET CLR to be created in the same process as the Java application when the Java application starts, and the Java code will seamlessly and directly communicate with the .NET code. If the .NET side is on a different machine from the Java side, or if more than one Java program will be accessing the .NET code, we can start up the CLR separately, and configure the two sides to communicate via a socket-based communications channel. In either case, the Java and .NET code remain the same; only the configuration information is changed.
In this tcp/binary example, we start up the .NET side of the program. Then we run the Java application. Calls to the .NET code will automatically be made, and the .NET-side console window will display logging messages resulting from the calls from the Java side.
Summary
This demo has shown how simple it is to integrate Java and .NET code. We accomplished it in three stages:
- Generate proxies to allow Java classes to access .NET classes. The proxies were generated using a visual tool that allows you to explore which .NET classes are to be exposed to Java.
- Reference the Java proxy jar file (if you’re using the standalone proxy generation tool) or the Java-to-.NET interoperability project (if you’re using the Eclipse plugin) and write the Java code that accesses the .NET classes. The Java classes access .NET classes transparently, as if the .NET classes were themselves Java classes. JNBridgePro automatically manages the Java-.NET communications and object lifecycles.
- Configure JNBridgePro to specify the communications mechanism and run the integrated .NET and Java code. JNBridgePro can scale from in-process on the same machine to cross-network via a simple configuration file change, your code remains untouched.
Download JNBridgePro to try this for yourself! The sample code for this demo, and more, is included in the installation.

