
Using a Java SSH library to build a BizTalk Adapter
One of the most frequently used BizTalk adapters is the File Adapter. While its most common use is in tutorials and customer evaluations, the File Adapter is essential in situations where BizTalk needs to be integrated with other applications that are self-contained and not designed for connectivity. In such situations, the other applications can simply drop documents in a folder, and the File Adapter simply reads the new documents as they appear. The adapter can also write documents to a folder, from where they can be read by the other applications.
Recently, we had a conversation with a customer who was using the standard File Adapter to process files. The files had been transfered to the Windows server from a Linux server via a Java Secure Shell (SSH) client, a perfect example of file-level interoperability between platforms. Secure Shell is a secure network protocol that enables shell services between client and server machines providing remote command execution and file transfer. SSH servers and clients are most prevalent on Linux/Unix platforms as a standard component of the OS. There are, of course, SSH clients and servers that run on Windows, but they are rarely used.
Obviously, for the customer, the best implementation would be a BizTalk adapter that supports SSH, specifically the SFTP channel for file transfer, in order to avoid the extra step in transferring the file via SSH, followed by reading it with the File Adapter. In addition, an SSH/SFTP adapter would enable secure, encrypted file transfer over the public internet between, for example, a company’s IT infrastructure on the ground and resources that reside in the cloud. We decided to investigate whether it would be possible to use the File Adapter example in the BizTalk Adapter Framework SDK as a starting point to build a SSH/SFTP adapter. This would require a SSH API, preferably one that’s open source. We based the adapter on a Java SSH client library, and used JNBridgePro to bridge from the .NET-based adapter framework because there’s no open source .NET SSH API that is current, or been released. There are several open source Java SSH class libraries available; we chose JCraft’s Java Secure Channel—JSch—because of its prevalence in Java developement tools and IDEs. JSch is distributed under a BSD-like license.
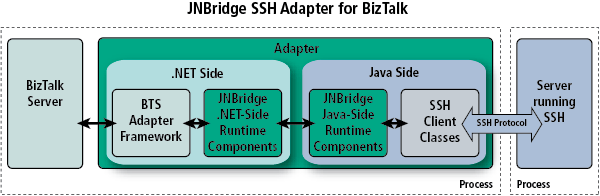
JNBridgePro 6.0 allows us to proxy the JSch class library directly to .NET. During execution, a JNBridgePro .NET proxy represents an instance of a Java class running in the JVM. The interoperability bridge between the CLR and the JVM manages method calls between the proxy and the Java object, data marshaling/representation and object life cycle. Here’s a closer look at how JNBridgePro works.
The BizTalk Adapter Framework .NET File Adapter example
%INSTALL_DIR%Microsoft BizTalk Server 2010SDKSamplesAdaptersDevelopment
File Adapter. We used the version in BizTalk Server 2010, although the example source hasn’t changed since BizTalk 2006. Visual Studio 2010 and JNBridgePro complete the development environment. First, copy the example’s root directory to a more suitable working directory. The BizTalk Adapter Framework (BAF) base classes, a convienient layer that implements many important mechanisms required for a robust adapter, must also be added to the solution. The base classes can be found in the directory BaseAdapter.
Preliminary Tasks
The very first step is to make sure we can build and deploy the File Adapter before modifying the code. This involves building the three projects we’ve consolodated into one Visual Studio solution: AdapterManagement, DotNetFile and Microsoft.Samples.BizTalk.Adapter.Common. In order to build the adapter, the only thing we need to do is repoint the reference to the adapter base class library in the DotNetFile project because the path has changed. While it is possible to unload the project from Visual Studio and edit the project file as a text file, it is simpler and less error-prone to remove and then re-add the reference.
Deploying a BizTalk adapter is done using registry entries. There are a couple of ‘.reg’ files with the example. We’ll use the registration entries file, StaticAdapterManagement.reg. However, because the example was copied from the BizTalk install directory to a working directory, the regisitry file must be edited to modify the paths to the management and run-time assemblies. We also can edit the name of the adapter stored in the TransportType key from “Static DotNetFile” to “JNBPSshFile” to avoid confusion.
Bridging the JSch Java API to .NET
JCraft’s open source SSH class library is written in Java. A BizTalk adapter is written in .NET C#. Use JNBridgePro to create .NET proxies of the JSch classes that represent the Java classes during development and at run-time. To do so, we’ll add a JNBridge DotNetToJavaProxies project to the adapter solution using the provided Visual Studio plug-in. We also need the JSch library, the JAR file jsch-0.1.45.jar.
The first task is to configure the proxy project’s class path to point to the JSch JAR file. The JNBridgePro development environment consists of a proxy tool that uses reflection to expose the Java classes—the public methods and variables—in the JAR file. Before we start exposing the Java classes, we’ll need to tell the proxy tool what classes we need to proxy to .NET. We could expose everything in the JAR file, but by looking at JCraft’s sample Java source (which we’ll draw heavily from when we code in C#), we can determine in advance the pertinent classes. Add the classes from the class path using the proxy tool, as shown below.
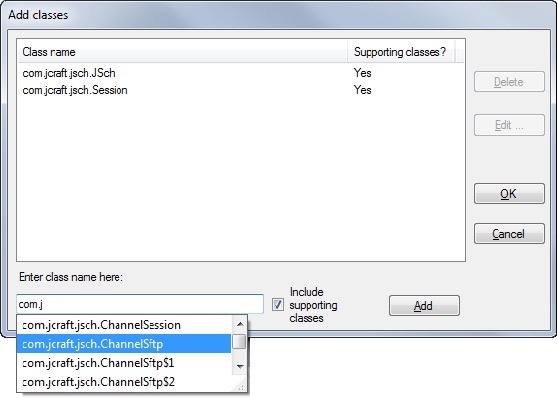
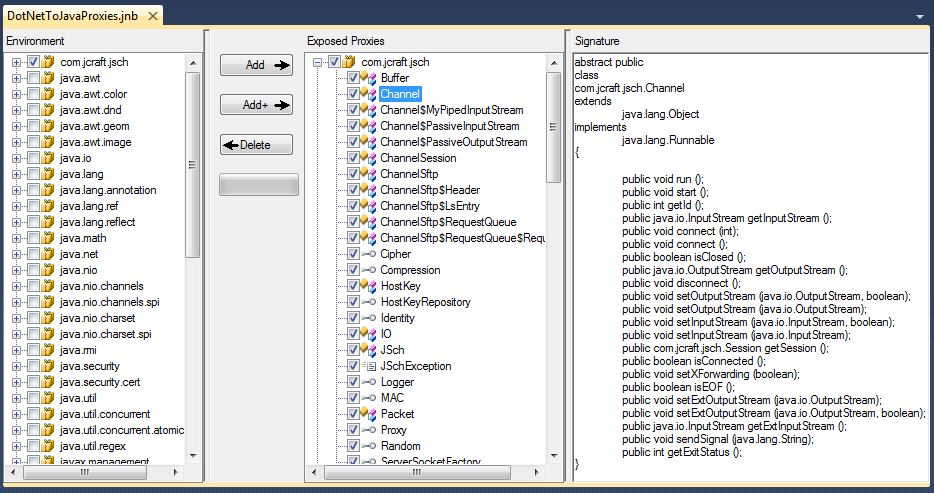
Because we’ve checked the box Include supporting classes, the proxy tool will also load all class dependencies from the com.jcraft.* namespace as well as those from the JRE, like java.util.Vector. We can then choose exactly which Java classes we would like proxied into an assembly. The next screen shot shows the proxy tool with the loaded classes on the left and the selected classes on the right. The far right displays the interface of the class Channel. The abstract Channel class will be proxied along with the class that extends it, ChannelSftp.
Coding: Change from a File Adapter to a Secure FTP adapter
The adapter currently understands how to consume and place files locally. We need to modify the configuration interface for the adapter to support SSH/SFTP. We’ll leave the transport handler configurations alone and modify only the transmit and receive location configurations. We’ll be able to leverage some of the existing properties, like directory and fileMask, but will have to add properties that handle SSH connection and credential arguments. We’re going to keep things simple and only use simple security—a user name and password—instead of more robust public/private key pair encryption. Hardening the security of user credentials is left as an exercise to the reader. We then add the following to the source file ReceiveLocation.xsd and TransmitLocation.xsd.
<xs:element name=”host” default =”localhost” type=”xs:string” >
<xs:annotation>
<xs:appinfo>
<baf:designer>
<baf:displayname _locID=”hostName”>in resource file</baf:displayname>
<baf:description _locID=”hostDesc”>in resource file</baf:description>
<baf:category _locID=”SSHCategory”>in resource file</baf:category>
</baf:designer>
</xs:appinfo>
</xs:annotation>
</xs:element>
<xs:element name=”port” default=”22″ type=”xs:int” >…</xs:element>
<xs:element name=”user” type=”xs:string” >…</xs:element>
<xs:element name=”password” type=”xs:string” >…</xs:element>
The block of XSD code shows the schema for the host property that’s used to populate the location property grid and create the XML document that contains the location’s configuration. The strings used for the display name, description, etc… are in the resource file, DotNetFileResource.resx. The schema for the remaining properties will be similar. To correctly parse the the XML document in order to retrieve the configuration values, add the following C# code (again, just using the host property as an example—the other properties will have similar code) to the classes DotNetFileReceiveProperties and DotNetFileTransmitProperties, both defined in the file DotNetFileProperties.cs. The static utility method IfExistsExtract() is defined in ConfigProperties.cs in the adapter base classes.
private string hostName;
public string HostName { get { return this.hostName; } }
public override void ReadLocationConfiguration (XmlDocument configDOM)
{
// to this method, add lines like this for each property:
this.hostName = IfExistsExtract(configDOM, “/Config/host”, “localhost”);
}
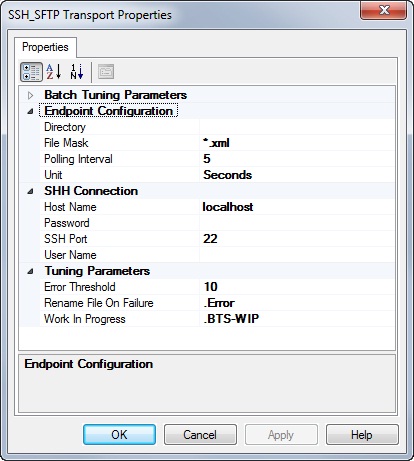
Once done with modifying the adapter’s properties to accommodate an interface for SSH, we can fire up the BizTalk Admin Console, create a receive location and open the property sheet. Here’s what it looks like.
Coding the SSH/SFTP adapter
All of the C# code will be added to the DotNetFile project. We’ve already added the properties code to DotNetFileProperties.cs, now it’s time to start coding the adapter. First, add a couple of references to the project: one to point to the JNBridgePro proxy assembly, the other to point to the JNBridgePro run-time, JNBShare.dll.
Initiating the Java/.NET bridge
The bridge between the CLR and the JVM will use a shared memory transport. The JVM will run as a thread within the BizTalk Server process. Thankfully, JNBridgePro hides all the details. A new source file, JNBridgeProInit.cs, will define the static class JNBridgeProInit. The class has one method, init(). Because a process can have only one JVM instance, we’ll need to provide a mechanism to ensure that JNBridgePro is initialized once, and only once, per process. The bridge needs a pointer to the Java Virtual Machine, the JNBridgePro run-time assemblies and JAR files and a class path pointing to the JSch JAR file.
private static object jnbInitLock = new Object();
public static void init()
Coding a .NET implementation of a Java interface
When connecting to a SSH server, the server negotiates security credentials by asking the client for a user name and password or a private key and pass phrase. JCraft’s JSch provides a convenient Java interface, com.jcraft.jsch.UserInfo, that when implemented returns the required information. When we built the proxy assembly using the JNBridgePro proxy tool, the Java interface was mapped to a .NET interface. We can implement the interface in the class UserInfoImpl, which we’ll place in the file UserInfoImpl.cs. Because an instance of UserInfoImpl will be created on the .NET side, but called on the Java side of the bridge, we’ll have to use a JNBridgePro Callback attribute to decorate the interface implementation.
Initiating JSch
Now it’s time to code against the JCraft JSch class library. Because our project references the proxy assembly we built in the JNBridgePro project, we can code in C# as if JSch were implemented in .NET. In fact, we can use the example Java code that ships with JSch as a starting point. First, we need a method to initiate a JSch context, connect to a SSH server and create the SFTP channel. We’ll add the following private instance variables to the two endpoint classes, DotNetFileTransmitterEndpoint and DotNetFileReceiverEndpoint, in DotNetFileReceiverEndpoint.cs and DotNetFileTransmitterEndpoint.cs.
We’ll now add the following method to the two endpoint classes. Notice the line where an object of type Channel is cast to type ChannelSftp. If the cast to System.Object is not done first, Visual Studio will complain. Using the proxy tool, we can take a look at the class hierarchy. The public class ChannelSftp inherits from ChannelSession, which in turn inherits from the abstract base class Channel. The problem is that ChannelSession is not public while the abstract base class and ChannelSftp are public. Java has the concept of default access—not specified private, public or protected—allowing the class to be accessible within its own package, like ChannelSession. Java allows a cast from a base class to subclass even if intermediate subclasses have default access. The C# language requires that the entire class hierarchy be public if any subclass is public. If not, Visual Studio refuses to build the assembly. The point is that this is a language restriction, not a restriction, or lack of mechanism, in the target byte-code. JNBridgePro constructs the proxy assembly directly to MSIL, where classes are either Public or NotPublic. The intermediate cast to Object just gets past the language restriction imposed by the C# specification and Visual Studio. Yes, it’s a hack, but if we didn’t use the indirection, we’d have to code a Java wrapper to do the cast, create a .NET proxy of the wrapper and then call the wrapper to cast on the Java side.
Paths
We’ll need to add some code to perform transformations between Windows-style and Unix-style paths such as the directory property that tells the adapter where to look for, or place, files that end in the specified qualifier. Even when a SSH server is running on Windows, paths must be in a Unix-like format, so the path C:UsersMyAccountDownloads must be changed to /users/myaccount/downloads. Luckily, JSch provides a method for path transformation. We’ll add the path transformation code to the Open() method of both endpoint classes. Here’s the receive endpoint code.
Receiving Files: SFTP get
The Java type byte is signed. JNBridgePro converts Java signed bytes to the .NET type sbyte. Converting back to type byte involves a little indirection. The use of the unchecked keyword makes sure that there is no run-time exception. Using unchecked is equivalent to casting a void pointer in C—the bits are taken at face value with no overflow checking. Besides using the JSch class library, this code uses two standard types from the Java run-time library, Vector and ByteArrayOutputStream.
The class BatchInfo maintains a list of the files that have been received. The ReceiveBatch constructor accepts as an argument the callback method BatchInfo.OnBatchComplete(). When the batch has been successfully submitted to the BizTalk Message Box, the callback method will delete the files.
com.jcraft.jsch.ChannelSftp.LsEntry entry;
List<BatchMessage> files = new List<BatchMessage>();
java.util.Vector list = this.sftpChannel.ls(this.properties.FileMask);
int len = list.size();
for (int ndx = 0; ndx < len; ndx++)
{
entry = (com.jcraft.jsch.ChannelSftp.LsEntry)list.elementAt(ndx);
string fileName = entry.getFilename();
java.io.ByteArrayOutputStream byteArrayOStrm = new java.io.ByteArrayOutputStream();
this.sftpChannel.get(fileName, byteArrayOStrm);
sbyte[] sbytes = byteArrayOStrm.toByteArray();
byte[] bytes;
unchecked
{
bytes = (byte[])((Array)sbytes);
}
fs = new MemoryStream(bytes);
IBaseMessagePart part = this.messageFactory.CreateMessagePart();
part.Data = fs;
IBaseMessage message = this.messageFactory.CreateMessage();
message.AddPart(MESSAGE_BODY, part, true);
SystemMessageContext context = new SystemMessageContext(message.Context);
context.InboundTransportLocation = this.properties.Uri;
context.InboundTransportType = this.transportType;
files.Add(new BatchMessage(message, fileName, BatchOperationType.Submit));
}
if (files.Count > 0)
{
BatchInfo batchInfo = new BatchInfo(files, this.sftpChannel);
using (ReceiveBatch batch = new ReceiveBatch(this.transportProxy
, this.controlledTermination
, batchInfo.OnBatchComplete
, this.properties.MaximumNumberOfFiles))
{
foreach (BatchMessage file in files)
batch.SubmitMessage(file.Message, file.UserData);
batch.Done(null);
}
}
Transmitting Files: SFTP put
The BizTalk Adapter Framework calls this method in DotNetFileTransmitterEndpoint whenever a BTS message is available to a subscribing transmit location. The method readStreamToBuffer() copies the message body to an array of type sbyte.
public override IBaseMessage ProcessMessage(IBaseMessage message)
{
Stream source = message.BodyPart.Data;
DotNetFileTransmitProperties props = new DotNetFileTransmitProperties(message
, propertyNamespace);
if (props.Directory != this.currentPath)
{
this.currentPath = props.Directory;
string aPath = props.Directory.Substring(Path.GetPathRoot(props.Directory).Length);
this.sftpChannel.cd(“/”);
aPath = this.sftpChannel.realpath(aPath);
this.sftpChannel.cd(aPath);
}
string filePath = DotNetFileTransmitProperties.CreateFileName(message, props.Uri);
filePath = filePath.Remove(0, filePath.LastIndexOf(“\”) + 1);
sbyte[] sbytes = this.readStreamToBuffer(source);
java.io.ByteArrayInputStream inputStream = new java.io.ByteArrayInputStream(sbytes);
this.sftpChannel.put(inputStream, filePath);
return null;
}
Running the adapter
Testing the adapter is simple. For example, we can create an Ubuntu VM running in Amazon’s EC2 using a pre-configured Amazon Machine Image. Using the standard File Adapter and the SSH/SFTP Adapter we’ve just created, we can configure two send ports and two receive ports. Using simple routing, we can drop a file into a directory on the local Windows machine where a receive location routes the message to a send port configured with the SSH/SFTP prototype adapter. The file is transmitted to /home/myaccount/Downloads on the Linux VM where a second SSH/SFTP receive location grabs the file and routes it to a send port which drops it into a directory back on the local machine.
Wrap-up
We’ve shown how it’s straightforward to create a BizTalk SSH/SFTP adapter using JNBridgePro and the BizTalk Adapter Framework SDK. An adapter like this one can be used to allow BizTalk Server to read and write files securely to and from the cloud, and to communicate easily with Unix/Linux machines.
Note that the instructions and code that are given here are just a foundation—a production adapter will likely need to be enhanced with more hardened credential management, more flexible configuration options, and enhanced exception handling. The adapter can also be enhanced to support additional SSH functionality, including additional file manipulation and securely running applications on remote machines. Also, the adapter is targeted toward the Jsch implementation of SSH, but it is a simple matter to retarget it to other SSH implementations.
While the adapter should be enhanced for most production situations, what we’ve provided here provides a solid start that should allow you to create a useful BizTalk SSH adapter for real-world situations.
If interested, the source is here.