Calling the NI-DAQmx .NET API from Java
On this page
Introduction
This guide shows how JNBridgePro is used to build a Java application that acquires data from National Instruments DAQ hardware by calling the NI-DAQmx .NET API from Java. NI-DAQmx, NI’s driver for its data-acquisition devices, provides programming interfaces for C and for .NET — but not for Java (see why the Java gap exists, and why JNI isn’t the fix). We generate Java proxies for the NI-DAQmx .NET Framework class library, and a Java console application then uses them to create a DAQmx task, configure analog input channels and sample timing, and read voltage samples — driving the full acquisition pipeline directly from Java. The demo runs against a simulated device created in NI MAX, so no physical hardware is required; a physical device works identically.
JNBProxy’s demo project export does the Java-side setup automatically: it creates a Java project wired to the generated proxies and the JNBridgePro runtime, adds configuration files for both shared-memory and TCP communications, copies the .NET-side components, and generates scripts that build and run the demo with a single command. No manual project configuration is required.
What you’ll need
- A 64-bit Java JDK (JDK 21 or later recommended), and .NET Framework 4.8 (included with current versions of Windows).
- JNBridgePro v12.1 — download and install it from jnbridge.com; a free evaluation license is enough to run this demo.
- The NI-DAQmx driver with its .NET Framework support, and a DAQ device — a simulated one is fine. Both are covered in the next section.
NI-DAQmx is just the example. The same steps generate a proxy JAR for any .NET assembly: drop your own DLLs into the assembly list instead, expose the classes you need, and JNBProxy produces the JAR and a ready-to-run starter project around it in exactly the same way.
Installing NI-DAQmx and creating a simulated device
Download NI-DAQmx from ni.com (a free NI user account is required) and run the installer. On the Additional items screen, check the .NET Framework Languages Support items — depending on the NI-DAQmx version they are labeled .NET Framework 4.0 Languages Support and/or .NET Framework 4.5 Languages Support; select them all if unsure. They are not selected by default, and they install the NationalInstruments.DAQmx.dll class library that the proxies are generated from (the assemblies run on the .NET Framework 4.8 runtime). When the installer finishes, restart the computer — use Restart rather than Shut down, which with Windows Fast Startup enabled skips the full boot the NI driver services need.
Then create a simulated device: open NI MAX, right-click Devices and Interfaces → Create New… → Simulated NI-DAQmx Device or Modular Instrument, and pick X Series DAQ → PCIe-6363 (any device with analog inputs works). It appears as Dev1 with a yellow icon.
Finally, stage the NI .NET assemblies where they can be dragged into JNBProxy. The installer places them in the .NET Global Assembly Cache; this PowerShell copies the four the demo needs into a working folder, C:\NIAssemblies:
$dest = "C:\NIAssemblies"
New-Item -ItemType Directory -Force $dest | Out-Null
'NationalInstruments.DAQmx.dll','NationalInstruments.Common.dll',
'NationalInstruments.MStudioCLM.dll','NationalInstruments.NiLmClientDLL.dll' |
  ForEach-Object { Get-ChildItem "$env:windir\Microsoft.NET\assembly" -Recurse -Filter $_ |
    Sort-Object LastWriteTime -Descending | Select-Object -First 1 } |
  Copy-Item -Destination $dest
Generating the proxies
Launch JNBProxy, select Create new Java → .NET project in the launch dialog, and click OK (Figure 1). The main window (Figure 2) walks through proxy generation in four numbered panels: build an assembly list (1), load classes from it into the environment (2 and 3), choose the classes to expose (4), and build the proxy JAR. The project’s name and direction appear at the top right — Save stores the configuration as a project file for later — and progress and diagnostics appear in the Output pane at the bottom.

1Set up the assembly list
Drag the four NI assemblies from C:\NIAssemblies onto the drop target, or click Edit assembly list… and add them by path. NationalInstruments.DAQmx.dll is the assembly the proxies are generated from; the other three are dependencies it needs at load time. Added entries appear as chips at the top of the Assembly list panel (Figure 2).

2Load classes into the environment
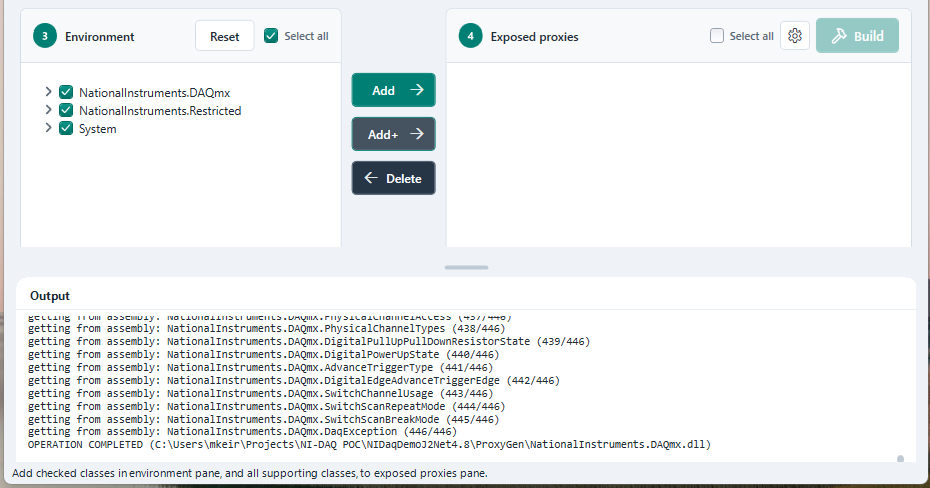
Open Add Classes from Assembly and choose NationalInstruments.DAQmx.dll (Figure 3). JNBProxy loads every class in the assembly — 446 of them — into the Environment tree, grouped by namespace; the Output pane logs each class and finishes with OPERATION COMPLETED. (To load only specific classes instead, use Add Classes from Assembly List and pick them by name.)

3Choose the classes to expose
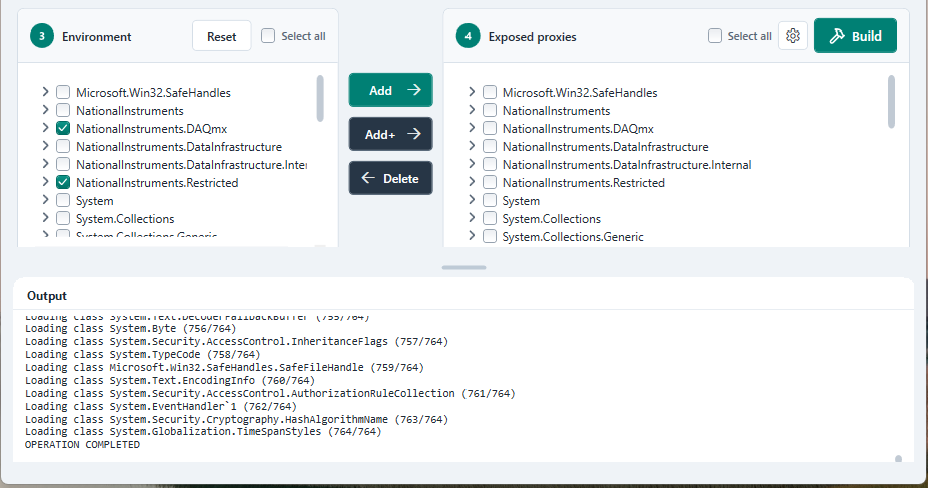
We want proxies for all of these classes: check Select all in the Environment panel (Figure 4) and click Add+, which adds every checked class — plus all supporting classes their signatures reference, drawn from the dependency assemblies — to the Exposed proxies pane. Here the supporting-class pass grows the set to 764 classes across the NationalInstruments, System, and Microsoft.Win32 namespaces (Figure 5).
4Build the proxy JAR
Click Build and choose a name and location for the JAR that will contain the generated proxies. Generation takes from a few seconds to a couple of minutes depending on the class count — here, about nine seconds; BUILD COMPLETED appears in the Output pane when it finishes.
Exporting a demo project
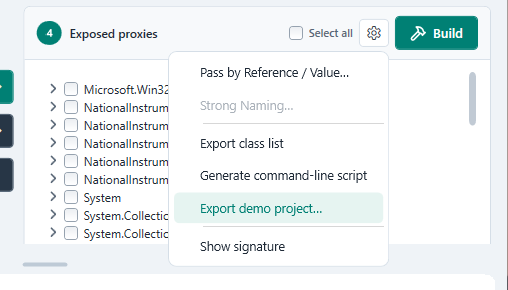
JNBProxy can now wrap the proxies in a complete, runnable Java project. In the Exposed proxies panel, open the gear menu and choose Export demo project… (Figure 6). Name the project — here, NiDaqDemoProxyDemo — pick its type (Java app calling .NET Framework 4.8 (Windows); .NET Core targets are under Advanced) and where to create it — here, C:\NiDaqDemo — and click Export (Figure 7).
Warning: Give the project a name that is different from the proxy JAR’s name — here the proxy is NiDaqDemoProxy.jar and the project is NiDaqDemoProxyDemo. If the two match, the project’s own build output collides with the proxy JAR and the demo fails at runtime.

The exported folder (Figure 8) contains everything the demo needs:
- NiDaqDemoProxyDemo\ — the Java side: MainClass.java (the entry point, exported as a stub), the generated proxy JAR, and the JNBridge Java-side runtime (jnbcore.jar, bcel);
- DotNet Side\ — the JNBridge .NET-side runtime (the JNBJavaEntry native DLLs, JNBShare.dll, and JNBDotNetSide.exe for TCP mode), copies of the assembly-list DLLs, and an optional class whitelist;
- env.bat — the Java locations used by the run scripts;
- sharedmemory.properties / tcp_binary_no_security.properties — configuration for each communication mode;
- buildAndRunSharedMem.bat / buildAndRunTCP.bat — one-click build and run for each mode;
- ReadMe.md — how the project fits together.

Running the demo
1Point env.bat at your JVM
Open env.bat (Figure 9) and set JAVA_HOME to your JDK root; JVM_DLL_64, the 64-bit jvm.dll used in shared-memory mode, is derived from JAVA_HOME by default.

2Prove the bridge
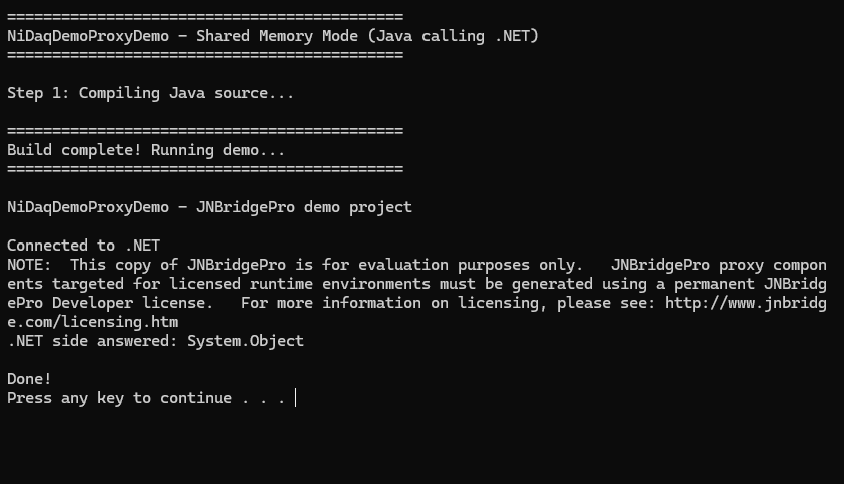
Double-click buildAndRunSharedMem.bat. It compiles the Java sources and runs MainClass with the shared-memory configuration. The exported MainClass starts as a stub that round-trips a call through the bridge using System.Object, which is included in every proxy JAR — the printed “.NET side answered: System.Object” means the bridge is up and the CLR is running inside the Java process (Figure 10).
3Add the demo code
Replace the contents of NiDaqDemoProxyDemo\MainClass.java with the following:
import com.jnbridge.jnbcore.DotNetSide;
import System.Exception;
import NationalInstruments.DAQmx.*;

public class MainClass
{
    private static final int SAMPLES_PER_CHANNEL = 100;
    private static final double SAMPLE_RATE_HZ = 1000.0;

    public static void main(String[] args) throws java.lang.Exception
    {
        System.out.println("Starting...");
        DotNetSide.init(args[0]);
        System.out.println("Connected to .NET");

        // Discover devices known to the NI-DAQmx driver
        DaqSystem daqSystem = DaqSystem.Get_Local();
        String[] devices = daqSystem.Get_Devices();
        if (devices == null || devices.length == 0)
        {
            System.err.println("No NI-DAQmx devices found. Create a simulated device in NI MAX first.");
            return;
        }
        for (String d : devices)
        {
            Device dev = daqSystem.LoadDevice(d);
            System.out.println("Found device: " + d + " (" + dev.Get_ProductType() + ")");
        }
        String deviceName = devices[0];

        System.out.println("Creating DAQmx task...");
        Task task = new Task();
        try
        {
            AIChannelCollection channels = task.Get_AIChannels();
            channels.CreateVoltageChannel(deviceName + "/ai0:3", "",
                    AITerminalConfiguration.Differential, -10.0, 10.0, AIVoltageUnits.Volts);
            task.Get_Timing().ConfigureSampleClock("", SAMPLE_RATE_HZ,
                    SampleClockActiveEdge.Rising, SampleQuantityMode.FiniteSamples, SAMPLES_PER_CHANNEL);
            task.Control(TaskAction.Verify);

            AnalogMultiChannelReader reader = new AnalogMultiChannelReader(task.Get_Stream());

            System.out.println("Starting acquisition...");
            task.Start();
            double[][] data = reader.ReadMultiSample(SAMPLES_PER_CHANNEL);   // [channel][sample]
            task.Stop();

            System.out.println("Read " + data[0].length + " samples on " + data.length + " channels:");
            for (int ch = 0; ch < data.length; ch++)
            {
                StringBuilder line = new StringBuilder(deviceName + "/ai" + ch + ":");
                for (int s = 0; s < Math.min(10, data[ch].length); s++)
                {
                    line.append(String.format(" %8.4f", data[ch][s]));
                }
                System.out.println(line.append(" ..."));
            }
        }
        catch (Exception ex)
        {
            System.err.println("DAQmx/.NET error:");
            printDotNetError(ex);
            throw ex;
        }
        finally
        {
            task.Dispose();
        }
        System.out.println("Done!");
    }

    // .NET exceptions cross the bridge wrapped (e.g. in TargetInvocationException);
    // walk InnerException to surface the underlying DAQmx message.
    private static void printDotNetError(Exception ex)
    {
        for (Exception cur = ex; cur != null; cur = cur.Get_InnerException())
        {
            System.err.println("  " + cur.Get_Message());
        }
    }
}
A few things worth noticing:
- Proxy packages match the .NET namespaces — we import NationalInstruments.DAQmx.* and use Task, DaqSystem, and AnalogMultiChannelReader exactly as they would be used in C#.
- .NET properties surface as methods with a Get_ prefix: task.Get_AIChannels(), task.Get_Timing(), DaqSystem.Get_Local().
- .NET string parameters accept java.lang.String directly; System.DotNetString is only needed where the .NET parameter type is System.Object.
- ReadMultiSample returns a .NET rectangular array double[,], which surfaces in Java as double[][], channel-major.
- .NET exceptions cross the bridge wrapped (for example in TargetInvocationException); printDotNetError walks Get_InnerException() to surface the underlying DAQmx error message.
4Run it
Run buildAndRunSharedMem.bat again. The console shows the device being found, each DAQmx step executing, and 100 voltage samples per channel printed from Java (Figure 11) — the simulated device produces a sine wave on every channel.

In shared-memory mode the .NET side runs inside the Java process — the CLR is loaded automatically before the first proxy call, so nothing needs to be started explicitly. It is the fastest communication mechanism and the simplest way to run the demo.
Using TCP/binary communications
The exported project can also run the .NET side as a separate process, communicating over TCP/binary. The difference is visible in the two properties files in the project folder. sharedmemory.properties hosts the CLR in the Java process, so it carries the .NET-side assembly list and the location of the native entry DLL:
dotNetSide.serverType=sharedmem
dotNetSide.assemblyList.1=DotNet Side/NationalInstruments.Common.dll
dotNetSide.assemblyList.2=DotNet Side/NationalInstruments.DAQmx.dll
dotNetSide.assemblyList.3=DotNet Side/NationalInstruments.MStudioCLM.dll
dotNetSide.assemblyList.4=DotNet Side/NationalInstruments.NiLmClientDLL.dll
dotNetSide.javaEntry=C:/NiDaqDemo/NiDaqDemoProxyDemo/DotNet Side/JNBJavaEntry_x64.dll
dotNetSide.appBase=DotNet Side
tcp_binary_no_security.properties only needs to say where the .NET side is listening:
dotNetSide.serverType=tcp
dotNetSide.host=localhost
dotNetSide.port=8086
In TCP mode the assembly list and the rest of the .NET-side configuration move to the .NET side: JNBDotNetSide.exe runs from the DotNet Side folder and reads its assembly list and port from JNBDotNetSide.exe.config. buildAndRunTCP.bat automates the whole sequence: build, start the .NET side, run the demo, and shut the .NET side down afterwards.
With TCP, the .NET side can also be restricted to serve only specific classes (class whitelisting — classWhiteList.txt and the useClassWhiteList / classWhiteListFile settings), and communications can be secured with SSL. See the Users’ Guide for both.
Summary
This demo drove NI data-acquisition hardware from Java in three short stages: JNBProxy generated Java proxies for the NI-DAQmx .NET classes; the demo project export wrapped them in a fully configured project; and the demo code dropped into MainClass.java and ran with a single script, over shared memory or TCP. A Java application creates DAQmx tasks, configures channels and timing, and reads live samples through the same .NET API NI supports for C# — and by allowing Java and .NET code to interoperate like this, JNBridgePro helps developers derive full value from platform libraries like NI-DAQmx as they build on the Java platform. The same three steps apply to any .NET assembly you need to reach from Java.