Connect Ignition to NI-DAQmx Without a Python/MQTT Sidecar

JNBridgePro — the fastest, easiest way to bridge Java and .NET in production. Generate proxies in minutes, call Java from C# (or C# from Java) with native syntax — trusted by enterprises worldwide. Learn more · Download free trial

Case Study Ignition 8.1 / 8.3 Java → .NET In-process, no sidecar

Plants that run Ignition SCADA often also own NI DAQ hardware from National Instruments — and those two worlds famously don’t meet. The accepted wisdom is that to connect Ignition to NI-DAQmx you must deploy a sidecar: a separate Python process reading the device and republishing data over MQTT or OPC UA. This case study shows the alternative everyone says doesn’t exist: an Ignition gateway module we built that calls the NI-DAQmx .NET API directly inside the gateway’s own JVM using JNBridgePro, and publishes readings as native Ignition tags. One process. No broker. No sidecar.

Two worlds that don’t meet

Ignition’s gateway is a Java application. NI-DAQmx — NI’s driver for its PCIe, USB, and CompactDAQ (cDAQ) hardware — exposes programmable APIs for C, .NET, and Python, but has never offered a Java API. There is no National Instruments driver module for Ignition, and the standard NI-DAQmx install contains no OPC UA server for Ignition’s OPC client to talk to. So a platform built on the JVM sits next to a driver whose supported interfaces are all somewhere else.

The Ignition community treats the direct route as a dead end. When a user asked the official forum, point-blank, whether Ignition can call a .NET assembly, the entire answer was:

“Not from inside Ignition (java vs .net).”

Inductive Automation forum, “Calling .NET assembly from Ignition”

The thread ended there. In every Ignition forum discussion we could find, bridging the gateway JVM to .NET is assumed impossible and never revisited.

What everyone builds instead: the sidecar

Because direct is “impossible,” the standing recommendation — including from Inductive Automation staff, when asked how to get NI USB-6211 data into Ignition — is middleware:

  • Python sidecar + MQTT: a separate Python program (the nidaqmx package) reads the device and republishes to a broker; Ignition subscribes. Three processes, two protocol hops, and a broker to babysit.
  • Python sidecar + OPC UA or HTTP: the same idea with a different transport — stand up a small OPC UA server or Flask app around the Python reader.
  • Commercial OPC middleware: a licensed OPC server in front of the hardware — still an extra hop, plus licensing.

These work — the forum thread above settled on Python + MQTT — but every variant adds processes to deploy and monitor, serializes every sample across a protocol boundary, and reduces the full NI-DAQmx API (timing, triggering, buffered reads) to whatever subset the sidecar chooses to expose.

The sidecar pattern (industry standard)

NI-DAQmx driver Python script MQTT broker Ignition gateway

3 processes · 2 protocol hops · every sample serialized twice

This module

Ignition tag system gateway module JNBridgePro shared memory NationalInstruments.DAQmx.dll

1 process · 0 hops — the .NET CLR runs inside the gateway JVM

The module: NI-DAQmx running inside Ignition

We built a standard Ignition gateway module (a .modl file, installed through the normal Config → Modules page) that uses JNBridgePro’s shared-memory transport to load the .NET CLR inside Ignition’s JVM, call NationalInstruments.DAQmx through generated Java proxies, and publish live readings through the Ignition SDK’s ManagedTagProvider — a native NI-DAQmx integration for Ignition, not a protocol relay. The Java-side technique is exactly the one from our NI-DAQmx from Java demo guide — same proxy JAR, same acquisition sequence — wrapped in about 300 lines of module glue.

Because the data enters Ignition through its native tag system rather than a protocol bridge, everything downstream just works: alarms, tag history, Perspective dashboards, transaction groups. The provider surfaces both the readings and the bridge’s own health:

TagMeaning
Bridge/StatusStarting / Running / Error: … / Stopped
Bridge/LastErrorMost recent error detail (walks .NET InnerExceptions)
Bridge/ReadCountCompleted polls since startup
Dev1/ProductTypeDevice model, e.g. PCIe-6363
Dev1/ai0…3/Value, Mean, Min, MaxPer-channel statistics over each 100-sample read

On a fault — device unplugged, driver error — the .NET exception detail lands in Bridge/LastError and the gateway log, value tags go stale (Bad_Stale quality), and the loop rebuilds the DAQmx task and recovers on its own.

How it works, in code

The acquisition loop is plain Java against the proxied .NET classes — recognizable to anyone who has used NI-DAQmx from C#:

DaqPollingService.java (condensed)
Task task = new Task();
task.Get_AIChannels().CreateVoltageChannel(device + "/ai0:3", "",
        AITerminalConfiguration.Differential, -10.0, 10.0, AIVoltageUnits.Volts);
task.Get_Timing().ConfigureSampleClock("", 1000.0,
        SampleClockActiveEdge.Rising, SampleQuantityMode.FiniteSamples, 100);
AnalogMultiChannelReader reader = new AnalogMultiChannelReader(task.Get_Stream());

while (running.get()) {
    task.Start();
    double[][] data = reader.ReadMultiSample(100);   // [channel][sample]
    task.Stop();
    publish(deviceName, data);                        // → Ignition tags
    Thread.sleep(pollPeriodMs);
}

Publishing is the Ignition SDK’s managed-provider API, nothing exotic:

NiDaqBridgeGatewayHook.java / TagPublisher.java (condensed)
provider = context.getTagManager().getOrCreateManagedProvider(
        ManagedTagProviderConfiguration.builder("NIDAQ")
                .persistTags(false)
                .allowTagCustomization(true)
                .build());
// per channel, each poll:
provider.configureTag("Dev1/ai0/Value", DataType.Float8);
provider.updateValue("Dev1/ai0/Value", volts, QualityCode.Good);

One architecture decision carries the whole design. JNI native libraries can be owned by only one classloader per JVM, and a loaded .NET CLR can never be unloaded — but Ignition modules are hot-reloadable, and every reinstall creates a fresh classloader. So the JNBridgePro runtime and proxy JARs do not ship inside the .modl: they sit on the gateway’s root classpath via three wrapper.java.classpath entries in ignition.conf, where they load once and live as long as the process. The .modl carries only the thin glue jar and can be upgraded freely; a system-property guard lets a reinstalled module reuse the already-loaded CLR:

ignition.conf additions
wrapper.java.additional.N=-Dignition.allowunsignedmodules=true
wrapper.java.additional.N=-Djnbridge.nidaq.config=C:/JNBridge-NIDaq/jnbridge-nidaq.properties
wrapper.java.classpath.N=C:/JNBridge-NIDaq/jnbcore.jar
wrapper.java.classpath.N=C:/JNBridge-NIDaq/bcel-6.10.0.jar
wrapper.java.classpath.N=C:/JNBridge-NIDaq/NIDAQmxProxies.jar

Verified on a live gateway

This isn’t a whiteboard exercise. The module was built against the Ignition SDK (8.3), installed on a stock Ignition 8.3.8 gateway on Windows, and run against a simulated PCIe-6363 created in NI MAX — the same no-hardware-required setup from the demo guide. The gateway log tells the story:

Ignition wrapper.log (excerpt)
NI-DAQmx bridge config (C:\JNBridge-NIDaq\jnbridge-nidaq.properties):
    device=(first found), channels=ai0:3, 100 samples @ 1000.0 Hz, poll every 1000 ms
Starting up module 'com.jnbridge.ignition.nidaq' v1.0.0 ...
NI-DAQmx acquisition started; tags publishing under provider 'NIDAQ'
NI-DAQmx bridge status: Starting
NI-DAQmx device found: Dev1 (PCIe-6363)
NI-DAQmx bridge status: Running

From there the NIDAQ provider appears in the Designer’s Tag Browser with Bridge/ReadCount incrementing once a second and live Value/Mean/Min/Max tags per channel — on our validation run the bridge polled for hours without a single error in the log. Both current Ignition lines can host it: 8.3, and 8.1 LTS from 8.1.33 (both bundle Java 17, which the full bridge pipeline passes on — verified on Azul Zulu 17, Ignition’s own JRE). The only version-specific code is five lines of provider configuration, since 8.1 uses ProviderConfiguration where 8.3 uses ManagedTagProviderConfiguration.builder — the SDK’s managed-tag-provider example shows both.

Why in-process beats a sidecar

  • Fewer moving parts. Nothing extra to deploy, monitor, or restart. No broker, no sidecar service, no per-sample serialize/deserialize.
  • Lower latency. Shared-memory in-process calls replace two network hops. Reads are block reads (100 samples per call), which is both DAQmx best practice and bridge-friendly.
  • The full API. The module speaks the complete NI-DAQmx .NET object model — timing, triggering, buffered acquisition — not the subset a sidecar happens to expose over MQTT topics.
  • Real diagnostics. DAQmx errors surface as .NET exception detail in the gateway log and a LastError tag, with tag quality going stale on faults — instead of a silently empty MQTT topic.
  • Native tags. Data enters through Ignition’s tag system, so alarming, history, and Perspective need no special handling.

A sidecar is still the right call in some architectures — if the DAQ box is remote from the gateway, a network hop is unavoidable, and our bridge vs REST vs gRPC comparison walks through that decision in general. But when the hardware and the gateway share a machine, inserting two protocol hops between a driver and its consumer is pure overhead.

💡

NI-DAQmx is the example, not the limit. The same pattern — proxy JAR on the root classpath, thin module glue, ManagedTagProvider — puts any .NET assembly in reach of an Ignition gateway: vendor SDKs that ship as DLLs, in-house .NET libraries, other instrument drivers. If Ignition needs data that only .NET can reach, it doesn’t need a sidecar to get it.

Build it yourself

Everything needed to connect NI DAQ hardware to Ignition this way is covered by existing material: the step-by-step demo guide shows how to generate the NI-DAQmx proxy JAR and run the same acquisition code from a console app (about 30 minutes, simulated device, no hardware), and the NI-DAQmx from Java overview shows the architecture interactively. From there, the module is glue: an AbstractGatewayModuleHook, a poll loop, and a ManagedTagProvider, with the JARs placed as described above. A JNBridgePro evaluation license is enough to run all of it.

Ignition talking to .NET, no sidecar Download JNBridgePro and start with the demo guide — or talk to us about the Ignition module POC.
Download JNBridgePro

FAQ

What is the best way to acquire data from an NI DAQ device in Ignition?

The standard advice is a Python sidecar republishing over MQTT or OPC UA — and when the DAQ hardware is remote from the gateway, that still makes sense. But when the device and the gateway share a machine, a gateway module that calls the NI-DAQmx .NET API in-process is simpler and faster: no broker, no extra processes, and readings land directly in Ignition’s tag system, as this case study’s module demonstrates.

Can Ignition call a .NET assembly?

Yes — despite the community’s standing answer of “not from inside Ignition.” A gateway module can use JNBridgePro to load the .NET CLR inside the gateway JVM and use any .NET DLL through generated Java proxies (JNA, the usual suggestion for native libraries in Ignition, only handles C-linkage DLLs — not .NET assemblies). This case study’s module does exactly that with NationalInstruments.DAQmx, verified on Ignition 8.3.8.

Does this need MQTT, OPC UA, or any middleware?

No. The .NET side runs in-process with the gateway over JNBridgePro’s shared-memory transport, and readings enter Ignition directly as managed tags. There is no broker, no separate server, and no additional process to operate.

Which Ignition versions can host the bridge?

Ignition 8.3 and 8.1 LTS from 8.1.33 onward — both bundle Java 17, on which the full bridge pipeline is verified. The only version-specific code is the five-line tag-provider configuration (the 8.1 and 8.3 SDKs differ there).

What happens when the module is reinstalled or upgraded?

The JNBridgePro runtime and proxy JARs live on the gateway’s root classpath, not inside the .modl, so the CLR loads once per process and survives module hot-reloads. The .modl itself is a thin glue jar that can be upgraded freely; an init guard reuses the already-loaded CLR.

Do I need real DAQ hardware to try this?

No — a simulated device created in NI MAX behaves like real hardware, produces sine-wave data on every analog-input channel, and is exactly what our validation used (a simulated PCIe-6363). Code developed against it runs unchanged on physical devices.

How to Use NI-DAQmx from Java Without JNI

JNBridgePro — the fastest, easiest way to bridge Java and .NET in production. Generate proxies in minutes, call Java from C# (or C# from Java) with native syntax — trusted by enterprises worldwide. Learn more · Download free trial

Problem / Solution Java → .NET NI-DAQmx No JNI required

If you need to use NI-DAQmx from Java, you’ve probably already discovered the problem: National Instruments ships programming interfaces for C, .NET, Python, and LabVIEW — but not for Java. The traditional workaround is to build a JNI wrapper around the driver’s C API, which is exactly the kind of code most teams regret owning. This article explains why the Java gap exists, what the JNI route really costs, and how JNBridgePro closes the gap a different way: by letting your Java code call the NI-DAQmx .NET class library directly — no JNI, no C glue, no rewrites.

Why NI-DAQmx has no Java API

NI-DAQmx — NI’s driver for its data-acquisition hardware — has never included an official Java API. The driver exposes an ANSI C API, a .NET class library for C# and Visual Basic (NationalInstruments.DAQmx), an official Python package (nidaqmx, a wrapper over the C API), and native LabVIEW support. Java has never been on the list.

That’s not an oversight so much as a reflection of where test and measurement historically lived: LabVIEW first, then C/C++ and .NET on Windows. Supporting Java properly would mean NI maintaining its own native bridging layer across JVM versions and vendors — a significant ongoing cost for a market it never targeted. A handful of community-built Java wrappers have appeared over the years, but they typically cover a small slice of the API and most are dormant.

The gap matters more than it used to. Java is everywhere DAQ data wants to go — lab-automation backends, test-stand orchestration, LIMS and enterprise systems, JVM-based data pipelines. Those teams face an unwelcome choice: rewrite the acquisition layer in another language, stand up a separate service just to move samples, or drop down to JNI.

The JNI route — and why teams avoid it

The Java Native Interface is the JDK’s official mechanism for calling native code, so on paper it solves the problem: write C glue that calls the DAQmx C API — DAQmxCreateTask, DAQmxCreateAIVoltageChan, DAQmxReadAnalogF64 and friends — and expose it to Java through native methods. In practice, here’s what you’ve signed up for:

  • Hand-written glue for every call. Each DAQmx function you use needs a native method declaration, a C implementation, and hand-rolled marshaling for its arguments — task handles, channel strings, sample buffers, timeouts.
  • Manual memory and buffer management. Multi-channel reads fill raw C arrays that you copy into Java arrays yourself, on every read, with the layout math on you.
  • Error handling from scratch. The C API reports numeric status codes; turning them into meaningful Java exceptions is your job.
  • One pointer mistake takes down the JVM. A bad native call doesn’t throw — it crashes the entire process, taking your application with it.
  • A maintenance tail that never ends. Every driver update, JDK upgrade, and 32/64-bit wrinkle means rebuilding and re-testing the glue layer. Asynchronous callbacks (say, EveryNSamples events) are harder still to carry across the boundary safely.

Newer bindings such as JNA or the Java Foreign Function & Memory API remove the hand-written C — but not the real problem. You’re still binding hundreds of procedural C functions one at a time, still managing raw handles and buffers, and still the sole owner of that layer forever. Either way you’re rebuilding, in Java, an API that NI already builds and maintains — the catch being that NI’s modern, object-oriented version of it ships for .NET, not Java.

Which suggests the actual solution: don’t rebuild the API. Reach the one NI already supports.

The solution: call the NI-DAQmx .NET API from Java

JNBridgePro connects the JVM and the .NET CLR directly, so Java code can use .NET classes as if they were Java classes. Applied to NI-DAQmx, that means your Java application programs against NationalInstruments.DAQmx — the same first-class, object-oriented API that C# developers use, with tasks, channel collections, readers, and events — instead of a hand-built binding to the C driver.

It works through generated proxies. JNBridgePro’s proxy generator, JNBProxy, is pointed at NationalInstruments.DAQmx.dll and emits a JAR of Java proxy classes mirroring the .NET object model — classes, methods, properties, enums, inheritance, the lot. Add that JAR to your classpath and the .NET API becomes ordinary Java. At runtime, the JNBridgePro runtime carries each call across to the CLR and returns the result.

What the Java code looks like

This is a condensed version of the working demo — plain Java that discovers a device, configures a four-channel analog-input task, and reads 100 voltage samples per channel:

AnalogInDemo.java
import com.jnbridge.jnbcore.DotNetSide;
import NationalInstruments.DAQmx.*;

public class AnalogInDemo
{
    public static void main(String[] args) throws java.lang.Exception
    {
        DotNetSide.init("sharedmemory.properties");   // start the bridge

        Task task = new Task();
        task.Get_AIChannels().CreateVoltageChannel("Dev1/ai0:3", "",
                AITerminalConfiguration.Differential, -10.0, 10.0, AIVoltageUnits.Volts);
        task.Get_Timing().ConfigureSampleClock("", 1000.0,
                SampleClockActiveEdge.Rising, SampleQuantityMode.FiniteSamples, 100);

        AnalogMultiChannelReader reader = new AnalogMultiChannelReader(task.Get_Stream());
        task.Start();
        double[][] data = reader.ReadMultiSample(100);   // [channel][sample]
        task.Stop();
        task.Dispose();

        System.out.println("Read " + data[0].length + " samples on " + data.length + " channels");
    }
}

A few things worth noticing:

  • The proxy packages mirror the .NET namespaces — the code imports NationalInstruments.DAQmx.* and uses Task, AnalogMultiChannelReader, and the DAQmx enums exactly as C# would.
  • .NET properties surface as methods with a Get_/Set_ prefix: task.Get_AIChannels(), task.Get_Timing().
  • The .NET rectangular array double[,] returned by ReadMultiSample surfaces in Java as double[][], channel-major.
  • .NET exceptions cross the bridge as catchable Java exceptions — a bad channel string produces a DAQmx error message in a Java catch block, not a process crash.

There is no JNI anywhere in this code, and none for you to write elsewhere: the native interop lives inside JNBridgePro’s supported runtime, not in project code you own. When NI updates the driver, you regenerate the proxy JAR — a build step, not an engineering project.

How the bridge works

Proxy generation happens once, at build time. At runtime, the JNBridgePro runtime connects the two sides in whichever of two configurations fits your deployment: shared memory, where the CLR is hosted inside the Java process for the fastest possible calls, or TCP/binary, where the .NET side runs as a separate process — even on a separate machine — which also opens up options like class whitelisting and SSL. Switching between them is a configuration-file change, not a code change.

For a visual version of this architecture — including an interactive diagram of the call path from Java code to NI hardware — see the How It Works section of our NI-DAQmx from Java page. And this pattern isn’t DAQmx-specific: the same proxy generation works for any .NET assembly you need to call from Java. If you’re weighing a bridge against putting a REST or gRPC service in front of the driver, our bridge vs REST vs gRPC comparison covers the trade-offs — for high-rate, method-level access to a hardware driver on the same machine, per-call network hops are a hard sell.

Try it yourself

Everything above runs against a simulated device created in NI MAX, so you can try it with no DAQ hardware on your desk — the simulated device produces a sine wave on every analog-input channel, and a physical device works identically. Our step-by-step demo guide walks through the whole thing: installing NI-DAQmx with .NET support, creating the simulated device, generating the proxy JAR, and exporting a ready-to-run Java project — about 30 minutes end to end. If you’d rather see it before building it, the NI-DAQmx from Java overview page shows the demo in action.

Skip the JNI project entirely Download JNBridgePro v12.1 with a free evaluation license and follow the demo guide — from install to voltage samples in Java in about 30 minutes.
Download JNBridgePro

FAQ

Does NI-DAQmx support Java?

No. NI-DAQmx officially supports C, .NET (C# and Visual Basic), Python, and LabVIEW. There is no official Java API, and community wrappers are partial and largely unmaintained. The practical route to NI-DAQmx from Java is bridging to one of the supported APIs — JNBridgePro does this against the .NET class library.

Can I use NI-DAQmx from Java without writing JNI code?

Yes. JNBridgePro generates Java proxy classes for the NI-DAQmx .NET assembly, so your Java code calls Task, AnalogMultiChannelReader, and the rest of the DAQmx object model directly. You write no JNI, no C, and no C# — the native interop is handled inside JNBridgePro’s runtime.

Do I need real DAQ hardware to try it?

No. NI MAX can create simulated NI-DAQmx devices that behave like real hardware — the demo guide uses a simulated PCIe-6363 and reads sine-wave samples from it. Code written against a simulated device runs unchanged on a physical one.

Is it fast enough for real acquisition work?

Yes, used the way DAQmx is meant to be used: the driver buffers samples in hardware and you read them in blocks (ReadMultiSample), so the bridge carries one call per block, not per sample. In shared-memory mode the CLR runs inside the Java process, making that per-call overhead very small. As with every DAQmx language binding, per-sample chattiness is the anti-pattern — block reads are both the DAQmx best practice and the bridge-friendly pattern.

Does this only work for NI-DAQmx?

No — NI-DAQmx is just the example. The same proxy generation works for any .NET assembly: other NI class libraries, vendor SDKs that ship as DLLs, or your own in-house .NET code. If a capability exists in .NET and you need it from Java, the same three steps apply. It even works inside other JVM applications — see how we connected Ignition SCADA to NI-DAQmx with a gateway module, no Python/MQTT sidecar required.

Calling the NI-DAQmx .NET API from Java

JNBridgePro — the fastest, easiest way to bridge Java and .NET in production. Generate proxies in minutes, call Java from C# (or C# from Java) with native syntax — trusted by enterprises worldwide. Learn more · Download free trial

JNBridgePro Demo Guide Version 12.1 Java → .NET No hardware required

Introduction

This guide shows how JNBridgePro is used to build a Java application that acquires data from National Instruments DAQ hardware by calling the NI-DAQmx .NET API from Java. NI-DAQmx, NI’s driver for its data-acquisition devices, provides programming interfaces for C and for .NET — but not for Java (see why the Java gap exists, and why JNI isn’t the fix). We generate Java proxies for the NI-DAQmx .NET Framework class library, and a Java console application then uses them to create a DAQmx task, configure analog input channels and sample timing, and read voltage samples — driving the full acquisition pipeline directly from Java. The demo runs against a simulated device created in NI MAX, so no physical hardware is required; a physical device works identically.

JNBProxy’s demo project export does the Java-side setup automatically: it creates a Java project wired to the generated proxies and the JNBridgePro runtime, adds configuration files for both shared-memory and TCP communications, copies the .NET-side components, and generates scripts that build and run the demo with a single command. No manual project configuration is required.

What you’ll need

  • A 64-bit Java JDK (JDK 21 or later recommended), and .NET Framework 4.8 (included with current versions of Windows).
  • JNBridgePro v12.1 — download and install it from jnbridge.com; a free evaluation license is enough to run this demo.
  • The NI-DAQmx driver with its .NET Framework support, and a DAQ device — a simulated one is fine. Both are covered in the next section.
💡

NI-DAQmx is just the example. The same steps generate a proxy JAR for any .NET assembly: drop your own DLLs into the assembly list instead, expose the classes you need, and JNBProxy produces the JAR and a ready-to-run starter project around it in exactly the same way.

Installing NI-DAQmx and creating a simulated device

Download NI-DAQmx from ni.com (a free NI user account is required) and run the installer. On the Additional items screen, check the .NET Framework Languages Support items — depending on the NI-DAQmx version they are labeled .NET Framework 4.0 Languages Support and/or .NET Framework 4.5 Languages Support; select them all if unsure. They are not selected by default, and they install the NationalInstruments.DAQmx.dll class library that the proxies are generated from (the assemblies run on the .NET Framework 4.8 runtime). When the installer finishes, restart the computer — use Restart rather than Shut down, which with Windows Fast Startup enabled skips the full boot the NI driver services need.

Then create a simulated device: open NI MAX, right-click Devices and InterfacesCreate New…Simulated NI-DAQmx Device or Modular Instrument, and pick X Series DAQ → PCIe-6363 (any device with analog inputs works). It appears as Dev1 with a yellow icon.

Finally, stage the NI .NET assemblies where they can be dragged into JNBProxy. The installer places them in the .NET Global Assembly Cache; this PowerShell copies the four the demo needs into a working folder, C:\NIAssemblies:

PowerShell
$dest = "C:\NIAssemblies"
New-Item -ItemType Directory -Force $dest | Out-Null
'NationalInstruments.DAQmx.dll','NationalInstruments.Common.dll',
'NationalInstruments.MStudioCLM.dll','NationalInstruments.NiLmClientDLL.dll' |
  ForEach-Object { Get-ChildItem "$env:windir\Microsoft.NET\assembly" -Recurse -Filter $_ |
    Sort-Object LastWriteTime -Descending | Select-Object -First 1 } |
  Copy-Item -Destination $dest

Generating the proxies

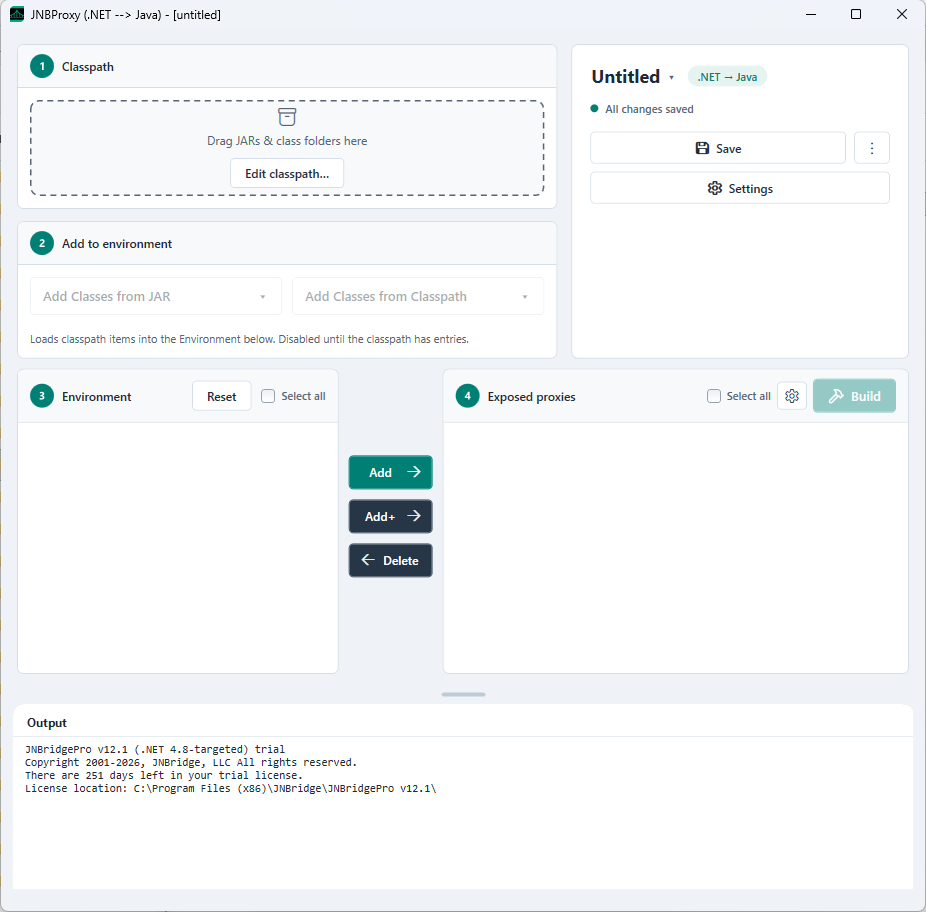
Launch JNBProxy, select Create new Java → .NET project in the launch dialog, and click OK (Figure 1). The main window (Figure 2) walks through proxy generation in four numbered panels: build an assembly list (1), load classes from it into the environment (2 and 3), choose the classes to expose (4), and build the proxy JAR. The project’s name and direction appear at the top right — Save stores the configuration as a project file for later — and progress and diagnostics appear in the Output pane at the bottom.
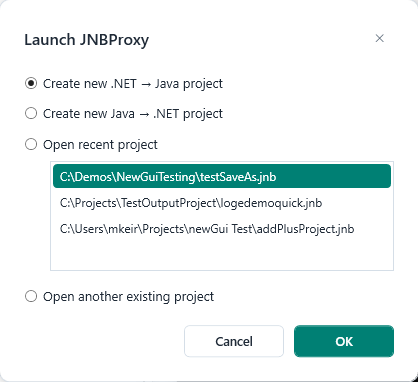
The Launch JNBProxy dialog with Create new Java to .NET project selected
Figure 1 — The Launch JNBProxy dialog

1Set up the assembly list

Drag the four NI assemblies from C:\NIAssemblies onto the drop target, or click Edit assembly list… and add them by path. NationalInstruments.DAQmx.dll is the assembly the proxies are generated from; the other three are dependencies it needs at load time. Added entries appear as chips at the top of the Assembly list panel (Figure 2).

The JNBProxy main window with the four NI assemblies in the assembly list
Figure 2 — The main window, with the four NI assemblies in the assembly list

2Load classes into the environment

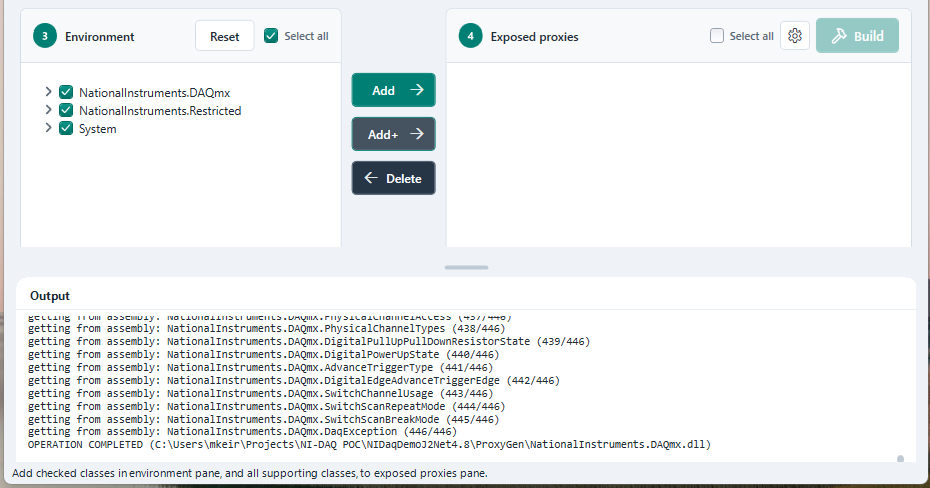
Open Add Classes from Assembly and choose NationalInstruments.DAQmx.dll (Figure 3). JNBProxy loads every class in the assembly — 446 of them — into the Environment tree, grouped by namespace; the Output pane logs each class and finishes with OPERATION COMPLETED. (To load only specific classes instead, use Add Classes from Assembly List and pick them by name.)

Loading every class from NationalInstruments.DAQmx.dll via Add Classes from Assembly
Figure 3 — Loading every class from NationalInstruments.DAQmx.dll

3Choose the classes to expose

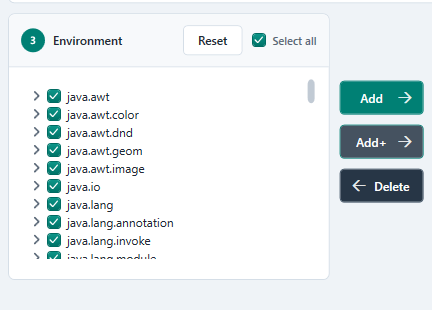
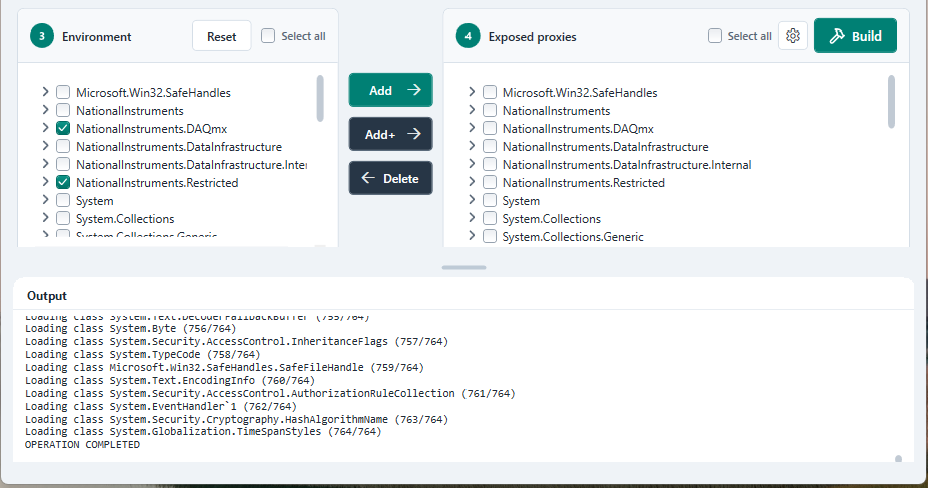
We want proxies for all of these classes: check Select all in the Environment panel (Figure 4) and click Add+, which adds every checked class — plus all supporting classes their signatures reference, drawn from the dependency assemblies — to the Exposed proxies pane. Here the supporting-class pass grows the set to 764 classes across the NationalInstruments, System, and Microsoft.Win32 namespaces (Figure 5).

The Environment tree loaded with all NI-DAQmx classes and Select all checked
Figure 4 — The Environment tree loaded, with Select all checked
Environment and Exposed proxies panes after Add+, showing 764 classes
Figure 5 — Environment and Exposed proxies after Add+

4Build the proxy JAR

Click Build and choose a name and location for the JAR that will contain the generated proxies. Generation takes from a few seconds to a couple of minutes depending on the class count — here, about nine seconds; BUILD COMPLETED appears in the Output pane when it finishes.

Exporting a demo project

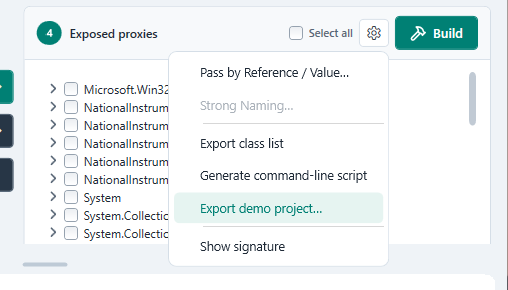
JNBProxy can now wrap the proxies in a complete, runnable Java project. In the Exposed proxies panel, open the gear menu and choose Export demo project… (Figure 6). Name the project — here, NiDaqDemoProxyDemo — pick its type (Java app calling .NET Framework 4.8 (Windows); .NET Core targets are under Advanced) and where to create it — here, C:\NiDaqDemo — and click Export (Figure 7).

⚠️

Warning: Give the project a name that is different from the proxy JAR’s name — here the proxy is NiDaqDemoProxy.jar and the project is NiDaqDemoProxyDemo. If the two match, the project’s own build output collides with the proxy JAR and the demo fails at runtime.

Export demo project command in the Exposed proxies gear menu
Figure 6 — Export demo project… in the gear menu
The Export demo project dialog naming the project and choosing its type and location
Figure 7 — Naming the project and choosing its type and location

The exported folder (Figure 8) contains everything the demo needs:

  • NiDaqDemoProxyDemo\ — the Java side: MainClass.java (the entry point, exported as a stub), the generated proxy JAR, and the JNBridge Java-side runtime (jnbcore.jar, bcel);
  • DotNet Side\ — the JNBridge .NET-side runtime (the JNBJavaEntry native DLLs, JNBShare.dll, and JNBDotNetSide.exe for TCP mode), copies of the assembly-list DLLs, and an optional class whitelist;
  • env.bat — the Java locations used by the run scripts;
  • sharedmemory.properties / tcp_binary_no_security.properties — configuration for each communication mode;
  • buildAndRunSharedMem.bat / buildAndRunTCP.bat — one-click build and run for each mode;
  • ReadMe.md — how the project fits together.
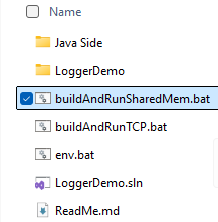
The exported demo project folder in File Explorer
Figure 8 — The exported project

Running the demo

1Point env.bat at your JVM

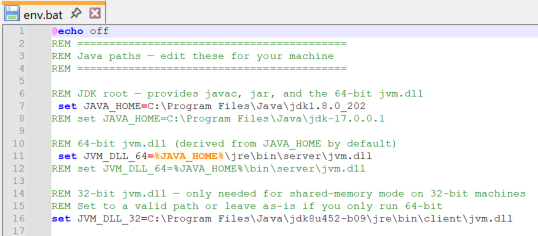
Open env.bat (Figure 9) and set JAVA_HOME to your JDK root; JVM_DLL_64, the 64-bit jvm.dll used in shared-memory mode, is derived from JAVA_HOME by default.

env.bat with JAVA_HOME and JVM_DLL_64 settings
Figure 9 — env.bat

2Prove the bridge

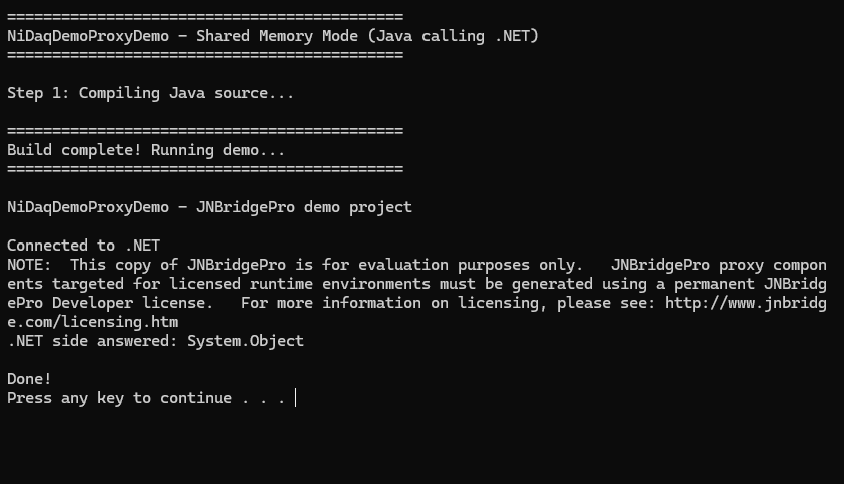
Double-click buildAndRunSharedMem.bat. It compiles the Java sources and runs MainClass with the shared-memory configuration. The exported MainClass starts as a stub that round-trips a call through the bridge using System.Object, which is included in every proxy JAR — the printed “.NET side answered: System.Object” means the bridge is up and the CLR is running inside the Java process (Figure 10).

Console output of the exported stub proving the bridge: .NET side answered System.Object
Figure 10 — The exported stub proving the bridge

3Add the demo code

Replace the contents of NiDaqDemoProxyDemo\MainClass.java with the following:

MainClass.java
import com.jnbridge.jnbcore.DotNetSide;
import System.Exception;
import NationalInstruments.DAQmx.*;

public class MainClass
{
    private static final int SAMPLES_PER_CHANNEL = 100;
    private static final double SAMPLE_RATE_HZ = 1000.0;

    public static void main(String[] args) throws java.lang.Exception
    {
        System.out.println("Starting...");
        DotNetSide.init(args[0]);
        System.out.println("Connected to .NET");

        // Discover devices known to the NI-DAQmx driver
        DaqSystem daqSystem = DaqSystem.Get_Local();
        String[] devices = daqSystem.Get_Devices();
        if (devices == null || devices.length == 0)
        {
            System.err.println("No NI-DAQmx devices found. Create a simulated device in NI MAX first.");
            return;
        }
        for (String d : devices)
        {
            Device dev = daqSystem.LoadDevice(d);
            System.out.println("Found device: " + d + " (" + dev.Get_ProductType() + ")");
        }
        String deviceName = devices[0];

        System.out.println("Creating DAQmx task...");
        Task task = new Task();
        try
        {
            AIChannelCollection channels = task.Get_AIChannels();
            channels.CreateVoltageChannel(deviceName + "/ai0:3", "",
                    AITerminalConfiguration.Differential, -10.0, 10.0, AIVoltageUnits.Volts);
            task.Get_Timing().ConfigureSampleClock("", SAMPLE_RATE_HZ,
                    SampleClockActiveEdge.Rising, SampleQuantityMode.FiniteSamples, SAMPLES_PER_CHANNEL);
            task.Control(TaskAction.Verify);

            AnalogMultiChannelReader reader = new AnalogMultiChannelReader(task.Get_Stream());

            System.out.println("Starting acquisition...");
            task.Start();
            double[][] data = reader.ReadMultiSample(SAMPLES_PER_CHANNEL);   // [channel][sample]
            task.Stop();

            System.out.println("Read " + data[0].length + " samples on " + data.length + " channels:");
            for (int ch = 0; ch < data.length; ch++)
            {
                StringBuilder line = new StringBuilder(deviceName + "/ai" + ch + ":");
                for (int s = 0; s < Math.min(10, data[ch].length); s++)
                {
                    line.append(String.format(" %8.4f", data[ch][s]));
                }
                System.out.println(line.append(" ..."));
            }
        }
        catch (Exception ex)
        {
            System.err.println("DAQmx/.NET error:");
            printDotNetError(ex);
            throw ex;
        }
        finally
        {
            task.Dispose();
        }
        System.out.println("Done!");
    }

    // .NET exceptions cross the bridge wrapped (e.g. in TargetInvocationException);
    // walk InnerException to surface the underlying DAQmx message.
    private static void printDotNetError(Exception ex)
    {
        for (Exception cur = ex; cur != null; cur = cur.Get_InnerException())
        {
            System.err.println("  " + cur.Get_Message());
        }
    }
}

A few things worth noticing:

  • Proxy packages match the .NET namespaces — we import NationalInstruments.DAQmx.* and use Task, DaqSystem, and AnalogMultiChannelReader exactly as they would be used in C#.
  • .NET properties surface as methods with a Get_ prefix: task.Get_AIChannels(), task.Get_Timing(), DaqSystem.Get_Local().
  • .NET string parameters accept java.lang.String directly; System.DotNetString is only needed where the .NET parameter type is System.Object.
  • ReadMultiSample returns a .NET rectangular array double[,], which surfaces in Java as double[][], channel-major.
  • .NET exceptions cross the bridge wrapped (for example in TargetInvocationException); printDotNetError walks Get_InnerException() to surface the underlying DAQmx error message.

4Run it

Run buildAndRunSharedMem.bat again. The console shows the device being found, each DAQmx step executing, and 100 voltage samples per channel printed from Java (Figure 11) — the simulated device produces a sine wave on every channel.

Console output showing 100 voltage samples per channel read from Java via NI-DAQmx
Figure 11 — Voltage samples from the simulated device, read from Java

In shared-memory mode the .NET side runs inside the Java process — the CLR is loaded automatically before the first proxy call, so nothing needs to be started explicitly. It is the fastest communication mechanism and the simplest way to run the demo.

Using TCP/binary communications

The exported project can also run the .NET side as a separate process, communicating over TCP/binary. The difference is visible in the two properties files in the project folder. sharedmemory.properties hosts the CLR in the Java process, so it carries the .NET-side assembly list and the location of the native entry DLL:

sharedmemory.properties
dotNetSide.serverType=sharedmem
dotNetSide.assemblyList.1=DotNet Side/NationalInstruments.Common.dll
dotNetSide.assemblyList.2=DotNet Side/NationalInstruments.DAQmx.dll
dotNetSide.assemblyList.3=DotNet Side/NationalInstruments.MStudioCLM.dll
dotNetSide.assemblyList.4=DotNet Side/NationalInstruments.NiLmClientDLL.dll
dotNetSide.javaEntry=C:/NiDaqDemo/NiDaqDemoProxyDemo/DotNet Side/JNBJavaEntry_x64.dll
dotNetSide.appBase=DotNet Side

tcp_binary_no_security.properties only needs to say where the .NET side is listening:

tcp_binary_no_security.properties
dotNetSide.serverType=tcp
dotNetSide.host=localhost
dotNetSide.port=8086

In TCP mode the assembly list and the rest of the .NET-side configuration move to the .NET side: JNBDotNetSide.exe runs from the DotNet Side folder and reads its assembly list and port from JNBDotNetSide.exe.config. buildAndRunTCP.bat automates the whole sequence: build, start the .NET side, run the demo, and shut the .NET side down afterwards.

With TCP, the .NET side can also be restricted to serve only specific classes (class whitelisting — classWhiteList.txt and the useClassWhiteList / classWhiteListFile settings), and communications can be secured with SSL. See the Users’ Guide for both.

Summary

This demo drove NI data-acquisition hardware from Java in three short stages: JNBProxy generated Java proxies for the NI-DAQmx .NET classes; the demo project export wrapped them in a fully configured project; and the demo code dropped into MainClass.java and ran with a single script, over shared memory or TCP. A Java application creates DAQmx tasks, configures channels and timing, and reads live samples through the same .NET API NI supports for C# — and by allowing Java and .NET code to interoperate like this, JNBridgePro helps developers derive full value from platform libraries like NI-DAQmx as they build on the Java platform. The same three steps apply to any .NET assembly you need to reach from Java.

Run it yourself Download JNBridgePro v12.1 with a free evaluation license, or see the NI-DAQmx from Java overview for the bigger picture.
Download JNBridgePro