
Azure Logic Apps Connector for JMS
Create a Custom Azure Logic App Connector using the JNBridge JMS Adapter for .NET

JNBridge R&D Showcase
Introduction
An Azure Logic App is a cloud service that automates and orchestrates tasks, business processes and workflows enabling integration of data, systems and services across the enterprise. Visually, a Logic App is a workflow built by linking together functional components such as connectors, flow controls and data conversion in the Azure portal. Here’s the Logic App that will be built in this R&D Showcase kit. It will consume a JMS text message from a queue, modify the text from that message and then publish a text message to another queue.
The key component in this workflow is the Azure Logic App Custom Connector that provides actions that map to JMS operations like consuming and publishing messages. This kit will show the reader how to build a custom connector using the JNBridge JMS Adapter for .NET to provide a back-end WCF service hosted in IIS. The API exposed by the service is called by the custom connector.
This kit is a continuation of two previous blog posts, Creating WCF Services using the .NET JMS Adapter–Part 1 and Creating WCF Services using the .NET JMS Adapter–Part 2. The second blog in the series will be our starting point. In that blog, the JMS Adapter for .NET was used to create a WCF Channel Listener service that consumed messages from a JMS destination. We’ll add another WCF Service similar to that built in the first blog post. It is the new service that will be used by the custom connector.
Overview
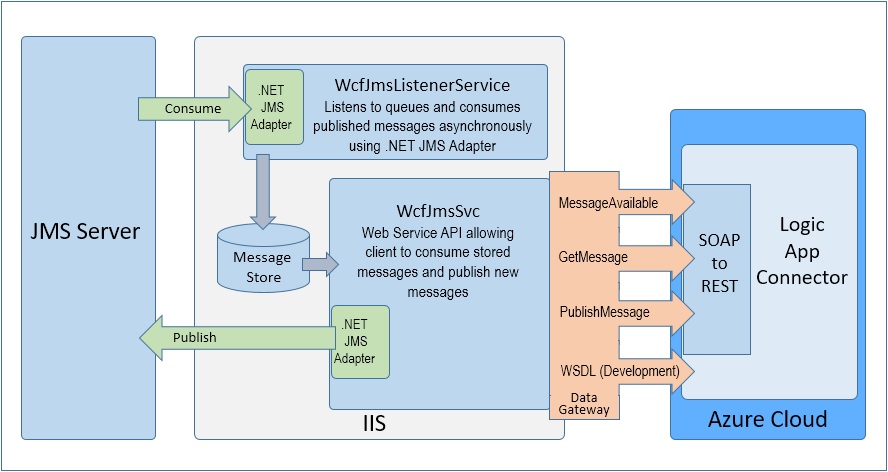
A Logic App Custom Connector is simply a graphical interface to any service that exposes a REST API. Since the WCF based service in this example exposes a SOAP interface, this example makes use of the SOAP-to-REST protocol translation feature in the Custom Connector architecture. The service is hosted on-premise in IIS, though the service could just as easily be hosted in Azure. Likewise, the on-premise JMS broker could also be hosted in Azure. The Azure On-Premise Data Gateway provides secure access to on-premise services, but would not be necessary if the WCF service were hosted in Azure.
The WcfJmsListenerService uses the .NET JMS Adapter to consume messages from the JMS broker and store them in memory. This service does not expose an interface. The WcfJmsSvc service exposes a SOAP interface to consume the stored messages and publish new messages, using the .NET Adapter, directly to the JMS broker.
Prerequisites
Building this example requires the JNBridge JMS Adapter for .NET and Visual Studio 2015. Deployment requires IIS 7.5, or later, and AppFabric for Windows Server. As before in Part 1 & 2, ActiveMQ will be the JMS implementation. Building the custom connector requires an Azure account and an Azure Resource Group to contain all the resources. While the WCF services can be hosted in Azure along with the ActiveMQ implementation, this example will use a local IIS and ActiveMQ broker. So the Logic App Connector can access the WCF service, it is necessary to install the Azure On-Premise Data Gateway for Logic Apps on the IIS machine. Here’s an excellent blog post that describes how to install and configure the gateway on the local machine. Finally, it might be useful to peruse Parts 1 & 2 in this blog series. The code in this kit is available for download here.
Create the Outbound Binding
Using Visual Studio 2015, open the WCF Service project created in Part 2. Open the Add Adapter Service Reference dialog from Visual Studio’s Project menu. This dialog consumes any WCFLOB adapter allowing the developer to choose individual messaging operations. As in Part 1 of this blog series, remember to use the Configure Adapter dialog to choose ActiveMQ as the JMS implementation and to toggle the property, Work Off Line, to true. As shown, a single generic operation has been chosen, SendText(). This operation will publish a JMS Text message to a specified JMS queue. In addition, the field, Filename prefix, contains the prefix, WcfJmsPublisher.

Clicking OK will create the source file, WcfJmsPublisherClient.cs, and modify the Web.config file. Note that Visual Studio will immediately complain that the default namespace has become polluted because of two different interfaces with the same name, JNBridgeJMSAdapter. The simplest solution is to add a namespace declaration to encapsulate the interface source in the file, WcfJmsPublisherClient.cs. Edit the file, adding the namespace, WcfJmsPublisher, as shown below.
[code language=”csharp”]
namespace WcfJmsPublisher
{
[System.CodeDom.Compiler.GeneratedCodeAttribute("System.ServiceModel", "4.0.0.0")]
[System.ServiceModel.ServiceContractAttribute(
Namespace = "jms://JNBridge.JMSAdapter",
ConfigurationName = "JNBridgeJmsAdapter")]
public interface JNBridgeJmsAdapter {…}
[System.Diagnostics.DebuggerStepThroughAttribute()]
[System.CodeDom.Compiler.GeneratedCodeAttribute("System.ServiceModel", "4.0.0.0")]
public partial class JNBridgeJmsAdapterClient :
System.ServiceModel.ClientBase<JNBridgeJmsAdapter>, JNBridgeJmsAdapter {…}
}
[/code]
Create a Second WCF Service
There is already one WCF service in this implementation; however, that service is a special inbound channel listener that consumes JMS Messages from a queue. A second service is required to expose an interface that will be consumed by the Custom Logic App Connector. Using Visual Studio, add a new WCF service to the project named WcfJmsSvc. Visual Studio will create three source files, IWcfJmsSvc.cs, WcfJmsSvc.svc.cs and WcfJmsSvc.svc. It will also modify the Web.config file. Edit the service interface definition in IWcfJmsSvc.cs. Note that this service declares a different Service Contract namespace than the Channel Listener contract in the class WcfJmsListenerService.
[code language=”csharp”]
namespace WcfJmsListener
{
[ServiceContract(Namespace = "jms://JNBridge.JMSAdapter/Service")]
interface IWcfJmsSvc
{
[OperationContract]
bool MessageAvailable();
[OperationContract]
JMSMessage GetMessage();
[OperationContract]
void PublishMessage(string destination, string text);
}
}
[/code]
Edit the interface implementation file, WcfJmsSvc.svc.cs. Notice that a Service Behavior attribute declaring the same namespace used in the interface’s Service Contract attribute decorates the implementation class. The namespaces in the attributes are necessary to separate the two WCF services running in one process. In addition, a simple, and serializable, data class is declared that will contain the JMS Message header and message body. The class, JMSMessageHeader, is defined in the source file, WcfJmsListenerInterface.cs, created by the JMS Adapter for .NET as part of the Channel Listener implementation.
[code language=”csharp”]
namespace WcfJmsListener
{
[ServiceBehavior(Namespace = "jms://JNBridge.JMSAdapter/Service")]
public class WcfJmsSvc : IWcfJmsSvc
{
JNBridgeJmsAdapterClient client = null;
public bool MessageAvailable()
{
return (WcfJmsListenerService.messages.IsEmpty == false);
}
public JMSMessage GetMessage()
{
JMSMessage aMessage;
WcfJmsListenerService.messages.TryDequeue(out aMessage);
return aMessage;
}
public void PublishMessage(string destination, string text)
{
if (client == null)
{
client = new JNBridgeJmsAdapterClient();
}
client.SendText(destination, text);
}
}
public class JMSMessage
{
private string messageText;
private JMSMessageHeader messageHeader;
public string Text
{
get { return messageText; }
set { this.messageText = value; }
}
public JMSMessageHeader Header
{
get { return messageHeader; }
set { this.messageHeader = value; }
}
}
}
[/code]
Edit the original Channel Listener implementation source file, WcfJmsListenerService.cs. Orginally, the listener callback method, OnReceiveAnnotatedTextFromQueue(), just used trace statements to dump the contents of the consumed JMS Text Message. The new source creates an instance of the data class, JMSMessage, and adds it to a FIFO collection. Because of the multi-threaded nature of the WCF Services, the thread-safe collection class ConcurrentQueue is used as the FIFO.
[code language=”csharp”]
namespace WcfJmsListener
{
public class WcfJmsListenerService : JNBridgeJmsAdapter
{
public static ConcurrentQueue<JMSMessage> messages =
new ConcurrentQueue<JMSMessage>();
public virtual void OnReceiveAnnotatedTextFromQueue(string name,
string text,
jnbridge.jmsadapter.JMSMessageHeader messageHeader)
{
JMSMessage aMessage = new JMSMessage();
aMessage.Header = messageHeader;
aMessage.Text = text;
messages.Enqueue(aMessage);
}
}
}
[/code]
Now it’s time to edit the Web.config file. The configuration contains two WCF services and a client endpoint.
[code language=”xml”]
<?xml version="1.0"?>
<configuration>
<appSettings>
<add key="aspnet:UseTaskFriendlySynchronizationContext" value="true" />
</appSettings>
<system.web>
<compilation debug="true" targetFramework="4.6.1" />
<httpRuntime targetFramework="4.6.1"/>
</system.web>
<system.serviceModel>
<!– This is the "outbound" client that contains the operation SendText() –>
<client>
<endpoint address="jms://localhost:61616/"
binding="JNBridgeDotNetJMSAdapterBinding"
bindingConfiguration="JMSAdapterBinding"
contract="JNBridgeJmsAdapter"
name="JMSAdapterBinding_JNBridgeJmsAdapter" />
</client>
<extensions>
<behaviorExtensions>
<add name="inboundActionElement"
type="Microsoft.ServiceModel.Channels.InboundActionElement,
Microsoft.ServiceModel.Channels, Version=3.0.0.0,
Culture=neutral, PublicKeyToken=31bf3856ad364e35" />
</behaviorExtensions>
</extensions>
<services>
<!–Channel Listener service that consumes messages from the queue, dynamicQueues/exampleQueue –>
<service name="WcfJmsListener.WcfJmsListenerService">
<endpoint address="jms://localhost:61616/"
behaviorConfiguration="InboundActionEndpointBehavior"
binding="JNBridgeDotNetJMSAdapterBinding"
bindingConfiguration="JMSAdapterBinding"
contract="JNBridgeJmsAdapter" />
</service>
<!–This is the WCF service that exposes the operations used by the Logic App Connector–>
<!–Note that the transport protocol is basicHttpBinding–>
<service behaviorConfiguration="WcfJmsSvcBehavior" name="WcfJmsListener.WcfJmsSvc">
<endpoint address="" binding="basicHttpBinding" bindingConfiguration=""
contract="WcfJmsListener.IWcfJmsSvc" />
<endpoint address="mex" binding="mexHttpBinding" contract="IMetadataExchange" />
</service>
</services>
<bindings>
<JNBridgeDotNetJMSAdapterBinding>
<binding BcelPath="C:\Program Files\JNBridge\JMSAdapters\jnbin\bcel-5.1-jnbridge.jar"
JnbCorePath="C:\Program Files\JNBridge\JMSAdapters\jnbin\jnbcore.jar"
name="JMSAdapterBinding" AcknowledgeMode="AUTO_ACKNOWLEDGE"
SecurityAuthentication="none" TopicConnectionFactory="ConnectionFactory"
QueueConnectionFactory="ConnectionFactory"
ClassPath="C:\Program Files\apache-activemq-5.13.3\activemq-all-5.13.3.jar;"
JvmPath="C:\Program Files\Java\jre1.8.0_77\bin\server\jvm.dll"
JMSScheme="tcp"
InitialContextFactory="org.apache.activemq.jndi.ActiveMQInitialContextFactory"
JmsVendor="ActiveMQ" MessageSelector="" DurableSubscription=""
QueueName="dynamicQueues/exampleQueue" TopicName="" OffLine="false"
TransactionEnlistment="false" RunTime="true" BridgeType="Shared Memory"
HostName="" PortNumber="" UseSSL="false" JVMArgs="" InboundPollPeriod="10"
CustomConnectionString="" JmsVersion="JMS 1.1" />
</JNBridgeDotNetJMSAdapterBinding>
</bindings>
<behaviors>
<endpointBehaviors>
<behavior name="InboundActionEndpointBehavior">
<inboundActionElement />
</behavior>
</endpointBehaviors>
<serviceBehaviors>
<behavior name="WcfJmsSvcBehavior">
<serviceMetadata httpGetEnabled="true" />
<serviceDebug includeExceptionDetailInFaults="false" />
</behavior>
<behavior name="">
<serviceMetadata httpGetEnabled="true" httpsGetEnabled="true" />
<serviceDebug includeExceptionDetailInFaults="false" />
</behavior>
</serviceBehaviors>
</behaviors>
<serviceHostingEnvironment aspNetCompatibilityEnabled="true" multipleSiteBindingsEnabled="true" />
</system.serviceModel>
<system.webServer>
<modules runAllManagedModulesForAllRequests="true"/>
<directoryBrowse enabled="true"/>
</system.webServer>
</configuration>
[/code]
The resulting WCF service is composed of two WCF services, one that does not expose a SOAP interface and one that does. The Channel Listener that consumes JMS messages simply stores them in memory using a FIFO. The exposed service uses the basicHttpBinding, a SOAP transport using XML. It is not REST/JSON.
The final coding task is the publishing configuration, WcfJmsSvcPublish.pubxml, that will publish the two services to IIS. One final step is to include the JMS Adapter for .NET component, jnbproxies.dll, in the project with Copy Always enabled. The assembly can be found in …\JMSAdapters\DotNet\bin\jms11.
[code language=”XML”]
<Project ToolsVersion="4.0" xmlns="http://schemas.microsoft.com/developer/msbuild/2003">
<PropertyGroup>
<WebPublishMethod>MSDeploy</WebPublishMethod>
<LastUsedBuildConfiguration>Debug</LastUsedBuildConfiguration>
<LastUsedPlatform>Any CPU</LastUsedPlatform>
<SiteUrlToLaunchAfterPublish />
<LaunchSiteAfterPublish>True</LaunchSiteAfterPublish>
<ExcludeApp_Data>False</ExcludeApp_Data>
<MSDeployServiceURL>localhost</MSDeployServiceURL>
<DeployIisAppPath>Default Web Site/WcfJmsSvc</DeployIisAppPath>
<RemoteSitePhysicalPath />
<SkipExtraFilesOnServer>True</SkipExtraFilesOnServer>
<MSDeployPublishMethod>InProc</MSDeployPublishMethod>
<EnableMSDeployBackup>False</EnableMSDeployBackup>
<UserName />
<_SavePWD>False</_SavePWD>
<ADUsesOwinOrOpenIdConnect>False</ADUsesOwinOrOpenIdConnect>
</PropertyGroup>
</Project>
[/code]
After the services have been published to IIS, remember that the Channel Listener service must be configured for Auto-Start using AppFabric for Windows Server. Please refer to the section titled, Configuring AppFabric for Windows Server in the previous blog, Creating WCF Services using the .NET JMS Adapter–Part 2.
Building a Custom Logic App Connector
Most of the hard work is done because building the connector relies on the WSDL that describes the service that was just deployed to IIS. Despite the fact that the exposed API uses SOAP/XML, the WSDL description is used by the Custom Connector to facilitate a SOAP to REST/JSON conversion using Liquid templates.The best way to obtain the WSDL is to use the IIS Management Console to browse the service. Doing so will display the directory structure of the service.
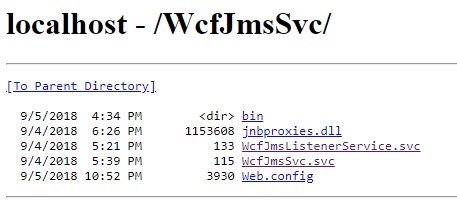
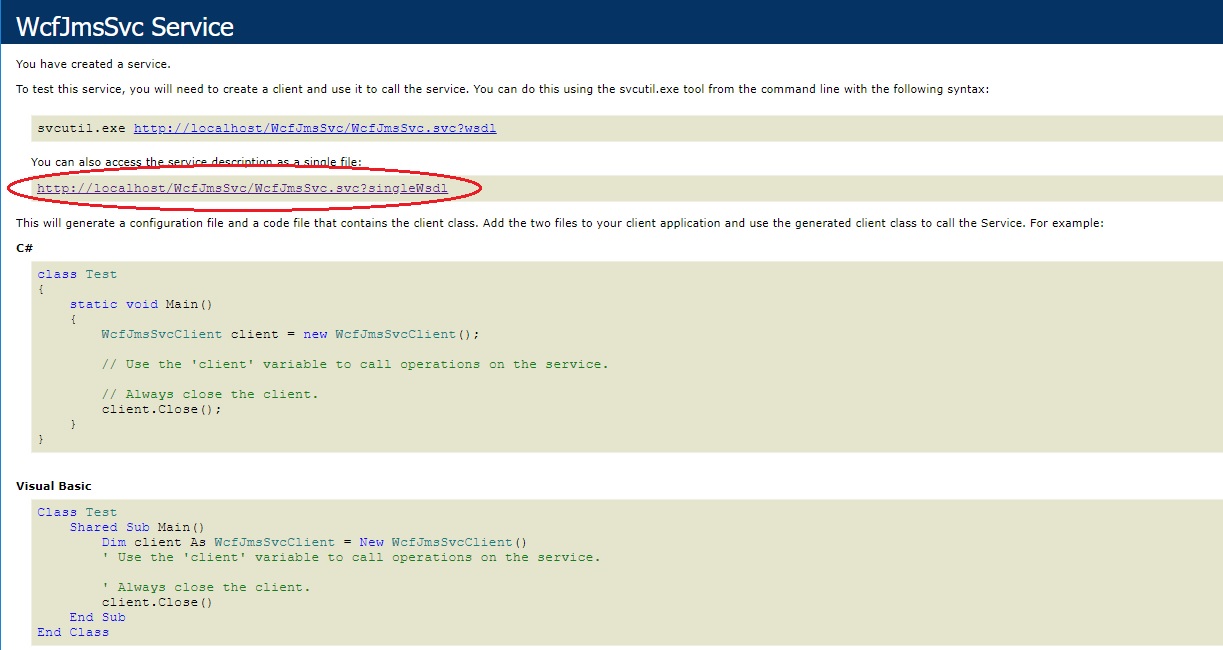
By simply clicking on the file, WcfJmsSvc.svc, the default page is displayed. Click on the circled link to generate the WSDL and save it to a file named WcfJmsSvc.wsdl.
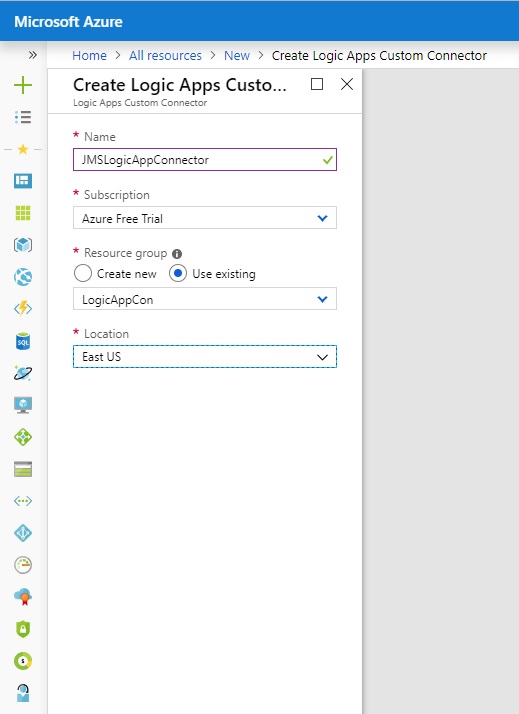
 Now it’s time to open the Azure portal and create a Custom Logic App Connector. The first step is to add a new resource of type Logic App Custom Connector. In the Azure Dashboard, click on the Add link to get the New form and type in the string Logic App Custom Connector in the search field. Click on the icon for the custom connector to display the Create form. Remember that all resources—the connector, the Logic App and the On-Premise Data Gateway—must all be in the same resource group.
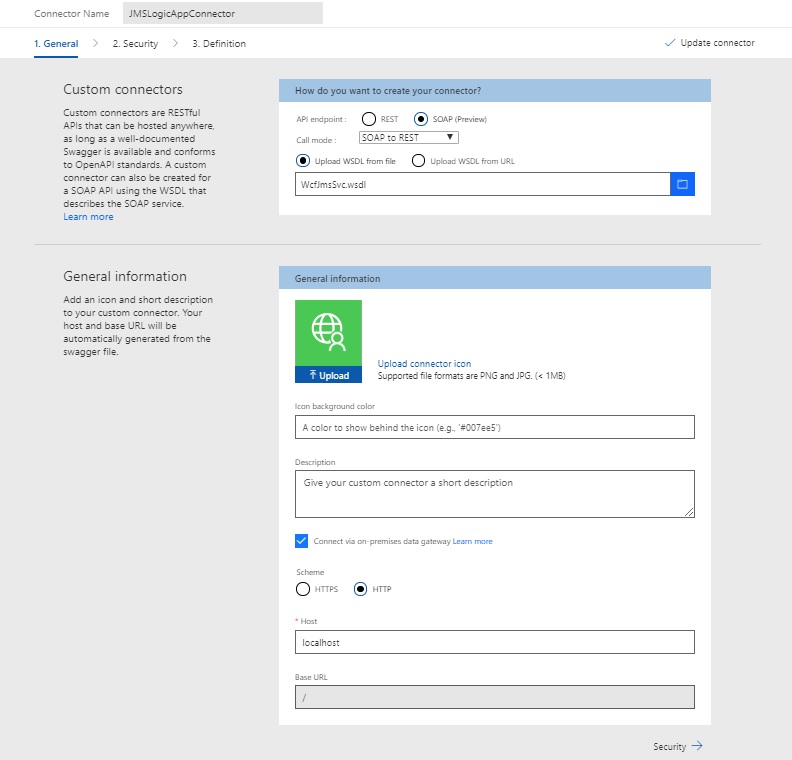
Once the new resource has been created, open the custom connector console and click on the Edit link. In the form, How do you want to create your connector?, choose SOAP as the API endpoint and SOAP to REST as the call mode. Choose Upload WSDL from File and click on the browse icon and navigate to the WSDL file created from the WCF service, WcfJMSSvc. In the General information form let everything default but make sure to check the box, Connect via on-premises data gateway.
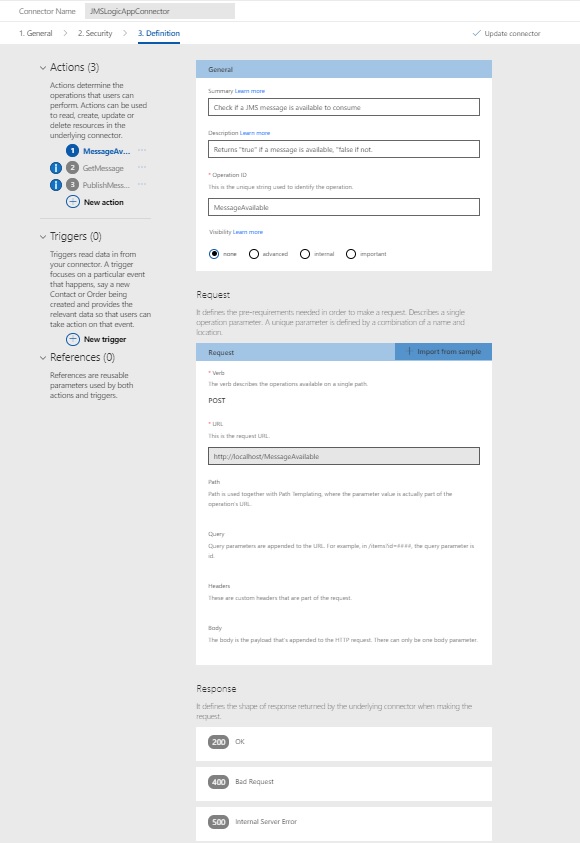
The next step is to click on the link Definition, bypassing the Security configuration as there will be no secure access in this example. Each of the operations exposed by the WCF service, MessageAvailable, GetMessage and PublishMessage must have a Summary and Description entered. In addition, both MessageAvailable and GetMessage must have the request body removed as they have no arguments. PublishMessage must have the response body set to type string even though the return type is void.
When completed, click on the link Update Connector.
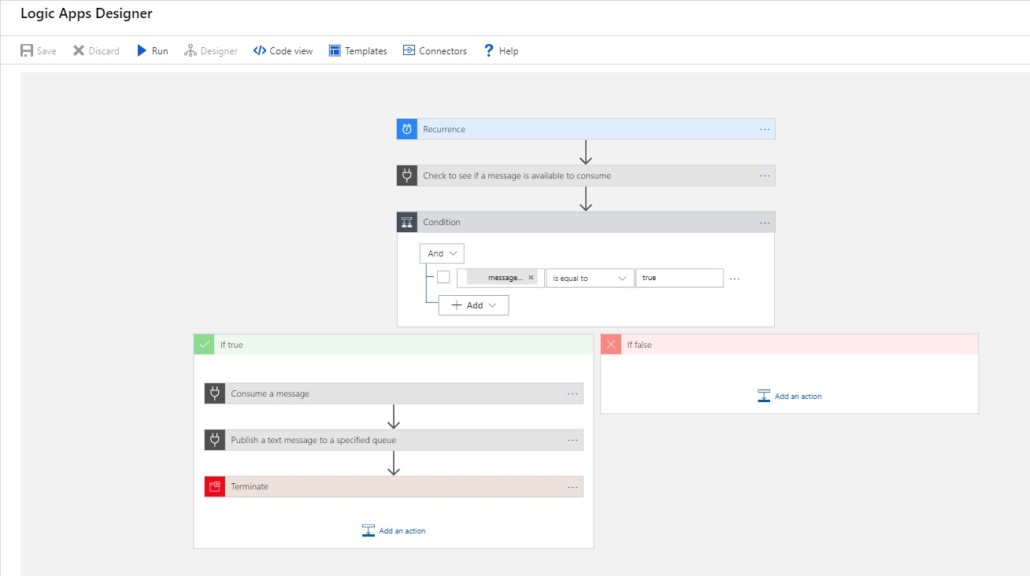
Building a Logic App to Test the Connector
The following screen shot shows the Logic App that will test the connector.
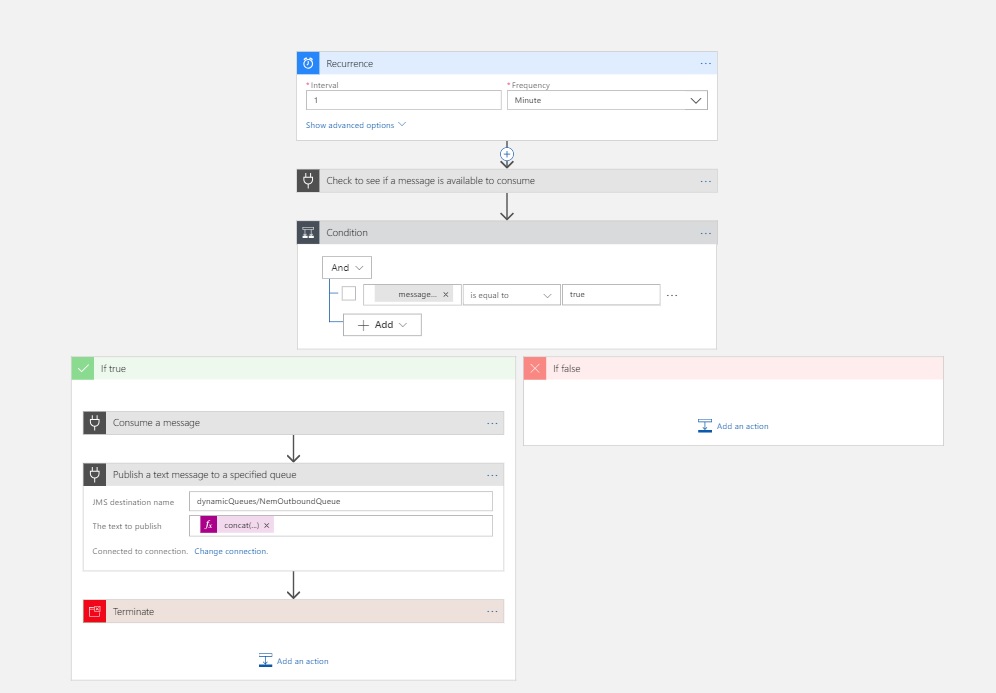
The Logic App is triggered by a Recurrence object that fires every minute. The first object to execute is the connector operation MessageAvailable which will return false if no JMS message is available to be consumed. If a message is available, the connector returns true. The output of the MessageAvailable operation is tested by the Condition object. If the result is false, nothing happens. If the result is true, then the connector operation GetMessage is executed. The output of GetMessage is a JSON document that is the serialized data class JMSMessage defined in the source file, WcfJmsSvc.svc.cs.
[code language=”javascript”]
{
"statusCode": 200,
"headers": {
"Transfer-Encoding": "chunked",
"Vary": "Accept-Encoding",
"x-ms-request-id": "27ef62a0-8883-4d57-80ae-e3ccafb50389",
"Cache-Control": "private",
"Date": "Wed, 05 Sep 2018 23:34:01 GMT",
"Set-Cookie": "ARRAffinity=29e552cea7db23196f7ffa644003eaaf39bc8eb6dd811911f669d13ab7424faf;Path=/;HttpOnly;Domain=gatewayconnector-eastus.logic-ase-eastus.p.azurewebsites.net",
"X-AspNet-Version": "4.0.30319",
"X-Powered-By": "ASP.NET,ASP.NET",
"Content-Type": "application/json",
"Content-Length": "671"
},
"body": {
"getMessageResponse": {
"getMessageResult": {
"header": {
"properties": [],
"jmsCorrelationID": "CorrelationID",
"jmsCorrelationIDAsBytes": "",
"jmsDeliveryMode": 1,
"jmsExpiration": 0,
"jmsMessageID": "ID:Medtner-6293-1536082484859-4:4:1:1:6",
"jmsPriority": 0,
"jmsRedelivered": false,
"jmsTimestamp": 1536190382790,
"jmsType": "",
"deliveryDelay": "0001-01-01T00:00:00"
},
"text": "Hello"
}
}
}
}
[/code]
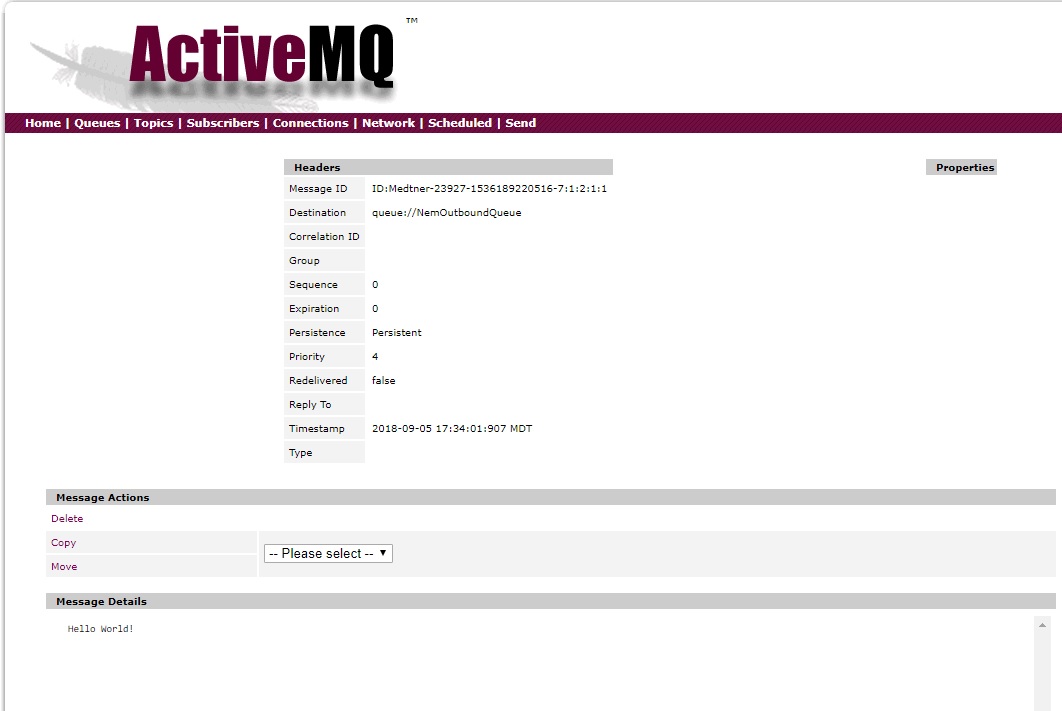
The arguments to the connector operation, PublishMessage, is a queue named, NemOutboundQueue and the text that is sent is a concatenation of the incoming text, “Hello”, and the string “ World!”. Here is the published JMS Text Message in the queue, NemInboundQueue.
Conclusion
The JNBridge JMS Adapter for .NET is a custom WCF stack. As such it can be used to create WCF services exposing a JMS publish/consume API that can be called remotely using HTTP/SOAP/XML. Even though the service ran on a local machine’s IIS and used the On-Premise Data Gateway to allow access from the Azure cloud, this entire implementation could be deployed to Azure, including ActiveMQ.
Because the Custom Logic App Connector is essentially a REST/JSON client 90% configured by using an API description language like WSDL or OpenAPI (Swagger), building a JMS connector is simple. Moreover, any JMS implementation can be supported by simply modifying the Web.config file.