
Creating WCF Services using the .NET JMS Adapter–Part 2
Introduction
In the first part of this blog series, Creating WCF Services using the .NET JMS Adapter–Part 1, a web service that exposed a simple API for publishing JMS messages was built. This outbound operation is a request/response messaging pattern, created by using the adapter to generate a WCF binding for a custom transport channel. In this blog, a WCF Channel Listener service is built to consume the message published by the web service deployed in Part 1. The channel listener is essentially equivalent to an Enterprise Java Message Driven Bean leveraging a JMS Message Listener. Unlike the outbound operation, the inbound listener represents a handler called by the adapter whenever a message is available for consumption from the JMS destination. The handler processes the message, perhaps updating a DB, for example.
A WCF Channel Listener can be hosted in a WCF Service Host process or IIS. This blog explorers deploying the listener to IIS. For an introduction to the .NET JMS Adapter, please see this tutorial on building simple messaging clients.
Prerequisites
Building this example requires the JNBridge JMS Adapter for .NET and Visual Studio version 2010, 2012 or 2013. Deployment requires IIS 7.5, or later, and AppFabric for Windows Server. As before in Part 1, ActiveMQ will be the JMS implementation.
Creating the Inbound Binding
In Visual Studio create a new WCF Service Application named WcfJmsListener. Once again, Visual Studio will produce a bunch of default code and names, so the project will have to be cleaned up. Delete the files IService.cs and Service1.svc.cs. Rename the file Service1.svc to WcfJmsListenerService.svc.
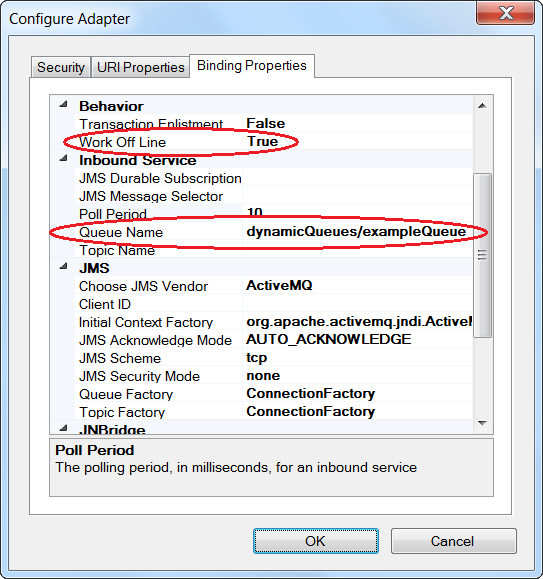
Open the Add Adapter Service Reference design tool from the Project menu. Select the binding JNBridgeDotNetJMSAdapter and open the Configure Adapter dialog. Choose ActiveMQ as the JMS implementation. If the adapter has been used in Part 1, then all the correct property values are already loaded into the dialog. There are two modifications required to the configuration properties. Again, because generic operations will used, the property, Work Off Line, is set to true. The property, Queue Name, is set to the name of the JMS destination.
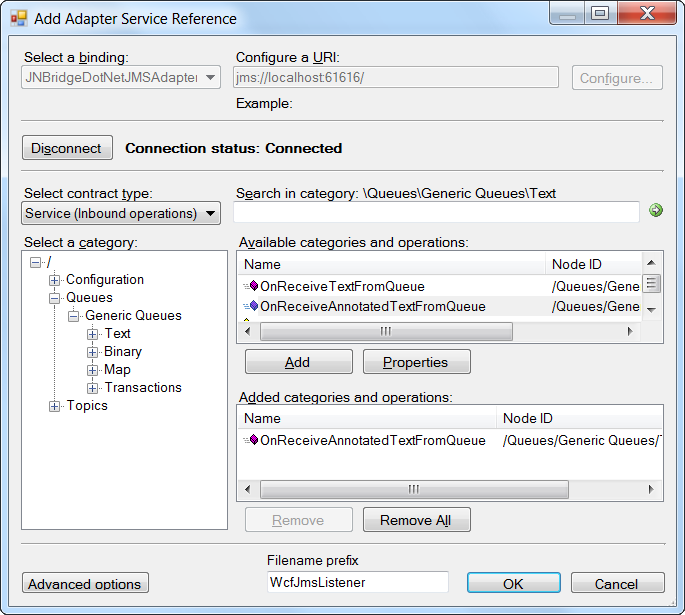
Once the configuration is correct, the Connect button is clicked, allowing selection of operations. Since the operation type is inbound, use the drop down control Select contract type to choose Service (inbound operations). The selected inbound operation is OnReceiveAnnotatedTextFromQueue(). At the bottom of the dialog the Filename prefix field has a custom name entered, WcfJmsListener. The completed dialog is shown below.
When OK is clicked, the adapter supplies WSDL to the WCF ServiceModel metadata utility which generates a couple of source files and updates Web.config. The two files, WcfJmsListenerInterface.cs and WcfJmsListenerService.cs, represent the channel listener interface and implementation, respectively.
Configuring the Channel Listener
As was necessary in Part 1, the service definition file, WcfJmsListenerService.svc, and the IIS service configuration file, Web.config, will have to be modified.
WcfJmsListenerService.svc
This file is modified replacing the original placeholder defaults with the full service name and implementation file.
<%@ ServiceHost
      Language="C#"
      Debug="true"
      Service="WcfJmsListener.WcfJmsListenerService"
      CodeBehind="WcfJmsListenerService.cs"
%>;
Web.config
Only one modification is needed here. Toggle the property, Offline, to false.
<?xml version="1.0"?>
<configuration>
  <appSettings>
    <add key="aspnet:UseTaskFriendlySynchronizationContext" value="true" />
  </appSettings>
  <system.web>
    <compilation debug="true" targetFramework="4.5" />
    <httpRuntime targetFramework="4.5"/>
  </system.web>
  <system.serviceModel>
    <extensions>
      <behaviorExtensions>
        <add name="inboundActionElement" type="Microsoft.ServiceModel.Channels.InboundActionElement,
          Microsoft.ServiceModel.Channels, Version=3.0.0.0, Culture=neutral,
          PublicKeyToken=31bf3856ad364e35" />
      </behaviorExtensions>
    </extensions>
    <services>
      <service name="WcfJmsListener.WcfJmsListenerService">
        <endpoint address="jms://localhost:61616/"
          behaviorConfiguration="InboundActionEndpointBehavior"
          binding="JNBridgeDotNetJMSAdapterBinding" bindingConfiguration="JMSAdapterBinding"
          contract="JNBridgeJmsAdapter" />
      </service>
    </services>
    <bindings>
      <JNBridgeDotNetJMSAdapterBinding>
        <binding BcelPath="C:\Program Files\JNBridge\JMSAdapters\jnbin\bcel-5.1-jnbridge.jar"
          JnbCorePath="C:\Program Files\JNBridge\JMSAdapters\jnbin\jnbcore.jar"
          name="JMSAdapterBinding" AcknowledgeMode="AUTO_ACKNOWLEDGE"
          SecurityAuthentication="none" TopicConnectionFactory="ConnectionFactory"
          QueueConnectionFactory="ConnectionFactory"
          ClassPath="C:\temp\apache-activemq-5.10.0\activemq-all-5.10.0.jar;"
          JvmPath="C:\Program Files\Java\jre7\bin\server\jvm.dll" JMSScheme="tcp"
          InitialContextFactory="org.apache.activemq.jndi.ActiveMQInitialContextFactory"
          JmsVendor="ActiveMQ" MessageSelector="" DurableSubscription=""
          QueueName="dynamicQueues/exampleQueue" TopicName="" OffLine="false"
          TransactionEnlistment="false" RunTime="true" BridgeType="Shared Memory"
          HostName="" PortNumber="" UseSSL="false" JVMArgs="" InboundPollPeriod="10" />
      </JNBridgeDotNetJMSAdapterBinding>
    </bindings>
    <behaviors>
      <endpointBehaviors>
        <behavior name="InboundActionEndpointBehavior">
          <inboundActionElement />
        </behavior>
      </endpointBehaviors>
      <serviceBehaviors>
        <behavior name="">
          <serviceMetadata httpGetEnabled="true" httpsGetEnabled="true" />
          <serviceDebug includeExceptionDetailInFaults="false" />
        </behavior>
      </serviceBehaviors>
    </behaviors>
    <protocolMapping>
        <add binding="basicHttpsBinding" scheme="https" />
    </protocolMapping>
    <serviceHostingEnvironment aspNetCompatibilityEnabled="true" multipleSiteBindingsEnabled="true" />
  </system.serviceModel>
  <system.webServer>
    <modules runAllManagedModulesForAllRequests="true"/>
    <directoryBrowse enabled="true"/>
  </system.webServer>
</configuration>
Completing the Listener Implementation
The channel listener implementation has a single method stub, OnReceiveAnnotatedTextFromQueue(). For the purposes of this blog, simply writing the received message to a file will suffice. As a convenience, the System.Diagnostic tracing utility is used.
using System.Diagnostics;
using jnbridge.jmsadapter;
namespace WcfJmsListener
{
    public class WcfJmsListenerService : JNBridgeJmsAdapter
    {
        TraceSource trace = new TraceSource("WcfJmsListener");
        public virtual void OnReceiveAnnotatedTextFromQueue(string name,
                             string text, JMSMessageHeader messageHeader)
        {
            trace.TraceInformation("Message received from JMS destination, " + name);
            trace.TraceInformation("Message content: " + text);
            trace.TraceInformation("Correlation ID: " + messageHeader.jmsCorrelationID);
            JMSProperty[] props = messageHeader.properties;
            foreach(JMSProperty prop in props)
            {
                trace.TraceInformation("Property name: " + prop.propertyName);
                trace.TraceInformation("Property type: " + prop.propertyType.ToString());
                trace.TraceInformation("Property value: " + prop.stringValue);
            }
        }
    }
}
In order to use the .NET tracing utility, this XML must be added to the configuration file, Web.config.
  <system.diagnostics>
    <switches>
      <add name="MySwitch" value="Information"/>
    </switches>
    <sources>
      <source name="WcfJmsListener" switchName="MySwitch">
        <listeners>
          <add name="traceListener"
              type="System.Diagnostics.TextWriterTraceListener"
              initializeData= "C:\temp\WcfJmsTrace.log" />
        </listeners>
      </source>
    </sources>
    <trace autoflush="true" />
  </system.diagnostics>
Publishing the Listener to IIS
The channel listener is published to IIS from Visual Studio using the following profile.
<Project ToolsVersion="4.0" xmlns="http://schemas.microsoft.com/developer/msbuild/2003">
  <PropertyGroup>
    <WebPublishMethod>MSDeploy</WebPublishMethod>
    <LastUsedBuildConfiguration>Release</LastUsedBuildConfiguration>
    <LastUsedPlatform>Any CPU</LastUsedPlatform>
    <SiteUrlToLaunchAfterPublish />
    <LaunchSiteAfterPublish>True</LaunchSiteAfterPublish>
    <ExcludeApp_Data>False</ExcludeApp_Data>
    <MSDeployServiceURL>localhost</MSDeployServiceURL>
    <DeployIisAppPath>Default Web Site/WcfJmsListener</DeployIisAppPath>
    <RemoteSitePhysicalPath />
    <SkipExtraFilesOnServer>True</SkipExtraFilesOnServer>
    <MSDeployPublishMethod>InProc</MSDeployPublishMethod>
    <EnableMSDeployBackup>False</EnableMSDeployBackup>
    <UserName />
    <_SavePWD>False</_SavePWD>
  </PropertyGroup>
</Project>
Configuring AppFabric for Windows Server
AppFabric for Windows Server provides an execution container for the WCF channel listener service. This is necessary because there is no client involved to invoke the service as there was in Part 1, therefore the application and its service must be configured for Auto-Start. Enabling Auto-Start is done in two steps. First, the application, WcfJmsListener, must have its WCF services enabled for Auto-Start. The screen-shot montage, below, shows enabling Auto-Start as a configuration option for each individual WCF service in the application.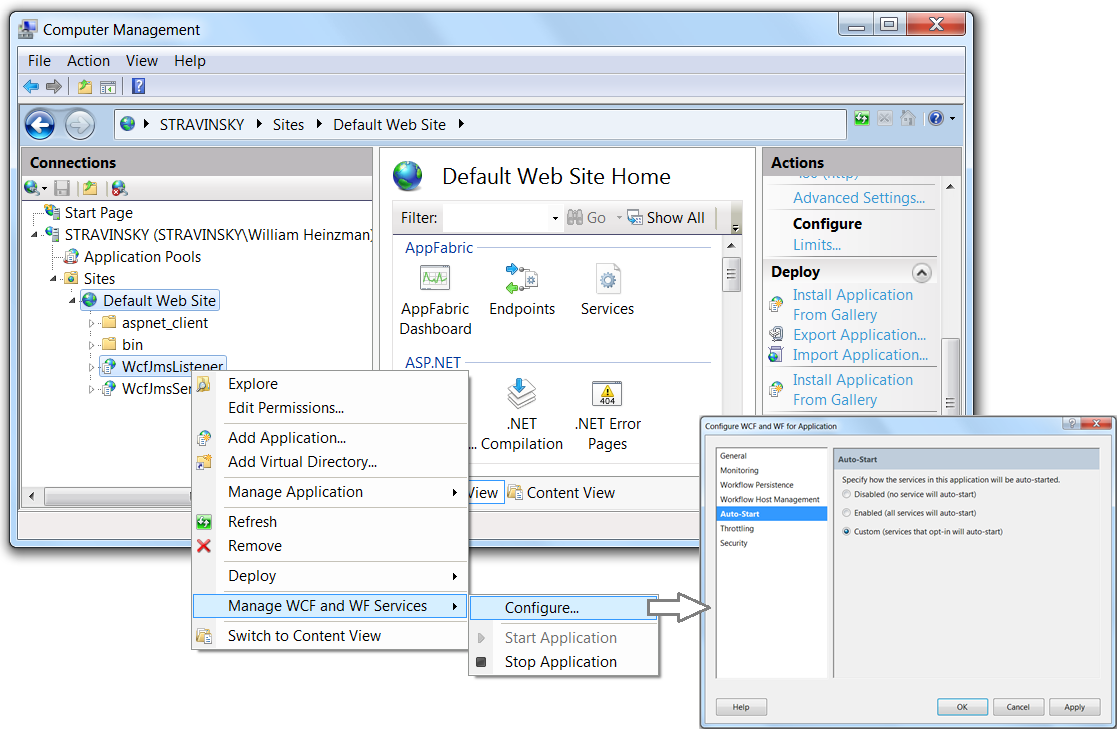
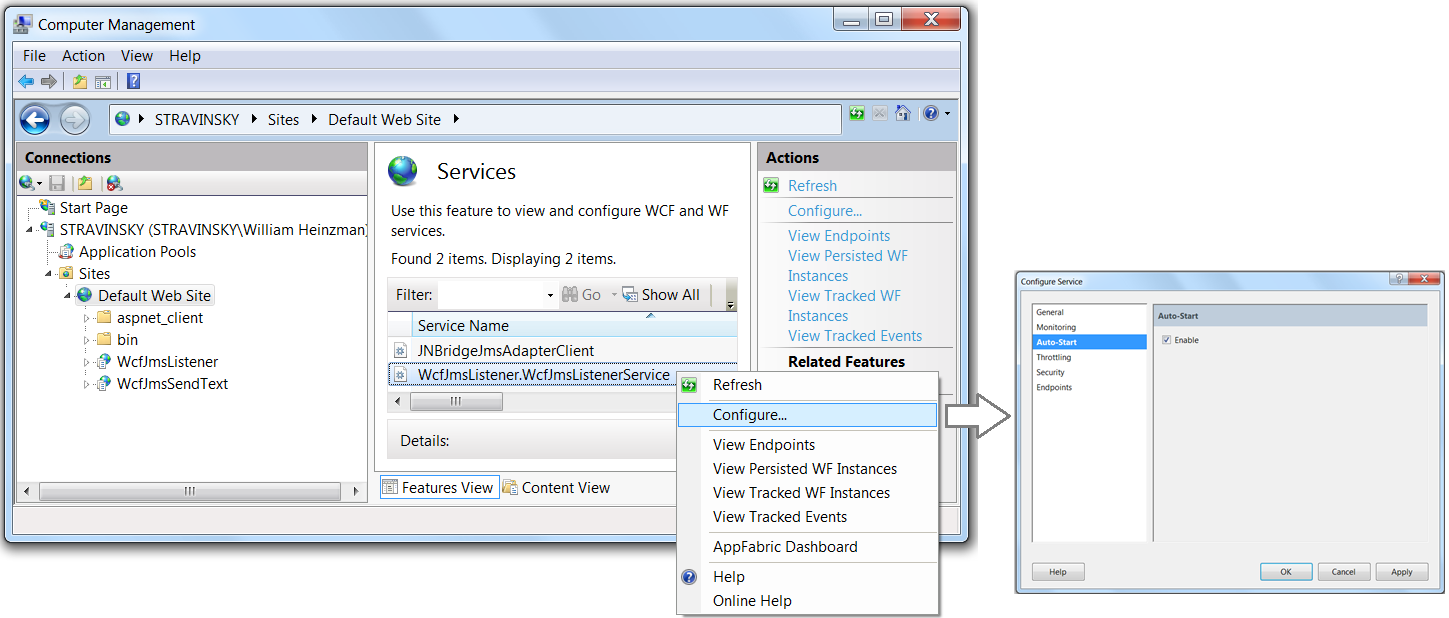
The next step is to enable Auto-Start for the specific service, WcfJmsListenerService. This is done by clicking on the Services icon in the AppFabric section in the Features View (see the Default Web Site pane in the above montage). The following screen shot montage shows enabling Auto-Start for the individual service.
Sending and Receiving a JMS Message
Using the web service, WcfJmsSendText, and the console application client built in Part 1, a JMS message is sent to the JMS queue. The WCF channel listener service, WcfJmsListenerService, will consume the message from the queue and call the service handler, OnReceiveAnnotatedTextFromQueue(). Here’s the trace file output of the received message. .
.
Conclusion
While the JNBridge JMS Adapter for .NET provides a messaging API for JMS that can be called from C#, it also is a custom WCF transport channel that can produce WCF client and listener channel stack bindings. In Part 1 of this blog, an outbound client service was created that, when deployed to IIS, provided a web service for publishing messages to a JMS queue. In Part 2, a channel listener was created to consume messages. When deployed to IIS, the listener consumed messages published by a web service client.
The source is available here.