
Creating WCF Services using the .NET JMS Adapter–Part 1
Introduction
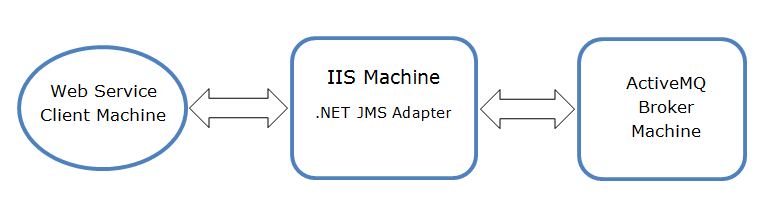
This is the first blog in a series about the JNBridge JMS Adapter for .NET. This adapter, like its sibling BizTalk adapter, surfaces the Java Message Service API, a standard Enterprise Java messaging interface. The Java/.NET interoperability technology in JNBridgePro allows either adapter to use any vendor’s Java JMS client JAR files. The .NET adapter uses the Windows Communication Foundation Line-Of-Business Adapter SDK to surface the JMS API with a custom WCF transport channel. This channel can generate WCF bindings that provide two patterns: request/response outbound and one-way receive inbound. Outbound operations provide a simple send/receive messaging interface. Inbound operations are asynchronous channel listeners, essentially a WCF service that listens for incoming messages, the .NET equivalent of an Enterprise Java message driven bean. The adapter can generate the WCF binding in C# or VB using a design-time tool used to select the outbound or inbound operations available from the adapter. At run-time, the resulting channel stack can be used by client code to send and receive messages while hiding the underlying JMS class hierarchy of connections, sessions, message producers and consumers.
In most cases, the resulting WCF binding is used in a single process. If it is an inbound channel, it can run in a WCF Service Host process or as a NT service. However, the JMS .NET adapter also supports Web Services, so it is possible to deploy the channel into IIS as an application. This series of blogs will explore using the adapter to create an outbound binding exposed as web services and inbound channels deployed as App Fabric services in IIS.
This first blog will explore exposing outbound operations using Web Services. One the service is deployed to IIS, a simple client can be generated that from the exposed WSDL enabling it to publish a JMS message with a custom header to a JMS queue.
For an introduction to the .NET JMS Adapter, please see this tutorial on building simple messaging clients.
Prerequisites
Building this example requires the JNBridge JMS Adapter for .NET and Visual Studio version 2010,2012 or 2013. Deployment requires IIS 7.5, or later, and AppFabric for Windows Server. A JMS implementation would also be nice, this example uses Apache ActiveMQ.
Create the Outbound Binding
Using Visual Studio, create a new WCF Service Application project named WcfJmsOutboundSvc. Visual Studio will try and be helpful and create a default interface, implementation and service reference called Service1. Clean up the project and delete the files IService1.cs, Service1.svc.cs. Rename the file Service1.svc to JmsClient.svc. Also, be sure to target the service for .NET 4.5.1.
Now open the Add Adapter Service Reference dialog from Visual Studio’s Project menu. This dialog consumes any WCFLOB adapter allowing the developer to choose individual messaging operations. Here’s what the dialog looks like when completed.
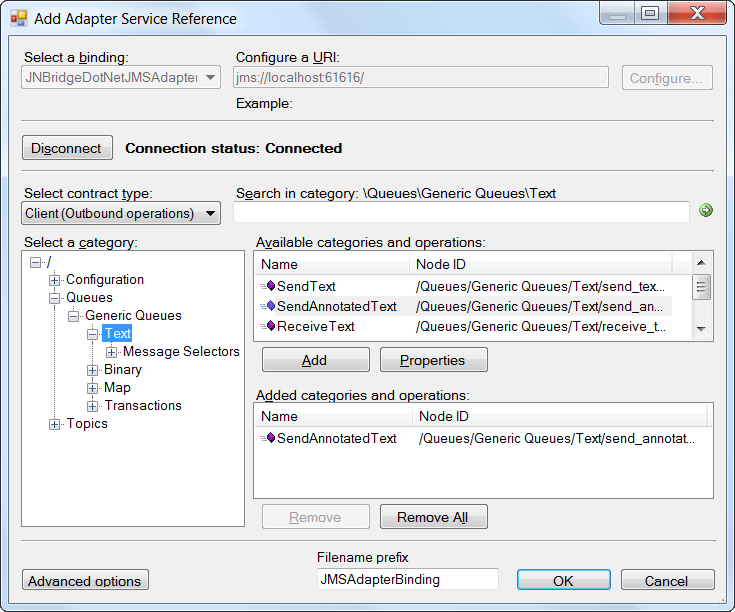
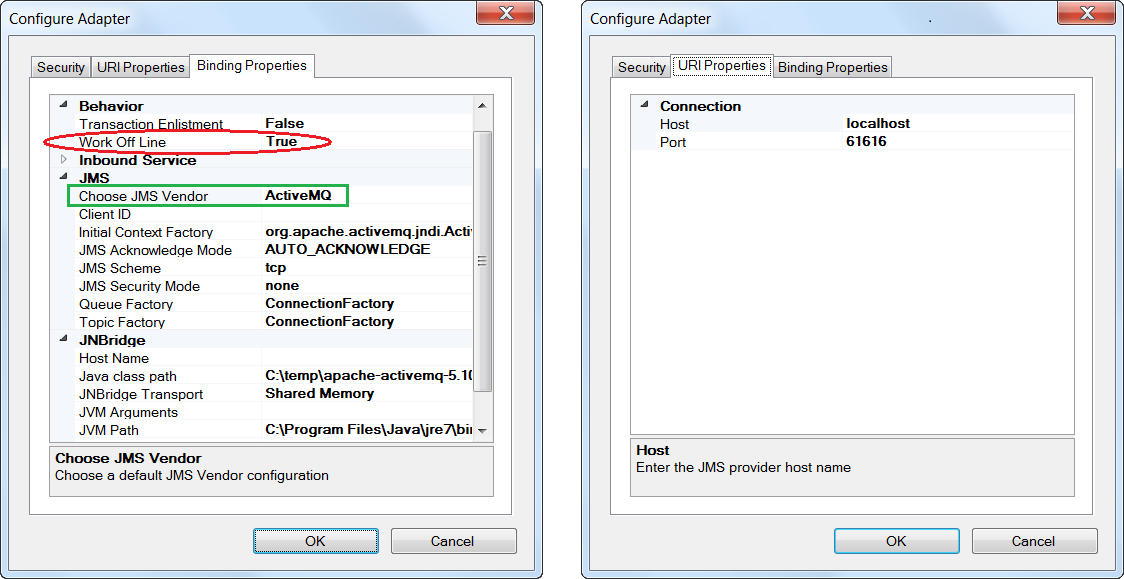
Before choosing the operations, the first step is to select the appropriate WCF binding, JNBridgeDotNetJMSAdapter, and configure the adapter by clicking on the Configure button. The configuration for the adapter is shown in the two screen shots, below. Note that the chosen JMS implementation is ActiveMQ and that the property, Work Off Line, is set to true. Working offline means that when the Connect button is clicked, the adapter does not attempt to connect to the server, instead providing generic operations. As shown above, a single generic operation has been chosen, SendAnnotatedText(). This operation will publish a JMS Text message with a custom JMS header.
When the OK button is clicked on the Add Adapter Service Reference dialog, a WCF channel is generated from metadata supplied by the adapter. The generated channel code in the file, JMSAdapterBindingClient.cs, is shown below. The client channel includes the selected operation, SendAnnotatedText(), along with all dependent methods and definitions.
[assembly: System.Runtime.Serialization.ContractNamespaceAttribute(
     "jms://JNBridge.JMSAdapter",
     ClrNamespace="jnbridge.jmsadapter")]

namespace jnbridge.jmsadapter
{
  using System.Runtime.Serialization;

  [System.Diagnostics.DebuggerStepThroughAttribute()]
  [System.CodeDom.Compiler.GeneratedCodeAttribute("System.Runtime.Serialization", "4.0.0.0")]
  [System.Runtime.Serialization.DataContractAttribute(
       Name="JMSMessageHeader",
       Namespace="jms://JNBridge.JMSAdapter")]
  public partial class JMSMessageHeader : object,
       System.Runtime.Serialization.IExtensibleDataObject {}

  [System.CodeDom.Compiler.GeneratedCodeAttribute("System.ServiceModel", "4.0.0.0")]
  [System.ServiceModel.ServiceContractAttribute(
       Namespace="jms://JNBridge.JMSAdapter",
       ConfigurationName="JNBridgeJmsAdapter")]
  public interface JNBridgeJmsAdapter
  {
    [System.ServiceModel.OperationContractAttribute(
         Action="/Queues/Generic Queues/Text/send_annotated_text_any_q",
         ReplyAction="/Queues/Generic Queues/Text/send_annotated_text_any_q/response")]
      void SendAnnotatedText(string name,
         jnbridge.jmsadapter.JMSMessageHeader messageHeader,
         string text);
  }

  [System.Diagnostics.DebuggerStepThroughAttribute()]
  [System.CodeDom.Compiler.GeneratedCodeAttribute("System.ServiceModel", "4.0.0.0")]
  public partial class JNBridgeJmsAdapterClient : System.ServiceModel.ClientBase<JNBridgeJmsAdapter>
                                                  , JNBridgeJmsAdapter
  {
    public void SendText(string name, string text) { base.Channel.SendText(name, text);
    }

    public string ReceiveText(string name)
    {
      return base.Channel.ReceiveText(name);
    }
  }
}
Configuring the WCF Service
When the proxy client is generated, the adapter also modifies the configuration file, Web.config, adding the adapter’s WCF configuration. In order to properly deploy the WCF proxy client to IIS, we’ll have to make some edits to that configuration file. In addition, the JmsClient.svc will also have to be edited.
JmsClient.svc
Remember that Visual Studio thoughtfully created an example Web Service called Service1. The service definition file, Service1.svc, was renamed to JmsClient.svc. Now that file must be edited to point to the WCF proxy file, JMSAdapterBindingClient.cs. This is the edited service definition. Highlighted lines are those modified.
<%@ ServiceHost
      Language="C#"
      Debug="true"
      Service="JNBridgeJmsAdapterClient"
      CodeBehind="JMSAdapterBindingClient.cs"
%>;
Web.config
The modifications to Web.config mostly have to do with eliding the references to the example Service1, substituting the names in the generated WCF proxy. However, there are two important modifications. The first is changing the adapter binding property, OffLine, to false from true. More importantly, the default web services protocol for the <services><service><endpoint> binding must be changed to wsHttpBinding from basicHttpBinding. The modified lines are highlighted.
<?xml version="1.0"?>
<configuration>
  <appSettings/>
  <connectionStrings/>
  <system.web>
    <compilation debug="true" targetFramework="4.5.1"/>
    <authentication mode="Windows"/>
    <pages controlRenderingCompatibilityVersion="3.5" clientIDMode="AutoID"/>
  </system.web>
  <system.webServer>
    <directoryBrowse enabled="true"/>
  </system.webServer>
  <system.serviceModel>
    <bindings>
      <JNBridgeDotNetJMSAdapterBinding>
        <binding BcelPath="C:\Program Files\JNBridge\JMSAdapters\jnbin\bcel-5.1-jnbridge.jar"
                 JnbCorePath="C:\Program Files\JNBridge\JMSAdapters\jnbin\jnbcore.jar"
                 name="JMSAdapterBinding" AcknowledgeMode="AUTO_ACKNOWLEDGE" SecurityAuthentication="none"
                 TopicConnectionFactory="ConnectionFactory" QueueConnectionFactory="ConnectionFactory"
                 ClassPath="C:\temp\apache-activemq-5.10.0\activemq-all-5.10.0.jar;"
                 JvmPath="C:\Program Files\Java\jre7\bin\server\jvm.dll" JMSScheme="tcp"
                 InitialContextFactory="org.apache.activemq.jndi.ActiveMQInitialContextFactory"
                 JmsVendor="ActiveMQ" MessageSelector="" DurableSubscription="" QueueName=""
                 TopicName="" OffLine="false" TransactionEnlistment="false" RunTime="true"
                 BridgeType="Shared Memory" HostName="" PortNumber=""
                 UseSSL="false" JVMArgs="" InboundPollPeriod="10"/>
      </JNBridgeDotNetJMSAdapterBinding>
    </bindings>
    <client>
      <endpoint address="jms://localhost:61616/" binding="JNBridgeDotNetJMSAdapterBinding"
                bindingConfiguration="JMSAdapterBinding" contract="JNBridgeJmsAdapter"
                name="JMSAdapterBinding_JNBridgeJmsAdapter"/>
    </client>
    <services>
      <service name="JNBridgeJmsAdapterClient" behaviorConfiguration="JNBridgeAdapterBehavior1">
        <endpoint address="" binding="wsHttpBinding" contract="JNBridgeJmsAdapter">
          <identity>
            <dns value="localhost"/>
          </identity>
        </endpoint>
        <endpoint address="mex" binding="mexHttpBinding" contract="IMetadataExchange"/>
      </service>
    </services>
    <behaviors>
      <serviceBehaviors>
        <behavior name="JNBridgeAdapterBehavior1">
          <serviceMetadata httpGetEnabled="true"/>
          <serviceDebug includeExceptionDetailInFaults="true"/>
        </behavior>
      </serviceBehaviors>
    </behaviors>
  </system.serviceModel>
</configuration>
Publishing the Service to IIS
The WCF binding can be deployed to IIS or IIS Express. IIS is chosen here because the Express development version is only 32-bit. A 64-bit process provides the JVM more contiguous memory for its heap. Here is the publish configuration to a local IIS instance.
<Project ToolsVersion="4.0" xmlns="http://schemas.microsoft.com/developer/msbuild/2003">
  <PropertyGroup>
    <WebPublishMethod>MSDeploy</WebPublishMethod>
    <LastUsedBuildConfiguration>Release</LastUsedBuildConfiguration>
    <LastUsedPlatform>Any CPU</LastUsedPlatform>
    <SiteUrlToLaunchAfterPublish />
    <LaunchSiteAfterPublish>True</LaunchSiteAfterPublish>
    <ExcludeApp_Data>False</ExcludeApp_Data>
    <MSDeployServiceURL>localhost</MSDeployServiceURL>
    <DeployIisAppPath>Default Web Site/WcfJmsSendText</DeployIisAppPath>
    <RemoteSitePhysicalPath />
    <SkipExtraFilesOnServer>True</SkipExtraFilesOnServer>
    <MSDeployPublishMethod>InProc</MSDeployPublishMethod>
    <EnableMSDeployBackup>False</EnableMSDeployBackup>
    <UserName />
    <_SavePWD>False</_SavePWD>
  </PropertyGroup>
</Project>
Once published to IIS, the service can be started by simply starting the default web site in IIS.
Creating a Client
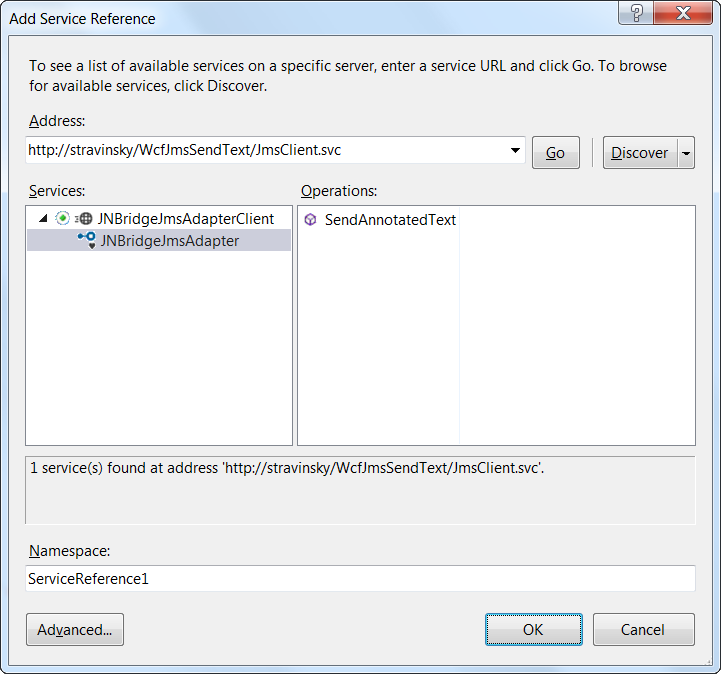
Now that the service is up and running, a client stub can be generated. This client will be able to publish a JMS message with a custom header to the JMS queue. This client can run on any machine and doesn’t require the .NET JMS adapter, which resides on the IIS server. In this example, the client will be a simple console application. The client stub is generated by using the Add Service Reference dialog in Visual Studio. Here’s what the dialog looks like before clicking OK.
Once the client has been generated, it’s a simple matter to create a client, connect to the Web Service running in IIS, create a JMS Text message with a custom header attribute and publish that message to an ActiveMQ broker.
using SendTextConsoleApplication.ServiceReference1;

namespace SendTextConsoleApplication {
    class Program {
        static void Main(string[] args) {
            try {
                JNBridgeJmsAdapterClient client = new JNBridgeJmsAdapterClient();
                JMSMessageHeader hdr = new JMSMessageHeader();
                JMSProperty[] props = new JMSProperty[1];
                props[0] = new JMSProperty();
                props[0].propertyName = "BookTitle";
                props[0].propertyType = JMSPropertyType.String;
                props[0].stringValue = "Lays of Ancient Rome";
                hdr.properties = props;
                hdr.jmsCorrelationID = "Match This!";
                client.Open();
                client.SendAnnotatedText("dynamicQueues/exampleQueue"
                    , hdr
                    , "A book of three epic poems published 1842");
            }
            catch (Exception ex) {
                Console.WriteLine(ex.Message);
                Console.WriteLine(ex.StackTrace);
            }
        }
    }
}
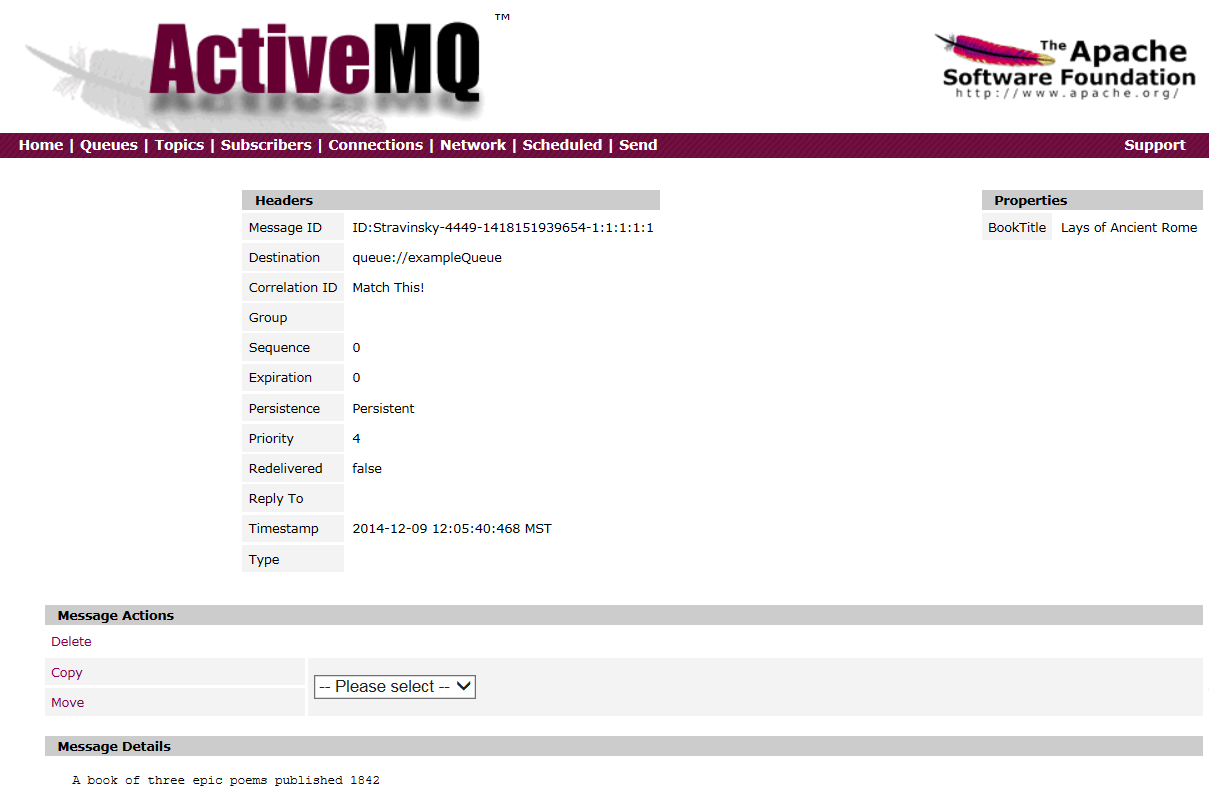
When the client is executed, a JMS message is published to the destination, dynamicQueues/exampleQueue. Here’s the Administration Console for ActiveMQ displaying the message sent by the client.
Next Step
In conclusion, this blog demonstrates using the JNBridge JMS Adapter for .NET to create a WCF channel that can be deployed to IIS as a Web Service. The outbound operation, essentially a SOAP request/response, allows a WS client to publish a JMS message to a queue. The next installment of this blog will concentrate on an inbound service channel to consume the messages published by this client.
The source is available here.
Go to part 2.