Using the Play Framework to Create a Java Web Application on Top of a .NET Back-End
Java web applications have come a long way since the days of servlets and Java Server Pages (JSPs). There are now many Java web frameworks for a developer to choose from, including Spring MVC, Java Server Faces, Struts, GWT, Play, and Grails. As with many other emerging technologies, an abundance of choices of web frameworks will lead to developer fatigue, the feeling of being overwhelmed by the need to keep up with the modern development world’s rapidly multiplying set of options. As we’ve said before, interoperability tools like JNBridgePro are an ideal way to deal with many kinds of developer fatigue, particularly when the new technologies are based on Java or .NET. With JNBridgePro, you can learn a small piece of a new technology, while bridging back to other parts of your project, which use the old, familiar technology.
For example, let’s say that you’re a .NET developer maintaining an all-.NET web application using ASP.NET as the web framework. If you’re tasked with updating the application to use a modern Java web framework, you can simplify your task and avoid developer fatigue by reimplementing only the front end, while preserving the familiar .NET code in the back end.
In this lab, we show how to create a web application that uses the Play Framework to implement the front-end presentation layer, and .NET to implement the back-end business logic and data layer. The Play Framework is based on Java and Scala, so JNBridgePro is an ideal tool for connecting Play web applications to .NET-based business logic. The example is based on the Books Demo, implementing a simple inventory system for a bookstore, which is distributed with the JNBridgePro installation. In the original Books Demo, the front end was implemented in ASP.NET, and the back end was Java. Here, we will invert this, so that the front end is written in Java using the Play Framework, and the back end is in .NET.
Building the .NET Back-End
The code for this lab can be downloaded here. We’ll start with the .NET side. While a real inventory system back end might link to a database, we are going to keep the internals of the system simple, and hardwire the data that’s returned. For the purposes of the lab, what’s important is the API that’s exposed by the back end:
namespace BookService
{
     public class Book : IComparable<Book>
     {
          public String title;
          public String publisher;
          public String year;
          public bool inStock;
          public int numInStock;

          public Book(String title, String publisher, String year, bool inStock, int numInStock);
          public static Book[] getBooks();
          public static Book[] getBooks(String firstName, String lastName);
          public int CompareTo(Book other);
          public override string ToString();
     }

     public class Author : IComparable<Author>
     {
          public String firstName;
          public String lastName;

          public Author(String firstName, String lastName);
          public static Author[] getAuthors();
          public int CompareTo(Author other);
          public override string ToString();
          public override bool Equals(object obj);
          public override int GetHashCode();
     }
}
The Book and Author classes represent books and authors, respectively, and provide mechanisms to retrieve data about them from the system. (The API does not provide for updating the data, but that can be easily added.)
Using this API, we want to implement a web application that displays the list of authors whose books are in the system. When the user clicks on an author, the application displays the list of books by that author that are in the inventory system, along with information on the books.
To create the .NET side, build a DLL project with the Author and Book classes, and place the DLL in a folder along with the JNBridgePro components JNBDotNetSide.exe, JNBDotNetSide.exe.config, JNBShare.dll, jnbauth_x86.dll, and jnbauth_x64.dll. If you know that the .NET side will always run with a certain bitness (that is, as a 32-bit or 64-bit process), you only need to use the appropriate jnbauth dll, but it never hurts to include both, and to allow the system to choose the right one. Finally, edit JNBDotNetSide.exe.config to contain the following <jnbridge> section:
<jnbridge>
     <dotNetToJavaConfig scheme="jtcp" host="localhost" port="8085"/>
     <javaToDotNetConfig scheme="jtcp" port="8086"/>
     <assemblyList>
          <assembly file=".\BookService.dll"/>
     </assemblyList>
</jnbridge>
Note that we’ll be using TCP/binary communications in this example.
Building the Java Front-End Using Play
This lab is not a Play tutorial, so we will limit ourselves to explaining how to get the web application working, and why certain things were done the way they were. To learn more about Play, see the Getting Started example and other tutorials that are available.
Before implementing the front end, first download and install the latest version of the Play Framework. Next, open a command-line window. We’re going to use the Activator command-line interface to build and run the web application. First, navigate to where you want to place the project, and enter the command line:
> activator new books-demo play-java
This will create a new Java-based Play project and place it in a new books-demo folder. Navigate into the books-demo folder and start the activator:
> cd books-demo
> activator
At this point, edit your Java code. You can use your favorite IDE, or can simply edit the files in a text editor, since Play will automatically detect files that have changed and recompile them. To implement this project, you only need to edit three files.
First, create proxies for the .NET Author and Book classes, along with supporting classes, and put the proxy jar file into the Play project’s lib folder (create the folder if it’s not there), along with the JNBridgePro files jnbcore.jar, bcel-5.1-jnbridge.jar, and jnbcore_tcp.properties. Any files that are in that folder are automatically included in the web application’s class path.
Next, edit app\controllers\HomeController.java:
package controllers;

import play.mvc.*;
import views.html.*;
import com.jnbridge.jnbcore.*;
import BookService.*;
import java.util.*;

/**
* This controller contains an action to handle HTTP requests
* to the application's home page.
*/
public class HomeController extends Controller {

     public static boolean isConfigured = false;

     /**
     * An action that renders an HTML page with a welcome message.
     * The configuration in the routes file means that
     * this method will be called when the application receives a
     * GET request with a path of /.
     */
     public Result index() {
          if (!isConfigured)
          {
               DotNetSide.init(".\\lib\\jnbcore_tcp.properties");
               isConfigured = true;
          }

          List<Author> authors = Arrays.asList(Author.getAuthors());

          return ok(index.render(authors, null));
     }

     public Result index2(String lastName, String firstName) {
          if (!isConfigured)
          {
               DotNetSide.init(".\\jnbcore_tcp.properties");
               isConfigured = true;
          }

          List<Author> authors = Arrays.asList(Author.getAuthors());

          List<Book> books = Arrays.asList(Book.getBooks(firstName, lastName));

          return ok(index.render(authors, books));
     }
}
HomeController.java contains code to render the application’s home page. Since this application only has one page, that’s the only code we need to change. The file provides methods to control rendering the page initially (when there’s no additional data supplied), in which case the list of authors is displayed, and, subsequently, when an author has been selected and the author’s first and last names provided, in which case the list of books by that author is also displayed.
Note that HomeController.java also contains code to configure JNBridgePro by calling DotNetSide.init(). We need to make sure it’s called only once, and before any proxy call. We can do it as we’ve done here, by putting the configuration check and call at the beginning of every method, or we can put it in each controller class’s static initializer.
Next, we edit the file conf\routes:
 # Routes
 # This file defines all application routes (Higher priority routes first)
 # ~~~~
GET /index/:lastName/:firstName controllers.HomeController.index2(lastName: String, firstName: String)
# An example controller showing a sample home page
GET / controllers.HomeController.index
# An example controller showing how to use dependency injection
GET /count controllers.CountController.count
# An example controller showing how to write asynchronous code
GET /message controllers.AsyncController.message
# Map static resources from the /public folder to the /assets URL path
GET /assets/*file controllers.Assets.versioned(path="/public", file: Asset)
We only need to add a single line towards the top, specifying the call in HomeController that’s called when the home page is rendered and an author’s name is supplied, as happens when an author’s name is selected.
Finally, we format the home page itself, by editing the file app\views\index.scala.html:
@*
* This template takes a single argument, a String containing a
* message to display.
*@
@(authors: List[BookService.Author], books: List[BookService.Book])

@*
* Call the `main` template with two arguments. The first
* argument is a `String` with the title of the page, the second
* argument is an `Html` object containing the body of the page.
*@
@main("Books Demo") {

<h1>Book Catalog</h1>
<h2>Authors</h2>
<ul>
@for(author <- authors) {
<li><a href="/index/@author.Get_lastName()/@author.Get_firstName()">@(author.Get_lastName() + ", " + author.Get_firstName())</a></li>
}
</ul>

@if(books == null || books.isEmpty()) {
} else {
<h2>Books</h2>

<style>
th, td {
     padding: 15px;
}
</style>

<table>
<tr>
<th>Title</th>
<th>Publisher</th>
<th>Publication Year</th>
<th>In Stock?</th>
<th>Number in Stock</th>
</tr>
@for(book <- books) {
<tr>
<td>@book.Get_title()</td>
<td>@book.Get_publisher()</td>
<td>@book.Get_year()</td>
<td>@book.Get_inStock()</td>
<td>@book.Get_numInStock()</td>
</tr>
}
</table>

}
}
Note that this is a mix of HTML and Play tags written in Java (or, actually, Scala, but it’s close enough to Java that you should have no trouble understanding it or writing your own). The page template receives a list of authors and a list of books (which may be null) to display. The authors are first displayed as a bulleted list, and then the list of books, if it is not null, is displayed as a table. Each element of the author list is a clickable link, whose URL is the same home page, except this time the URL contains the selected author’s name. Recall that we added an entry to the routes table to indicate what happens when the URL of the home page contains an author’s first and last name (it calls HomeController.index2() with the names), and we altered HomeController.java to include the index2() method (it looks up the list of the author’s books and passes that list back to the page to be rendered).
Running the Application
That’s all we need to do. To build and run the application, go back to the command line window, where Activator is still running, and enter:
> run
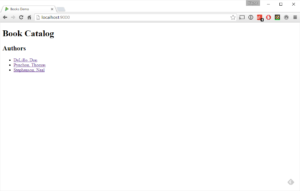
At this point, the server will be running, and listening on port 9000. Open that page in the browser, and you’ll see the initial home page:
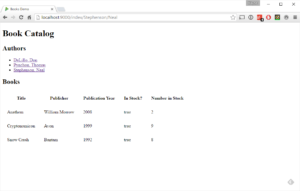
Click on any author’s name and a list of book inventory will be displayed:
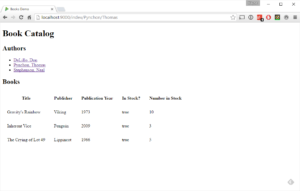
Clicking on a different author’s name will bring up that author’s inventory:
That’s really all there is to it. When you’re done, you can exit the Play server by entering Ctrl-D in the command line, and exit Activator by entering Ctrl-D again.
The source code for this lab can be downloaded here.
While we used Java in this Play Framework example, we could just as easily have used Scala, since it’s JVM-based, and Play supports it. (In fact, Play is written in Scala.) Also, while we chose Play for this lab, we could have chosen any other Java- or JVM-based web framework, including Grails, GWT, or JSF. In any of these cases, the use of JNBridgePro would have been just as straightforward. In any of those cases, it makes it easy to pick up the new framework and do the minimum to get a working website: the back end heavy lifting is done with familiar and existing code and developer fatigue is avoided!
Are you using or planning to use JNBridgePro to integrate .NET with Play or any other Java web framework? If so, let us know.


