
Accessing Java Messaging Service (JMS) from .NET
Updated December 2, 2015 for intervening technical changes.
Update October 2007: While you can still implement .NET/JMS integrations using the procedure described below, we now offer a packaged JMS adapter for .NET, so you don’t need to go to the trouble!
Numerous customers are using JNBridgePro to access JMS servers from .NET clients, and I get frequent requests from prospective customers asking how it’s done. So here’s an example of how to create a simple JMS sender and receiver in .NET. This isn’t a tutorial on JMS; you can find good tutorials on Oracle’s Java site.
We’ve prepared this example using OpenJMS, a free open-source JMS server that can be downloaded from http://openjms.sourceforge.net/. (We’re using version 0.7.6.1, but there are later releases; the principles will be the same.) It can be adapted for any other JMS server, although the details may vary from server to server.
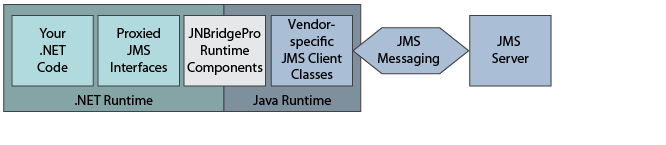
In this example, we’ve chosen an architecture that divides the JMS client into two parts: a .NET front end, and a thin Java back end. The .NET part can implement a GUI or offer a .NET-based API to other components, and the Java back end performs the actual communication with the JMS server using RMI or some other native Java protocol. The bridging between the .NET and Java portions of the client is done with JNBridgePro, using the shared-memory communications mechanism.
This architecture has a number of advantages. Most importantly, you don’t have to deploy anything to the server. Also, if your JMS server has clustering, load-balancing, or high-availability capabilities, and the JMS client classes in the client’s Java back end know how to use that clustering, your .NET JMS clients can now use this capability. The disadvantage of this architecture, of course, is that you need a JVM as well as a .NET CLR on each of your client machines. In a future blog post, we’ll discuss the tradeoffs between architectures that deploy the Java side to the server and those that deploy the Java side to the client.
So the architecture of this example looks like this:
The first thing we’ll do is generate the proxies. Note that we’re generating proxies for classes in javax.jms.* and javax.naming.*, so we’ll need a JNBridgePro installation with a developer license, or an eval copy. Add the files jms-1.0.2a.jar and jndi-1.2.1.jar (both in the lib folder) to the proxy generator’s classpath: we’re going to be using proxies of the JMS interfaces and JNDI contexts; if you only generate proxies for standard API classes like these, the proxy assembly that you generate will work even if you later change your JMS server to another vendor’s. After adding these files to the classpath, load all the classes in jms-1.0.2a.jar, plus javax.naming.InitialContext, and generate proxies for all these classes, plus all supporting classes. This is important, since it ensures that all methods in the various proxies will be generated.
Now, create your JMS sender and receiver projects. We’re going to do this in C#, creating console applications, but you can use any .NET language and make the clients as elaborate as you like.
In each of the projects, make sure to reference the proxy DLL you just created, plus jnbshare.dll and jnbsharedmem.dll. In your JMS sender project, add the following code:
using System;
using System.Collections.Generic;
using System.Text;
using javax.jms;
using javax.naming;

namespace JMS_sender
{
   class Program
   {
      static void Main(string[] args)
      {
         Console.WriteLine("JMS sender");

         // set up
         java.util.Hashtable properties = new java.util.Hashtable();
         properties.put((java.lang.JavaString) ContextConstants.INITIAL_CONTEXT_FACTORY, (java.lang.JavaString) "org.exolab.jms.jndi.InitialContextFactory");
         properties.put((java.lang.JavaString)
         ContextConstants.PROVIDER_URL, (java.lang.JavaString)"rmi://localhost:1099/");
         Context context = new InitialContext(properties);

         // get the queue connection factory
         QueueConnectionFactory factory = (QueueConnectionFactory) context.lookup("JmsQueueConnectionFactory");

         // get the queue connection
         QueueConnection connection = factory.createQueueConnection();
         connection.start();

         QueueSession session = connection.createQueueSession(false, SessionConstants.AUTO_ACKNOWLEDGE);

         javax.jms.Queue senderQueue = (javax.jms.Queue)context.lookup("queue1");

         QueueSender sender = session.createSender(senderQueue);

         Console.Write("Enter message (empty line followed by CR will exit): ");
         string input = Console.ReadLine();
         while (input != string.Empty)
         {
            // process the line
            TextMessage message = session.createTextMessage(input);
            sender.send(message);

            // get another one
            Console.Write("Enter message (empty line followed by CR will exit): ");
            input = Console.ReadLine();
         }

         // shut down the connection
         sender.close();
         session.close();
         connection.stop();
         connection.close();
      }
   }
}
If you know JMS, the above will look very familiar. If you don’t, you’ll either need to check out a JMS tutorial, or take my word for it. 🙂 There are a couple of things you should note here. The initial context factory value is hardwired to the one used by OpenJMS; if you use a different JMS server, this value will be different. The provider URL assumes use of the RMI protocol, that the JMS server is on the same machine as the client, and that the OpenJMS default port is being used. On your setup, any or all of these could be different. We also assume use of a particular queue connection factory and a particular queue name; these work with OpenJMS by default, but with other servers you may need to change these values or actually configure values on the server.
Create the receiver similarly, as follows. Note that the same issues as described above with the sender code also apply to the receiver.
using System;
using System.Collections.Generic;
using System.Text;
using javax.jms;
using javax.naming;

namespace JMS_receiver
{
   class Program
   {
      static void Main(string[] args)
      {
         Console.WriteLine("JMS receiver");

         // set up
         java.util.Hashtable properties = new java.util.Hashtable();
         properties.put((java.lang.JavaString) ContextConstants.INITIAL_CONTEXT_FACTORY, (java.lang.JavaString) "org.exolab.jms.jndi.InitialContextFactory");
         properties.put((java.lang.JavaString) ContextConstants.PROVIDER_URL, (java.lang.JavaString)"rmi://localhost:1099/");
         Context context = new InitialContext(properties);

         // get the queue connection factory
         QueueConnectionFactory factory = (QueueConnectionFactory) context.lookup("JmsQueueConnectionFactory");

         // get the queue connection
         QueueConnection connection = factory.createQueueConnection();
         connection.start();

         QueueSession session = connection.createQueueSession(false, SessionConstants.AUTO_ACKNOWLEDGE);

         javax.jms.Queue receiverQueue = (javax.jms.Queue)context.lookup("queue1");
         QueueReceiver receiver = session.createReceiver(receiverQueue);

         // register the message listener
         TextListener messageListener = new TextListener();
         receiver.setMessageListener(messageListener);

         Console.WriteLine("Enter empty line followed by CR to exit:");
         Console.ReadLine();

         // shut down the connection
         receiver.close();
         session.close();
         connection.stop();
         connection.close();
      }
   }
}
We’re going to use asynchronous message passing, so we’re going to need to create a callback to handle the incoming messages. Note above where we create a new TextListener object (which implements the MessageListener interface) and register it with the QueueReceiver object. You need to add the definition of TextListener, given below:
using System;
using System.Collections.Generic;
using System.Text;
using com.jnbridge.jnbcore;
using javax.jms;

namespace JMS_receiver
{
   // record messages as they're received
   [Callback("javax.jms.MessageListener")]
   public class TextListener : MessageListener
   {
      public TextListener()
      {
      }

      public void onMessage(Message message)
      {
         TextMessage msg = null;

         try
         {
            if (message is TextMessage)
            {
               msg = (TextMessage)message;
               Console.WriteLine("Message: " + msg.getText());
            }
            else
            {
               Console.WriteLine("Message of wrong type: " + message.GetType().FullName);
            }
         }
         catch (JMSException e)
         {
            Console.WriteLine("JMSException in onMessage(): " + e.toString());
         }
         catch (java.lang.Throwable t)
         {
            Console.WriteLine("Exception in onMessage(): " + t.getMessage());
         }
      }
   }
}
Note the [Callback] attribute. TextListener is a .NET object that’s being passed to the Java side, so it needs to be set up as a callback.
Finally, we need to configure the sender and receiver. In each project, add an application configuration file, and put the following into it:
<?xml version="1.0" encoding="utf-8" ?>
<configuration>
   <configSections>
      <sectionGroup name="jnbridge">
         <section name="dotNetToJavaConfig"
            type="System.Configuration.SingleTagSectionHandler, System, Version=4.0.0.0, Culture=neutral, PublicKeyToken=b77a5c561934e089"/>
         <section name="javaToDotNetConfig"
            type="System.Configuration.SingleTagSectionHandler, System, Version=4.0.0.0, Culture=neutral, PublicKeyToken=b77a5c561934e089"/>
         <section name="tcpNoDelay"
            type="System.Configuration.SingleTagSectionHandler, System, Version=4.0.0.0, Culture=neutral, PublicKeyToken=b77a5c561934e089"/>
         <section name="javaSideDeclarations"
            type="System.Configuration.NameValueSectionHandler, System, Version=4.0.0.0, Culture=neutral, PublicKeyToken=b77a5c561934e089"/>
      </sectionGroup>
   </configSections>
   <jnbridge>
      <dotNetToJavaConfig scheme="sharedmem"
         jvm32="C:\Program Files (x86)\Java\jre8\bin\client\jvm.dll"
         jvm64="C:\Program Files\Java\jre8\bin\server\jvm.dll"
         jnbcore="C:\Program Files (x86)\JNBridge\JNBridgePro v7.3\jnbcore\jnbcore.jar"
         bcel="C:Program Files (x86)\JNBridge\JNBridgePro v7.3\jnbcore\bcel-5.1-jnbridge.jar"
         classpath="C:\Data\openjms-0.7.6.1\lib\jndi-1.2.1.jar;C:\Data\openjms-0.7.6.1\lib\jms-1.0.2a.jar;C:\Data\openjms-0.7.6.1\lib\openjms-client-0.7.6.1.jar"/>
   </jnbridge>
</configuration>
You’ll need to make sure that the jvm32, jvm64, jnbcore, bcel, and classpath paths are correct for your machine. If you’re using a different JMS server, you’ll have a different set of jar files that will need to go into your classpath.
That’s it; you’re done. Build the sender and receiver projects.
Next, start up OpenJMS. There’s a startup.bat file in the bin folder that you can launch. Once it’s started, launch the JMS sender and receiver. If you’ve configured everything properly, no exceptions will be thrown. Now, if you type a message into the sender’s console window, the receiver’s TextListener callback will fire, and the message will be displayed in the receiver’s console window.
That’s all there is to it. JMS can be much more powerful than this; you can pass objects instead of just strings, you can communicate synchronously or asynchrously, and you can subscribe to topics, among other features. All of this can be accessed from .NET in the same way that we’ve done it in our simple example.
If you made it this far, what did you think? Was this post too long? Too complicated? Too boring? Let me know.